How each person at your agency uses FOIAdesk to log, route, review, release, and defend public-records requests — one section per role, start to finish.
Version 1.0 (draft)Updated 2026-07-01Demo tenant Town of Maplebrook
This guide walks through the product by role. Find your job title in the contents, and you have everything you do, in the order you do it — with the screens you will actually see.
New here? Start with How FOIAdesk works for a two-minute mental model, then read the section for your role. If you are the first person setting your agency up, read Getting started and Your first sign-in & setup first — together they take an empty workspace to ready for real requests in about an hour.
Every screenshot in this guide is the live product, using the Town of Maplebrook demo agency. Your data, departments, and branding will differ, but the screens are the same.
Throughout, a request's statutory deadline is shown as a three-state traffic light — ● On track, ◐ Due soon, ◉ Overdue — never colour alone. That clock is the thing FOIAdesk keeps in front of you, so this guide keeps it in front of you too.
◆ Everyone
How FOIAdesk works
A two-minute mental model before you jump to your role — the request lifecycle, the deadline clock, and where to get help.
A public-records request travels the same path at every agency. FOIAdesk is built around that path: each role owns one stretch of it, and the statutory deadline clock runs underneath the whole way.
The FOIL request lifecycle. The deadline clock starts at intake and never stops until the request closes.
The deadline clock is the hero
Every open request and appeal carries a live countdown to its statutory deadline, shown as a three-state traffic light — never colour alone, always colour + glyph + words:
● On track — comfortably inside the window.
◐ Due soon — act on these next.
◉ Overdue — act on these first.
The clock counts business days for you, applies your state's holiday calendar, and rolls deadlines forward across weekends and closures. You never count days by hand.
i
Acknowledge before you route. New York requires the agency to acknowledge a request (with an approximate response date) before work is dispatched. FOIAdesk enforces this: a request can't be sent to departments until it's been acknowledged. The legal deadline keeps running either way.
Every screen has a Help / quick guide button in the top bar. It opens a short, role-aware panel — the tips that matter for the page you're on. Dismiss it any time; reopen it whenever you need it.
The in-app Help / quick guide panel adapts to your role and the screen you're on.◇ New agencies
Getting started
How an agency comes onto FOIAdesk, what to have ready before day one, and how to try it first with no commitment.
FOIAdesk is set up for you — you do not create your own account from a sign-up page. An agency comes on board through a short conversation, and then your workspace is provisioned and your first administrator is invited by email. This page covers how that happens and what to gather so your first hour is spent setting up, not hunting for information.
Try it first — the live demo
Before anything else, you can take FOIAdesk for a test drive. The Town of Maplebrook demo tenant is open to anyone at foiadesk.com/demo — no account, no card. Sign in as any role (administrator, records officer, department responder, reviewer, appeals officer, or auditor) with the shared demo logins and explore the live app on sample data that resets every day. It is the fastest way to see how your own agency would work before you commit.
How your agency comes on board
There is no public self-service sign-up. Instead:
Talk to us. Tell us about your agency through the contact form on the marketing site or by emailing the sales address listed there. We will help you pick the right plan.
Your workspace is provisioned. We create your private agency workspace (your "tenant"), pin it to the correct statute rules for your state, and set how your files are stored.
Your first administrator is invited. The first administrator you name receives an email with a temporary password. Signing in for the first time is covered on the next page, Your first sign-in & setup.
i
Your workspace is yours alone. Every record carries your agency's identity, and no other agency can ever see into it. This separation is built into the product's foundations, not a setting you have to switch on.
Choosing a plan
Plans are tiered to the size and shape of an agency. The tier you are on decides what is available — these are structural, not just price differences:
Town — a single user, no departments. Built for the smallest offices, where one person handles records.
City — multiple users, departments, and routing between them.
Municipality — everything in City, sized for higher volume, with volume-banded pricing.
Going up a tier unlocks structure (a Town has no departments to route to, by design); it never blocks statutory work. Add-ons — extra file storage, AI assist, and review search — sit on top of any tier and are covered on the Tenant administrator page.
What to have ready before day one
Your first administrator will move much faster with these in hand. None of it has to be perfect — you can refine everything later — but having it ready turns setup into a smooth hour:
Have ready
Why it helps
Your departments
Requests route to departments; each one becomes a branch. (Town plans skip this.)
Staff names, emails, and roles
You invite each person and give them a role — intake, responder, reviewer, appeals officer, auditor.
A rough records inventory
Noting what each department keeps makes routing accurate and lets the portal tell requesters up front what you don't hold.
Your fee schedule
Your copying and labour fees, so the system can quote and track them.
Your holidays and closures
The deadline clock honours your calendar when it counts business days.
Your logo and accent colour
Your branding goes on letters, the public portal, and the emails requesters receive.
A decision on where files live
Short custody (auto-delete after closing), paid retention, or your own storage bucket.
✓
You do not need everything before you start. The guided Setup checklist walks you through each of these in order on your first sign-in, and it saves your progress — so you can gather a missing piece and come back without losing your place.
◈ New agencies
Your first sign-in & setup
Accepting your invite, setting up your sign-in security, and the guided checklist that gets your agency ready to take real requests in about an hour.
Your workspace is ready and your first administrator has an invitation in their inbox. This page is the first hour: getting signed in safely, then walking the guided Setup checklist that turns an empty workspace into one ready for real requests.
Accept your invitation
Open the invitation email and follow its link to the FOIAdesk app. Sign in with the email address you were invited under and the temporary password in the email.
Set your own password. You'll be asked to replace the temporary one straight away. Choose a strong password only you know.
Set up sign-in security. FOIAdesk protects accounts with a second factor. Follow the prompts to enrol your authenticator — this is what keeps your agency's records office secure even if a password is ever guessed.
i
Each person you later invite goes through this same first sign-in — they get their own invitation, set their own password, and enrol their own device security. You never see or set anyone else's password.
Where you land
You arrive on Today, your agency desk. It is quiet on day one — no requests yet — but it is where the open work, the deadline clock states, and your departments' workload will appear once you are live. From the left navigation you can reach Admin, where setup lives, any time.
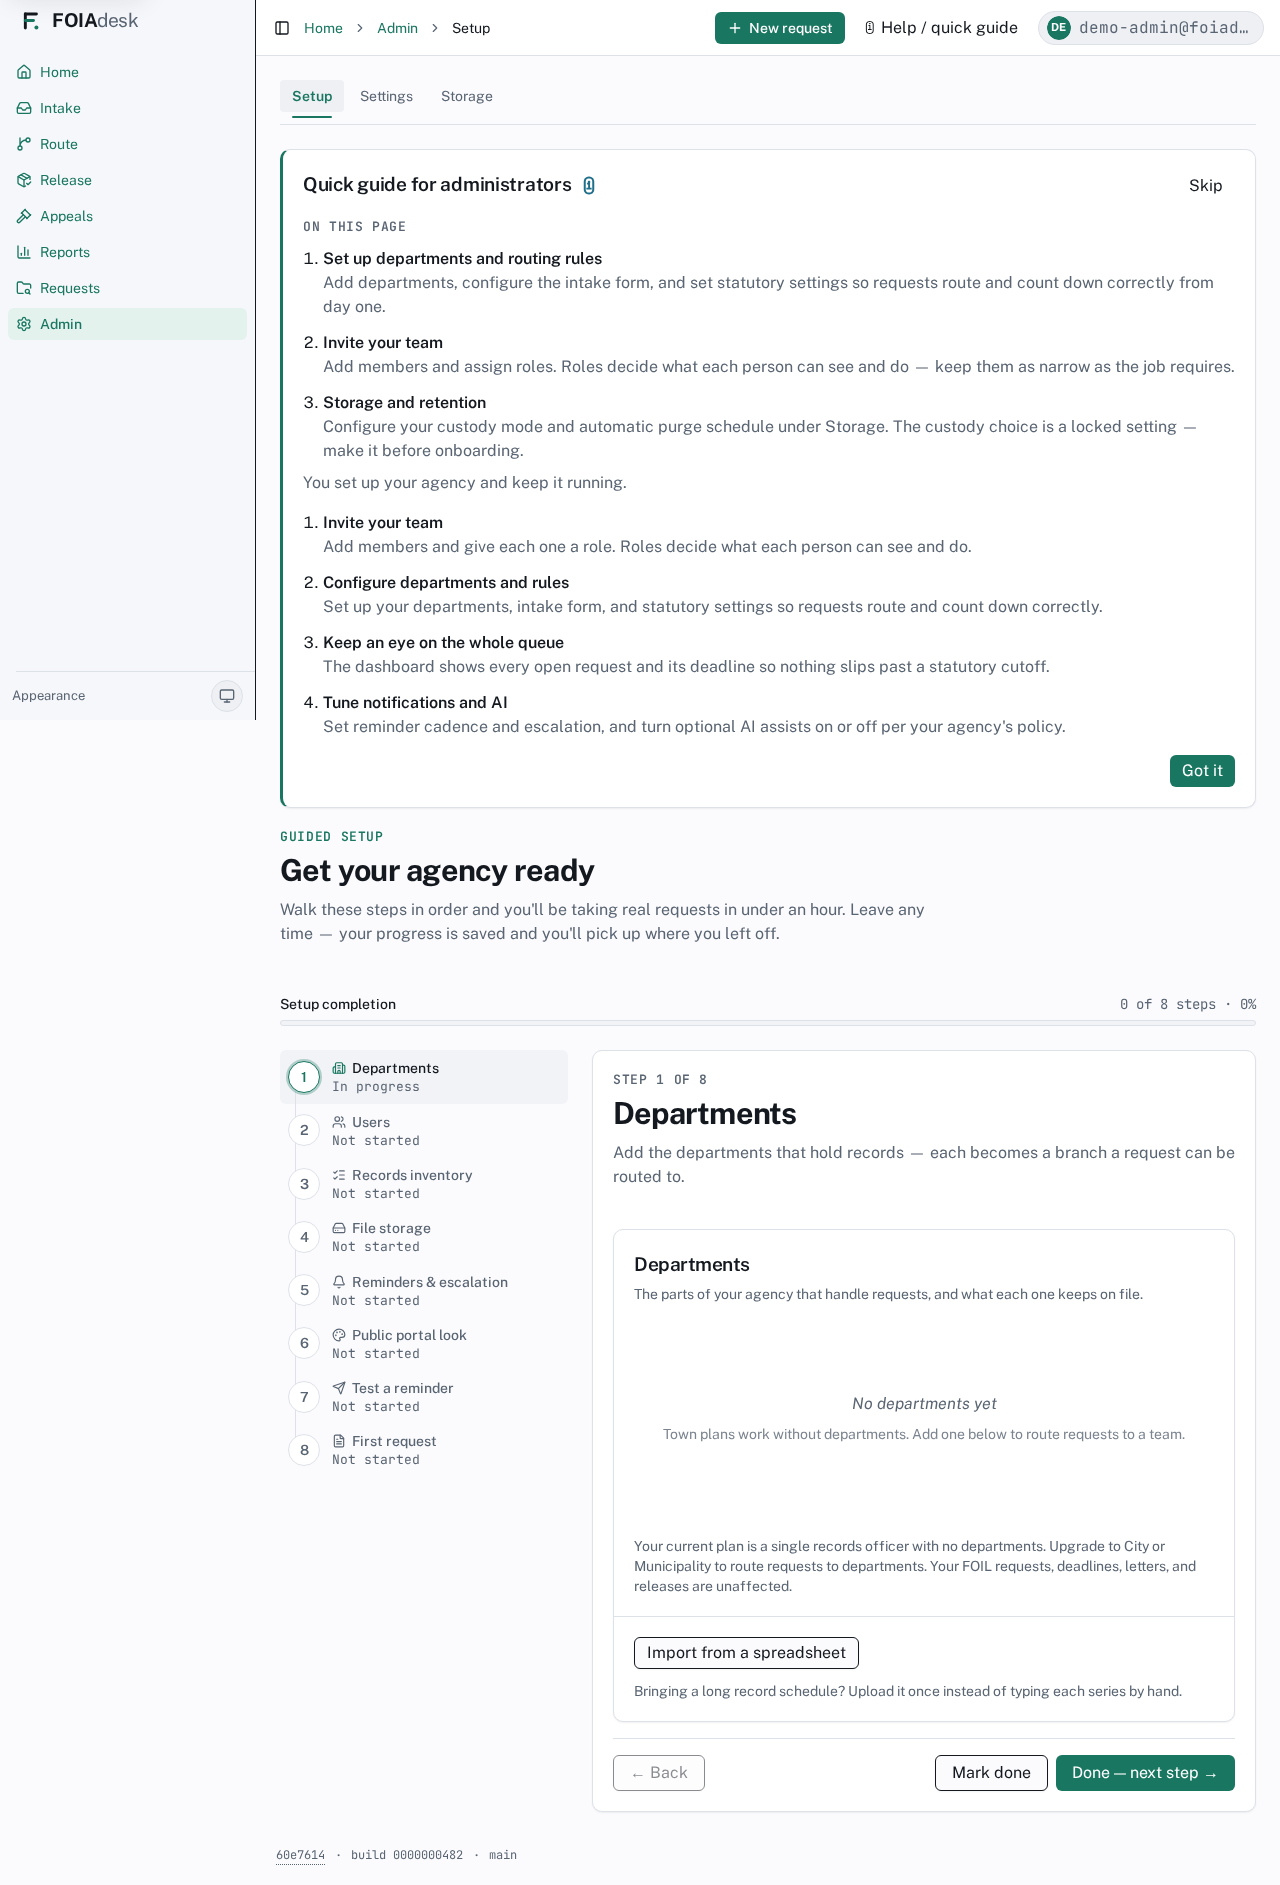
The guided Setup checklist
The fastest way to get ready is the guided Setup checklist (under Admin → Setup). It walks the essential steps in order, shows how close you are to launch, and saves as you go — leave any time and you resume where you left off. Most agencies are taking real requests in under an hour.
The guided Setup checklist walks a new agency through every essential step in order, saving progress so you can stop and resume.
The steps, in order:
Departments — add the departments that hold records; each becomes a branch a request can be routed to. (Town plans, with a single user and no departments, skip this.)
Users — invite the people who will work requests and give each one a role.
Records inventory — for each department, note the records it keeps, so routing is accurate and the portal can tell requesters what you don't hold.
File storage — choose where uploaded files live: short custody (auto-delete after closing), paid retention, or your own storage bucket.
Reminders & escalation — set how far ahead deadline reminders go out and who is escalated to when a deadline is missed. (Both ship with a sensible default — this step is to review them.)
Public portal look — brand the public request portal with your agency name, colours, and rights statement so it looks like yours.
Test a reminder — send yourself a real deadline reminder through the live email path, and confirm it lands in your inbox and not in spam.
First request — log one request end to end. It is the single fastest way to see the whole flow before go-live.
✓
Each step opens the real screen you would use later, not a throwaway copy — so the departments, users, and settings you enter here are exactly what runs your agency from day one. When a step looks complete, FOIAdesk nudges you, but you always confirm it yourself.
Getting help as you go
Every screen has a Help / quick guide button in the top bar. It opens a short panel with the tips that matter for the page you are on, adapted to your role. Dismiss it whenever you like and reopen it the moment you need it — you are never far from guidance.
The in-app Help / quick guide panel adapts to your role and the screen you're on.
Where to go next
Once setup is done, head to the page for your role to go deeper — most new agencies start with the Tenant administrator page (the rest of agency setup, billing, and the statute rules) and the Records access officer & intake page (logging, acknowledging, and routing the requests that come in).
⚙ Tenant administrator
Tenant administrator
You set up your agency and keep it running — departments, people, policy, billing, and the statute rules that drive every deadline.
The administrator workspace is Admin in the left navigation. It has three areas across the top — Setup, Settings, and Storage — and a sidebar of sections: Settings, Users & roles, Departments, Devices, Billing, Integrations, Coverage, Turnover, Exports & log, and Law updates. Everything is self-service, so staff changes never turn into support tickets.
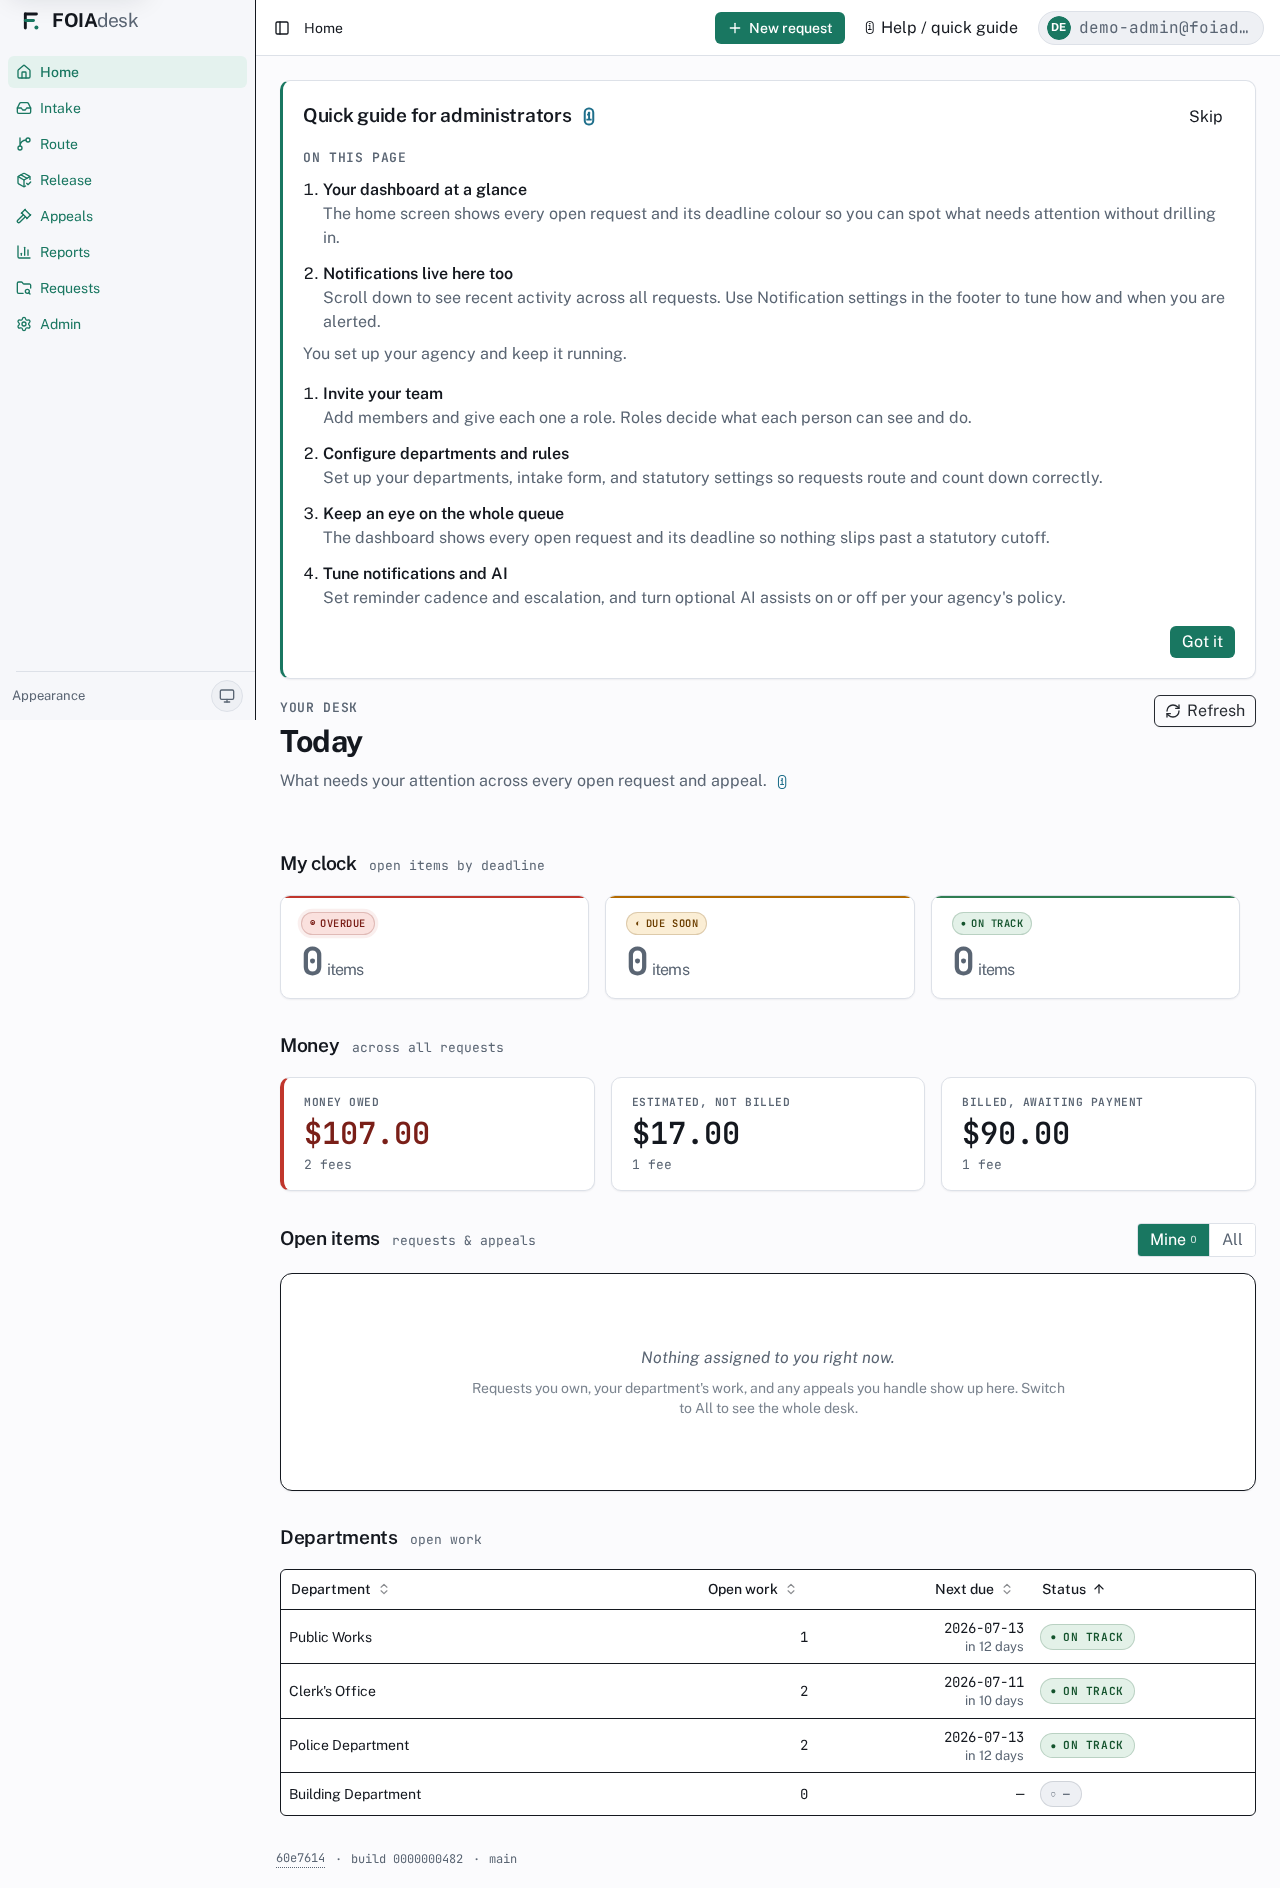
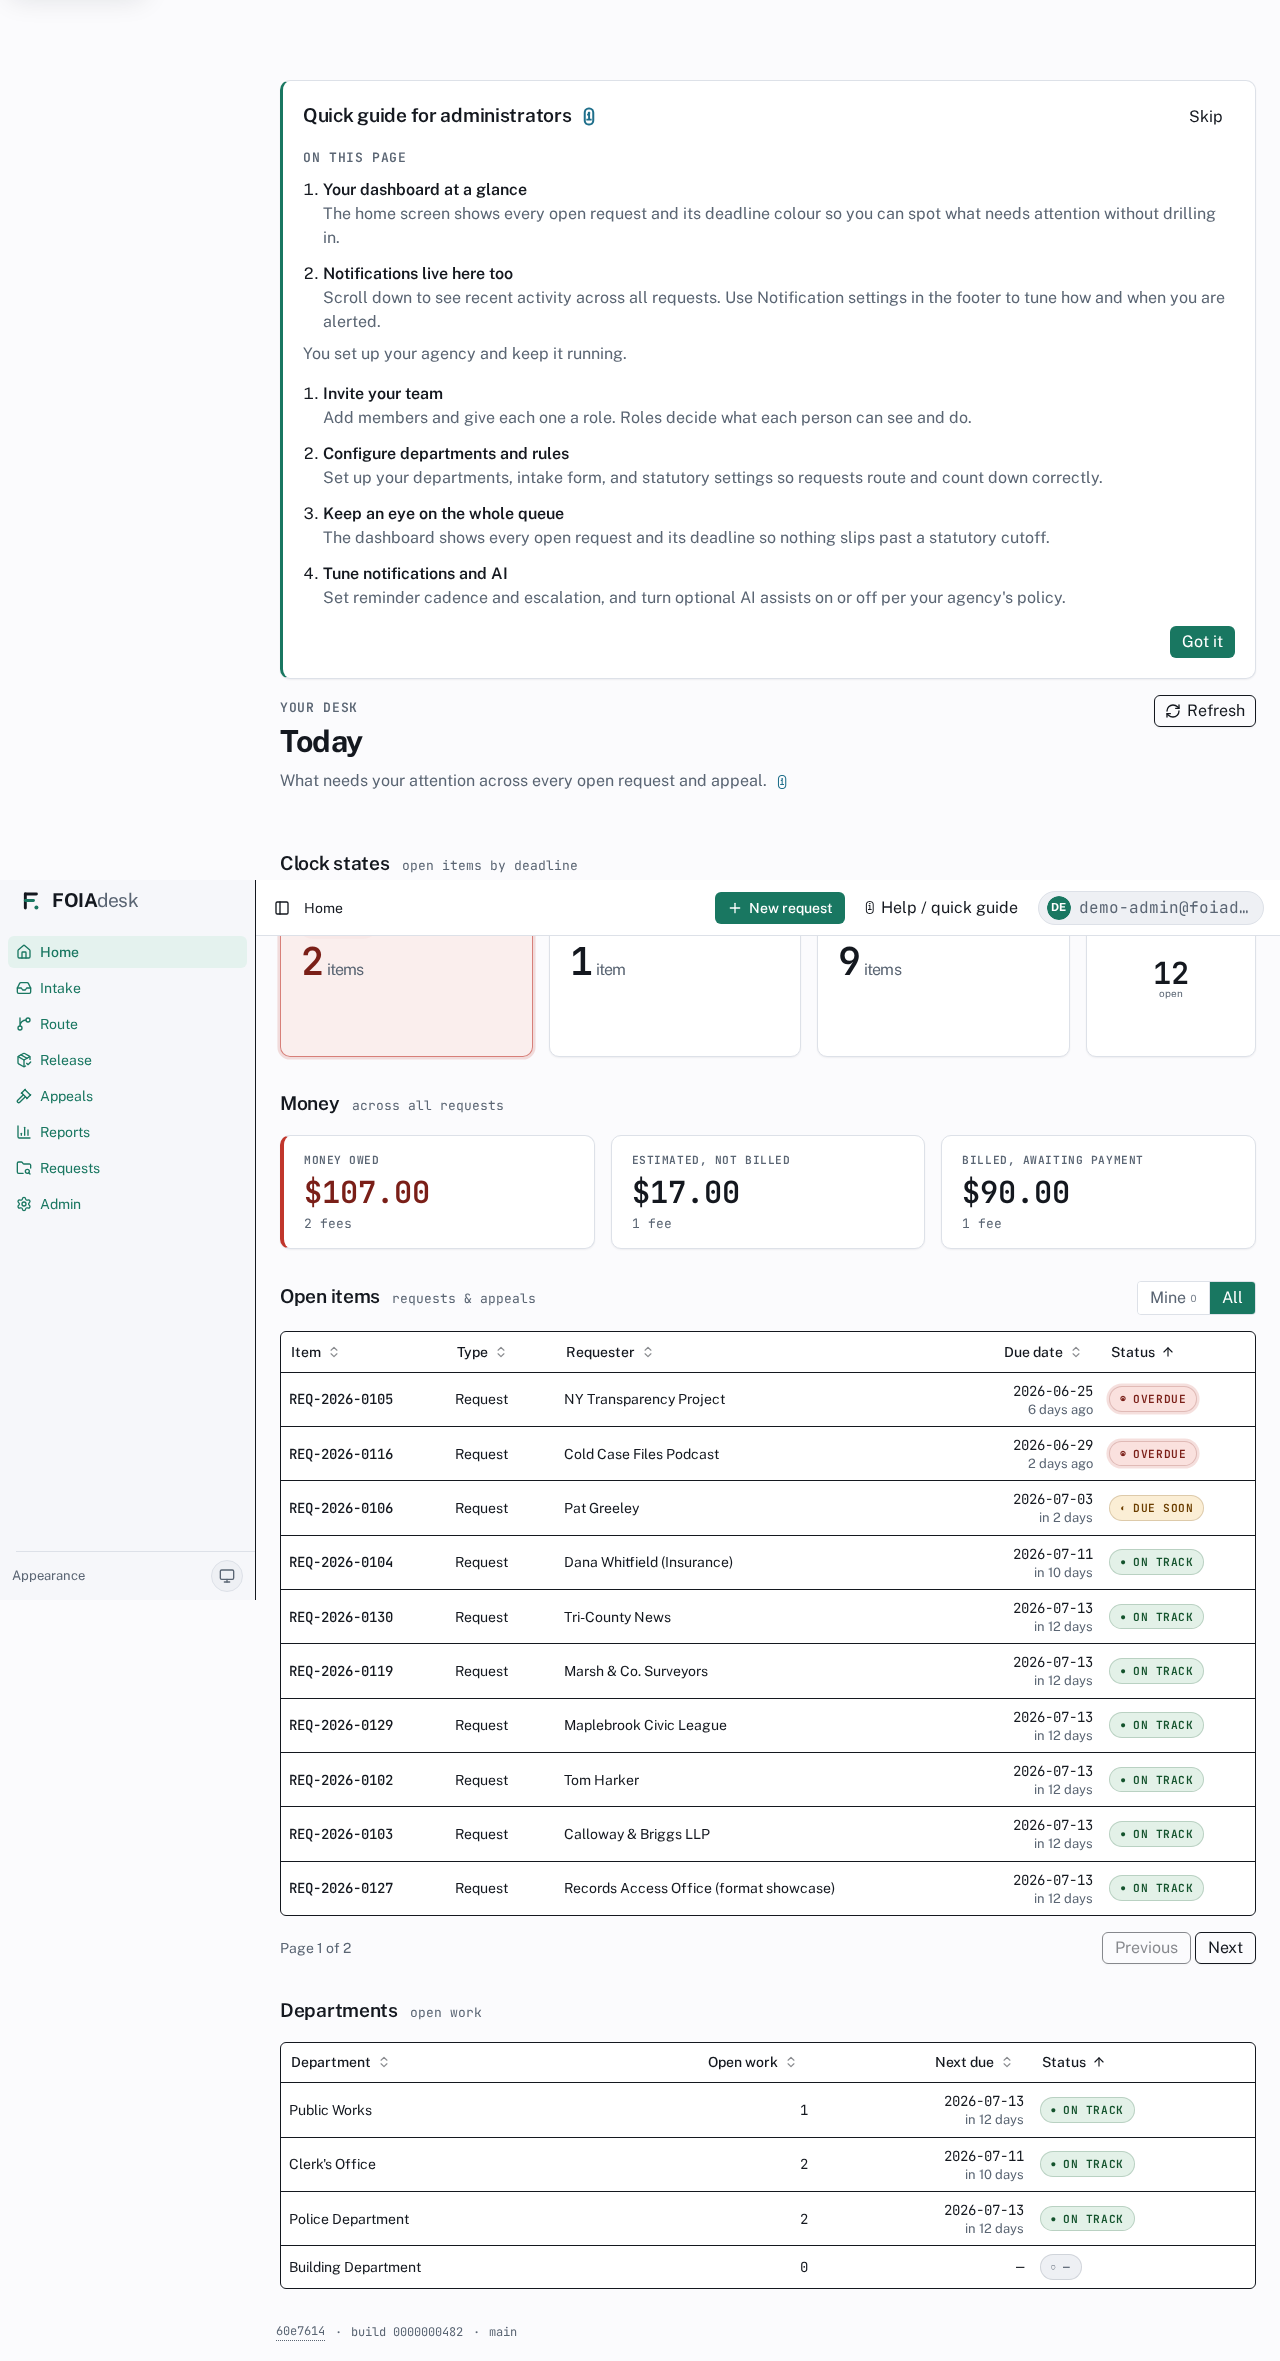
Your dashboard
You land on Today — the whole-agency desk. The clock-state band shows how many open items are overdue, due soon, and on track; the Open items table lists every request and appeal; the Departments table shows each department's open workload.
The administrator dashboard: clock-state summary, open items across the agency, and per-department workload.
✓
Switch Open items from Mine to All to see the whole agency. As an administrator you usually own no requests yourself, so All is your working view.
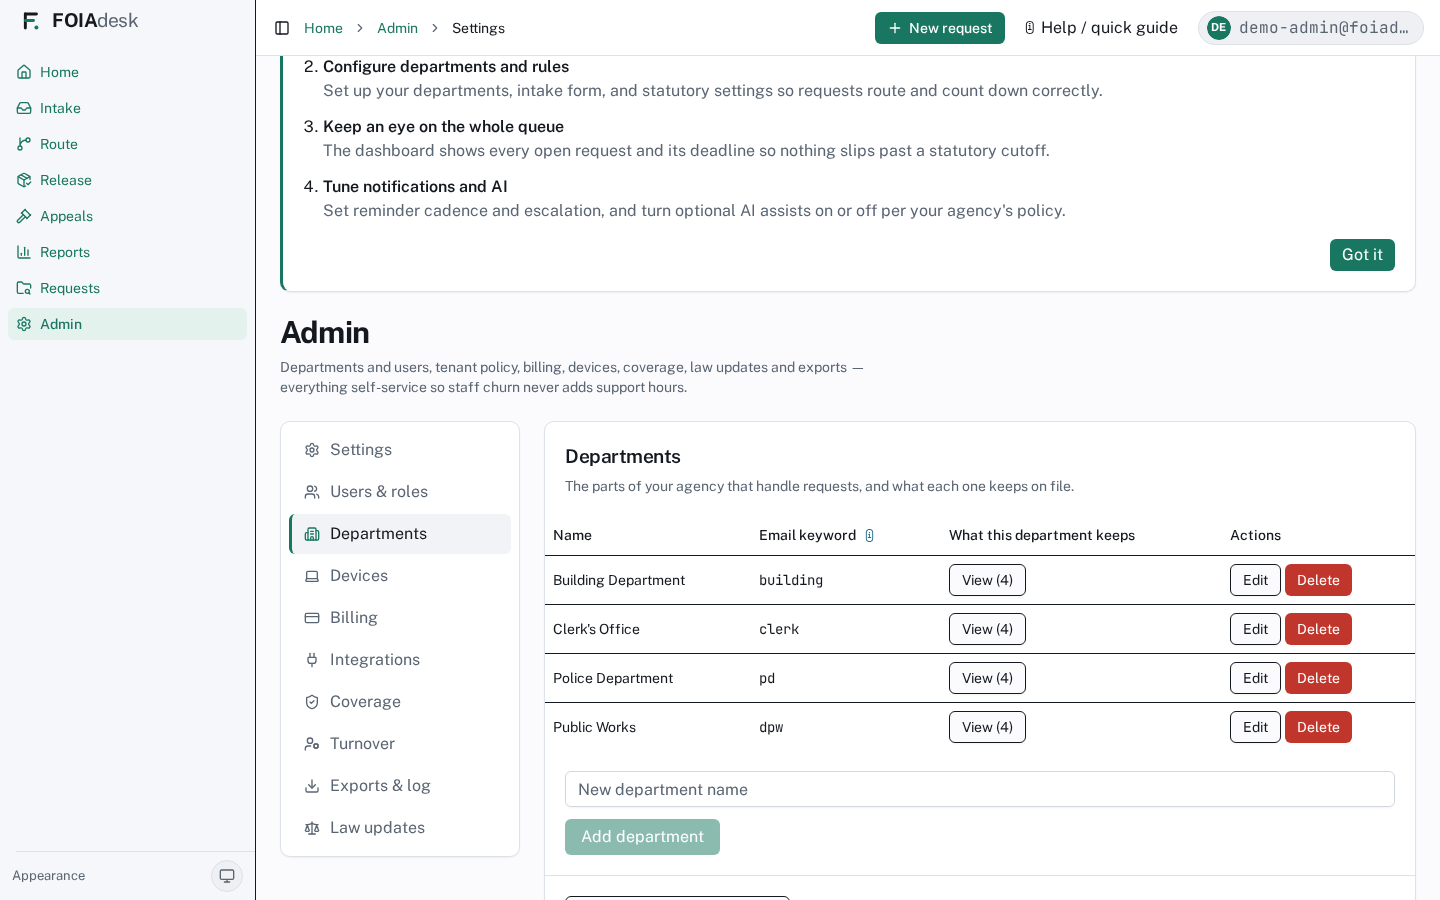
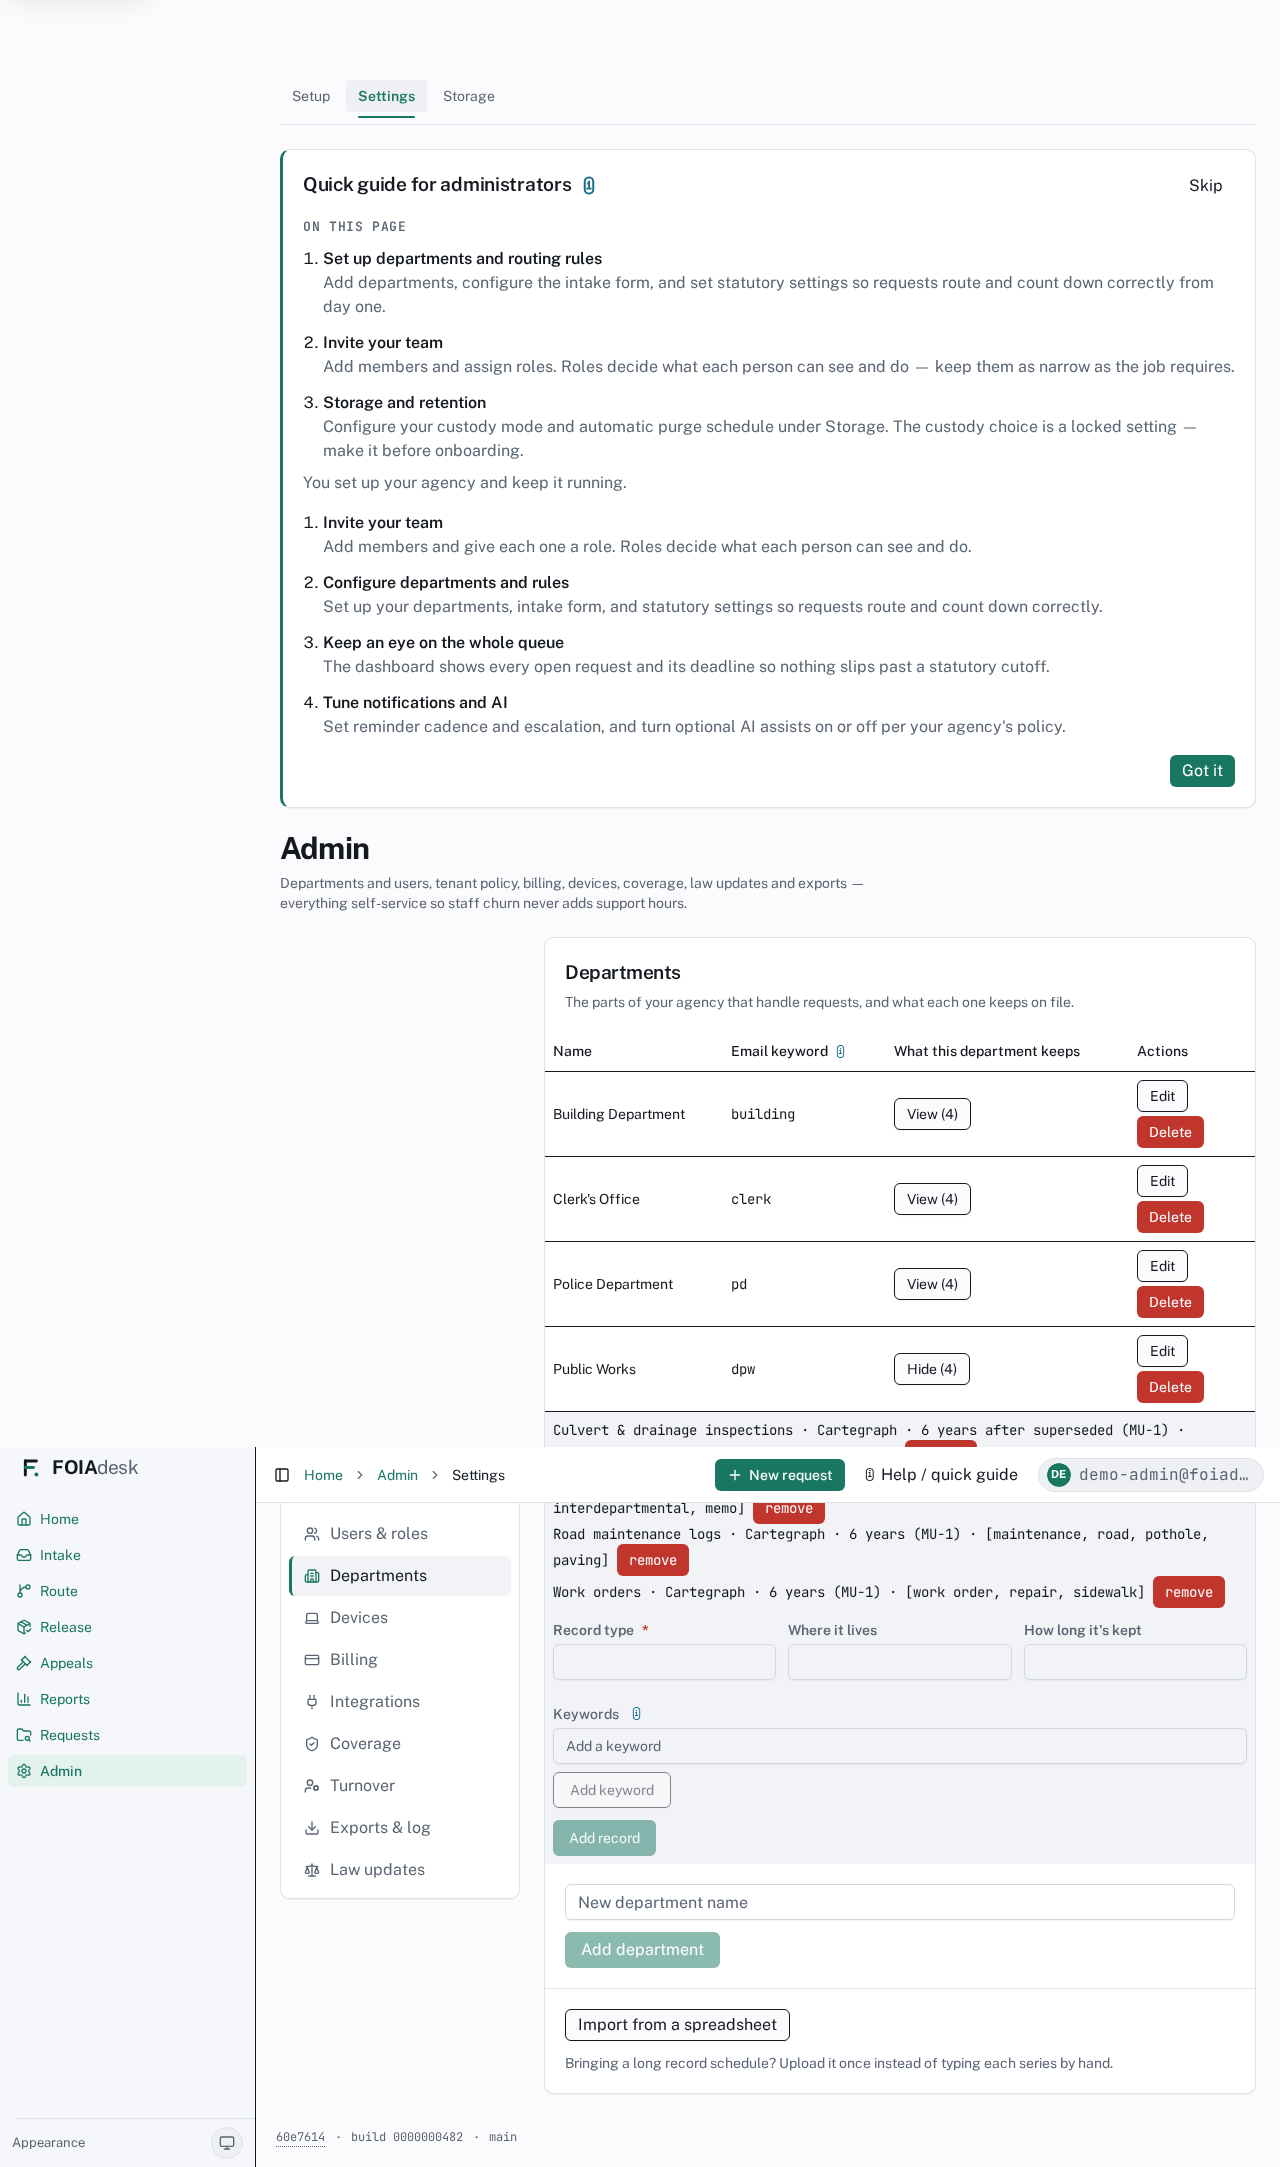
Step 1 — Departments
Set up the departments that hold records. Requests route to these, and each department's responders work only their own branch.
Departments: the branches requests route to.
To add one, type a name in New department name and click Add. Each department can also carry an intake email keyword — when a request email mentions that keyword, FOIAdesk can suggest that department as the destination — and an optional intake email address.
i
Town plans have no departments. On a Town plan you are a single records officer with no branches to route to, so this step is skipped and the screen simply says so. Moving up to City unlocks departments and routing between them.
Your records inventory
Under each department you list the records it keeps — its record series. A well-kept inventory does two jobs: it makes routing accurate (intake knows who holds what), and it lets the public portal tell a requester up front when your agency does not hold a record, before they even file.
For each record series you record:
Record type (required) — for example "Culvert maintenance logs" or "Council meeting minutes".
Where it lives — the system or filing cabinet that holds it.
How long it's kept — its retention period.
Keywords — words a requester might use, which help match a request to the right department. Add several by typing each and clicking Add keyword.
A department's records inventory: each record series with its type, where it lives, how long it's kept, and matching keywords.
✓
Bulk import for a long schedule. If you have a full retention schedule in a spreadsheet, don't hand-key it. Click Import from a spreadsheet on the Departments screen, upload a CSV or Excel file, map its columns to Department / Record type / Where it lives / How long it's kept / Keywords, review the preview (each row is validated and the totals reconcile), then create every series in one pass. Rows that name a department you haven't added yet are flagged, never silently dropped.
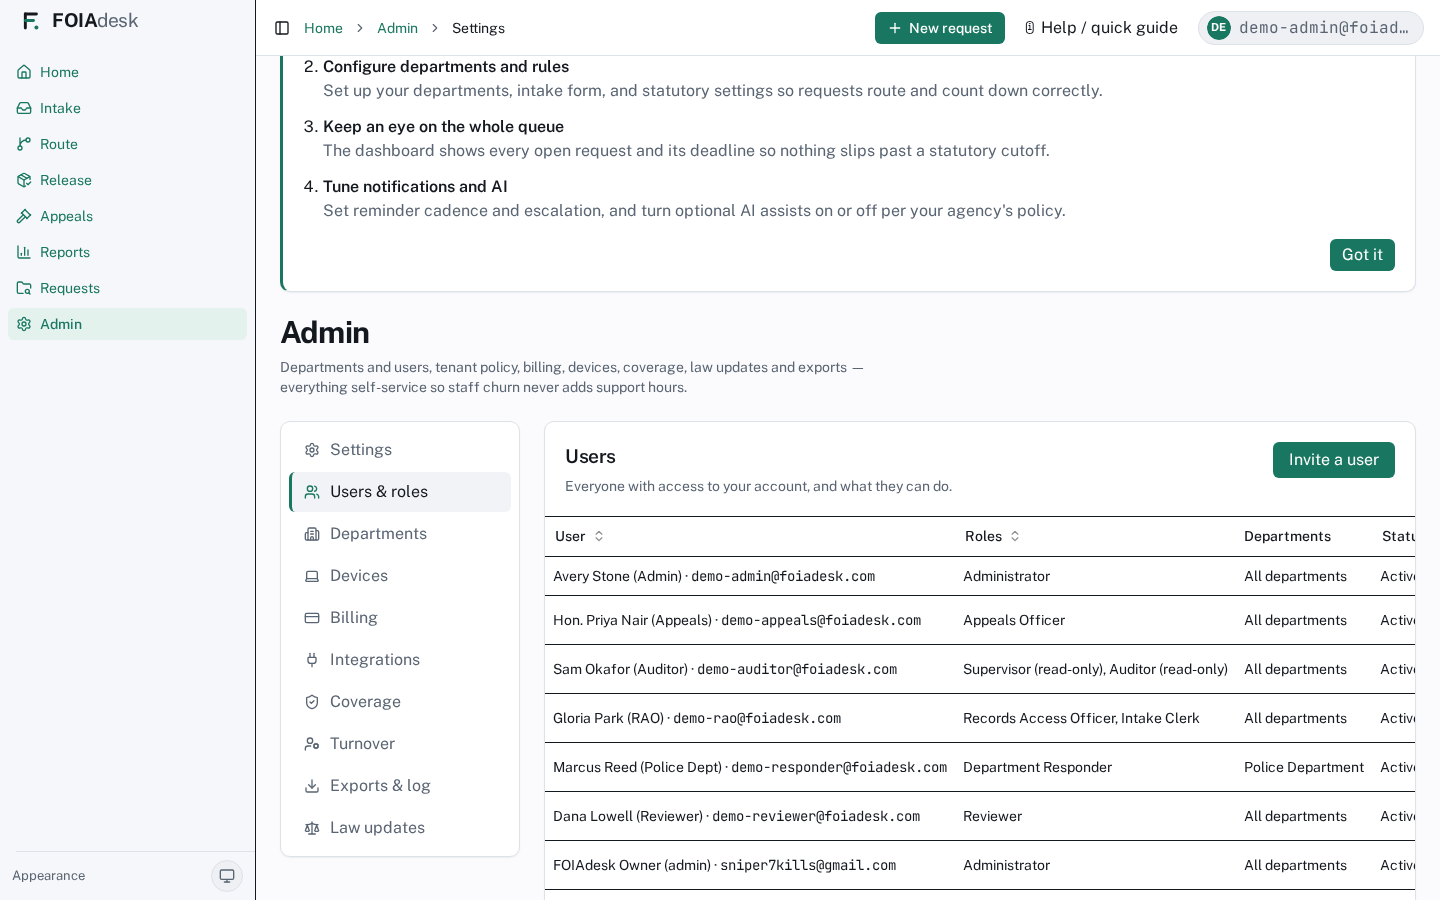
Step 2 — Invite your team and assign roles
Under Users & roles, invite each person and give them one or more roles. Roles decide exactly what each person can see and do — keep them as narrow as the job requires.
Users & roles: everyone with access and what they can do. Roles shown include Administrator, Records Access Officer, Department Responder, Reviewer, Appeals Officer, and Supervisor / Auditor (read-only).
Click Invite a user and enter their email.
Assign their role(s) and, for responders, the department(s) they cover.
They receive an invitation and set their own password and device security.
i
Deactivating someone removes their access within about an hour. Their row stays for the record — people are never erased from the history.
i
Pending approvals. If you've turned on Microsoft 365 sign-in with automatic sign-up (see Integrations), a new person signing in from a verified domain lands in a Pending approvals queue at the top of this screen instead of getting in straight away. You choose the roles (and departments) to grant, then Approve & grant access — or Deny. Nobody gains access until you say so.
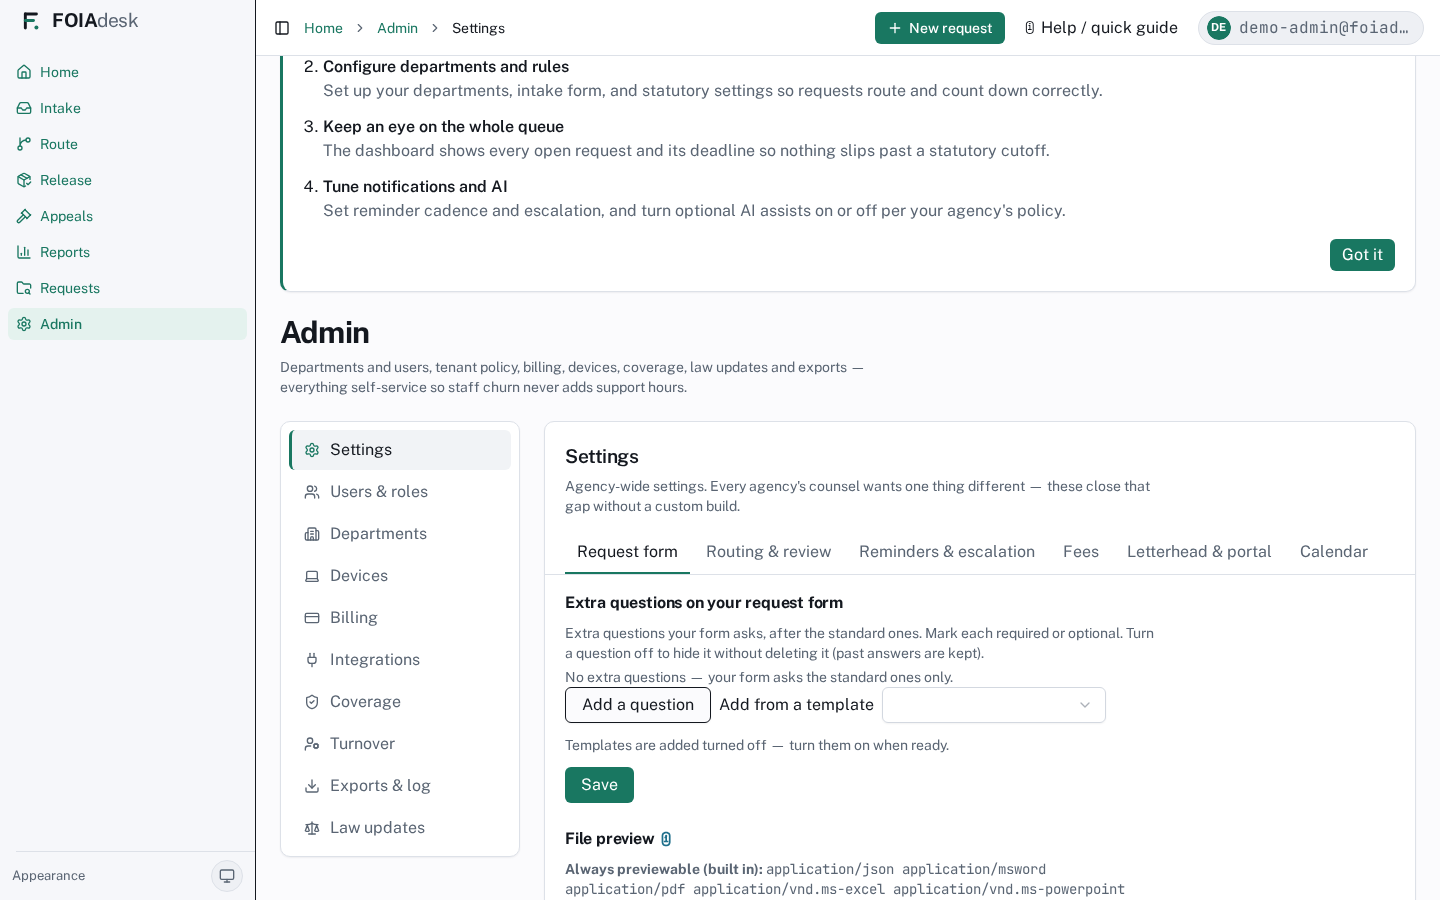
Step 3 — Agency settings
Settings is where each agency's counsel tunes the product without a custom build. The tabs:
Request form — extra questions on your intake and public-portal form, plus which file types preview in-app.
Routing & review — defaults for how requests move and who reviews.
Reminders & escalation — when the system nudges, and who it escalates to.
Fees — your copying/labour fee schedule.
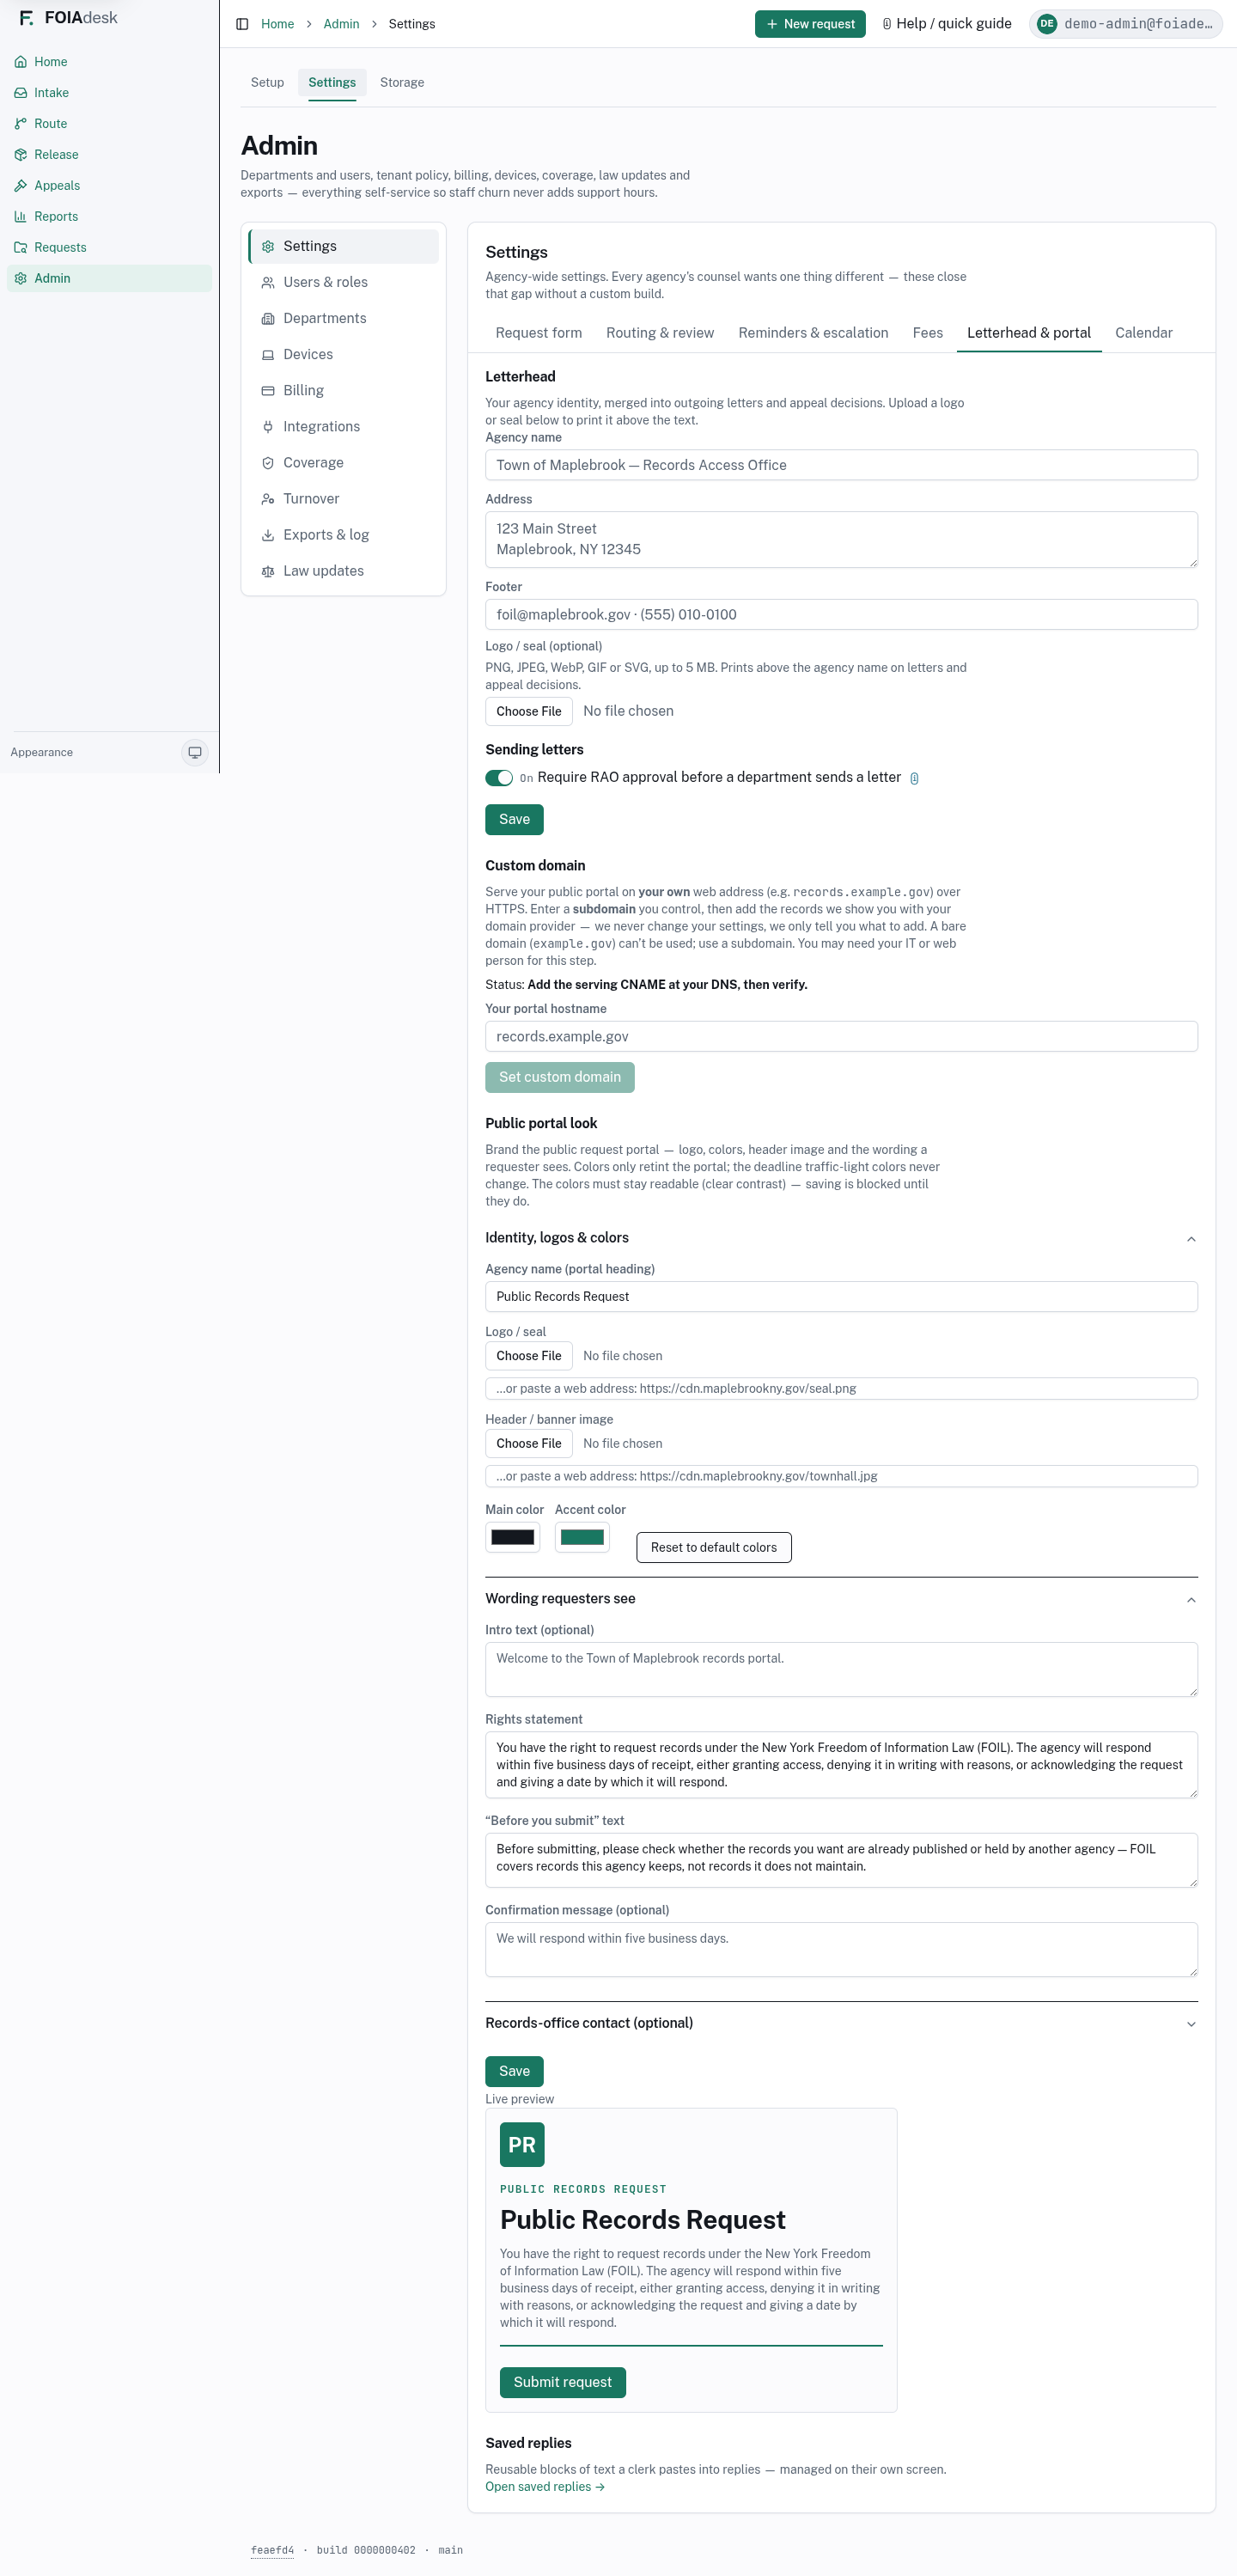
Letterhead & portal — your branding on letters and the public portal. The same branding (your agency name, logo, and accent colour) also styles the emails your requesters receive — acknowledgements, status updates, release notifications, and portal links. If you have not set any branding, those emails fall back to a clean, neutral FOIAdesk style. (Platform emails to your staff — daily digests, billing — keep the FOIAdesk identity.)
Calendar — your holidays and closures, which the deadline clock honours.
Agency settings — request form, routing, reminders, fees, letterhead, and calendar, all self-service.
Your own web address (custom domain)
By default your public records portal is served on a FOIAdesk address. If you would rather your requesters reach it at your own web address — for example records.yourtown.gov — you can point that address at us and we issue the HTTPS certificate automatically. No certificate handling on your side.
How it works, from Settings → Letterhead & portal → Custom domain:
Enter a subdomain you control (a bare domain like yourtown.gov cannot be used — use a subdomain such as records.yourtown.gov). We show you a CNAME record to add.
Add that record with your domain provider, then click Verify. We never change your DNS — we only tell you exactly what to add. (You may need your IT or web person for this step.)
If a certificate-validation record is required, we show it next — add it the same way. Once it validates, the certificate is issued and renews automatically.
When the status reads Live, your portal serves on your address over HTTPS.
The status on this screen always mirrors what the system has actually confirmed — it can never claim "Live" before the certificate is really issued. Your FOIAdesk operator can also see each agency's custom-domain status (awaiting CNAME, issuing certificate, live, or failed) from the operator console. (The same custom-domain panel also appears under Admin → Integrations → Your own web address & sending domain, alongside the email submission address and your own-storage setup — the steps your IT person handles sit together there.)
Letterhead & portal: your branding, a live portal preview, and the Custom domain panel where you point your own web address at FOIAdesk and read back its real status.
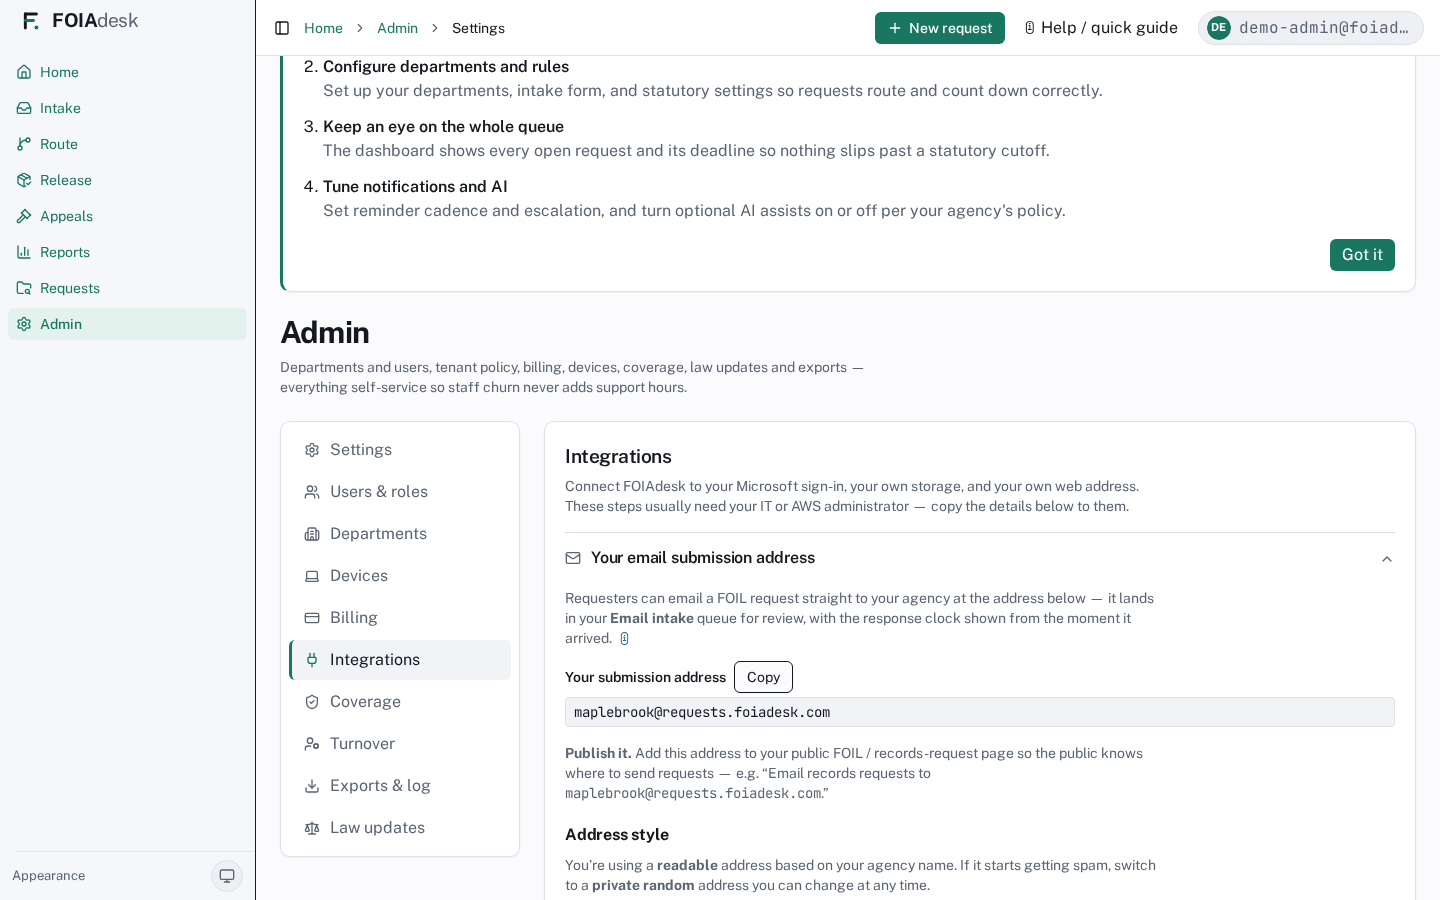
Your email submission address
Requesters can email a FOIL request straight to your agency. Every agency has its own submission address — find it under Admin → Integrations → Your email submission address. Mail sent there is received securely and lands in the Email queue tab of Intake for review, with the response clock shown from the moment it arrived. Nothing is filed as a request automatically; your records officer promotes a queued email when ready.
Integrations → Your email submission address: your agency's …@requests.foiadesk.com address with a Copy button, the readable-vs-private-random choice, and the button to rotate to a private random address.
Find and publish it. The address is shown at the top of the panel with a Copy button. Add it to your public FOIL / records-request page so the public knows where to send requests — for example, "Email records requests to yourtown@requests.foiadesk.com."
Two address styles:
Readable (default) — based on your agency name, e.g. yourtown@requests.foiadesk.com. Memorable and easy to publish.
Private random — an unguessable address like a7f3k9q2zxcv@requests.foiadesk.com. Use this if you would rather not advertise a guessable address.
Rotate it to stop spam. If your address starts getting spam or is abused, switch to (or regenerate) a private random address. The moment you do, the old address stops working — anyone using it, including spammers, no longer reaches your inbox — and a new one takes its place. Each change is confirmed first and recorded in your audit log. Remember to re-publish the new address on your FOIL page. You can switch back to the readable address at any time.
Microsoft 365 sign-in (single sign-on)
If your agency uses Microsoft 365, your staff can sign in to FOIAdesk with the same account they already use — no separate password to remember. Set it up under Admin → Integrations → Microsoft 365 / Entra sign-in. It is optional; email-and-password sign-in works without it.
The panel walks your IT person through it and shows a live status (Not set up → Waiting to test → Connected):
Enter your Directory (tenant) ID, Application (client) ID, and the email domains your agency uses.
Save, then click Test connection. The status only flips to Connected once a real sign-in succeeds — it can never claim to be working before it is.
Optionally map your Microsoft groups to FOIAdesk roles, so a person's role follows their group membership. Mapping only ever grants roles; it never removes one.
You can also verify a domain for automatic sign-up: add the domain, publish the DNS record we show you, click Verify, and new sign-ins from that domain land in your Pending approvals queue (below) rather than getting in automatically.
i
FOIAdesk never asks for your Microsoft client secret in this screen. Connection is proven by a successful test sign-in, not by handing over a secret.
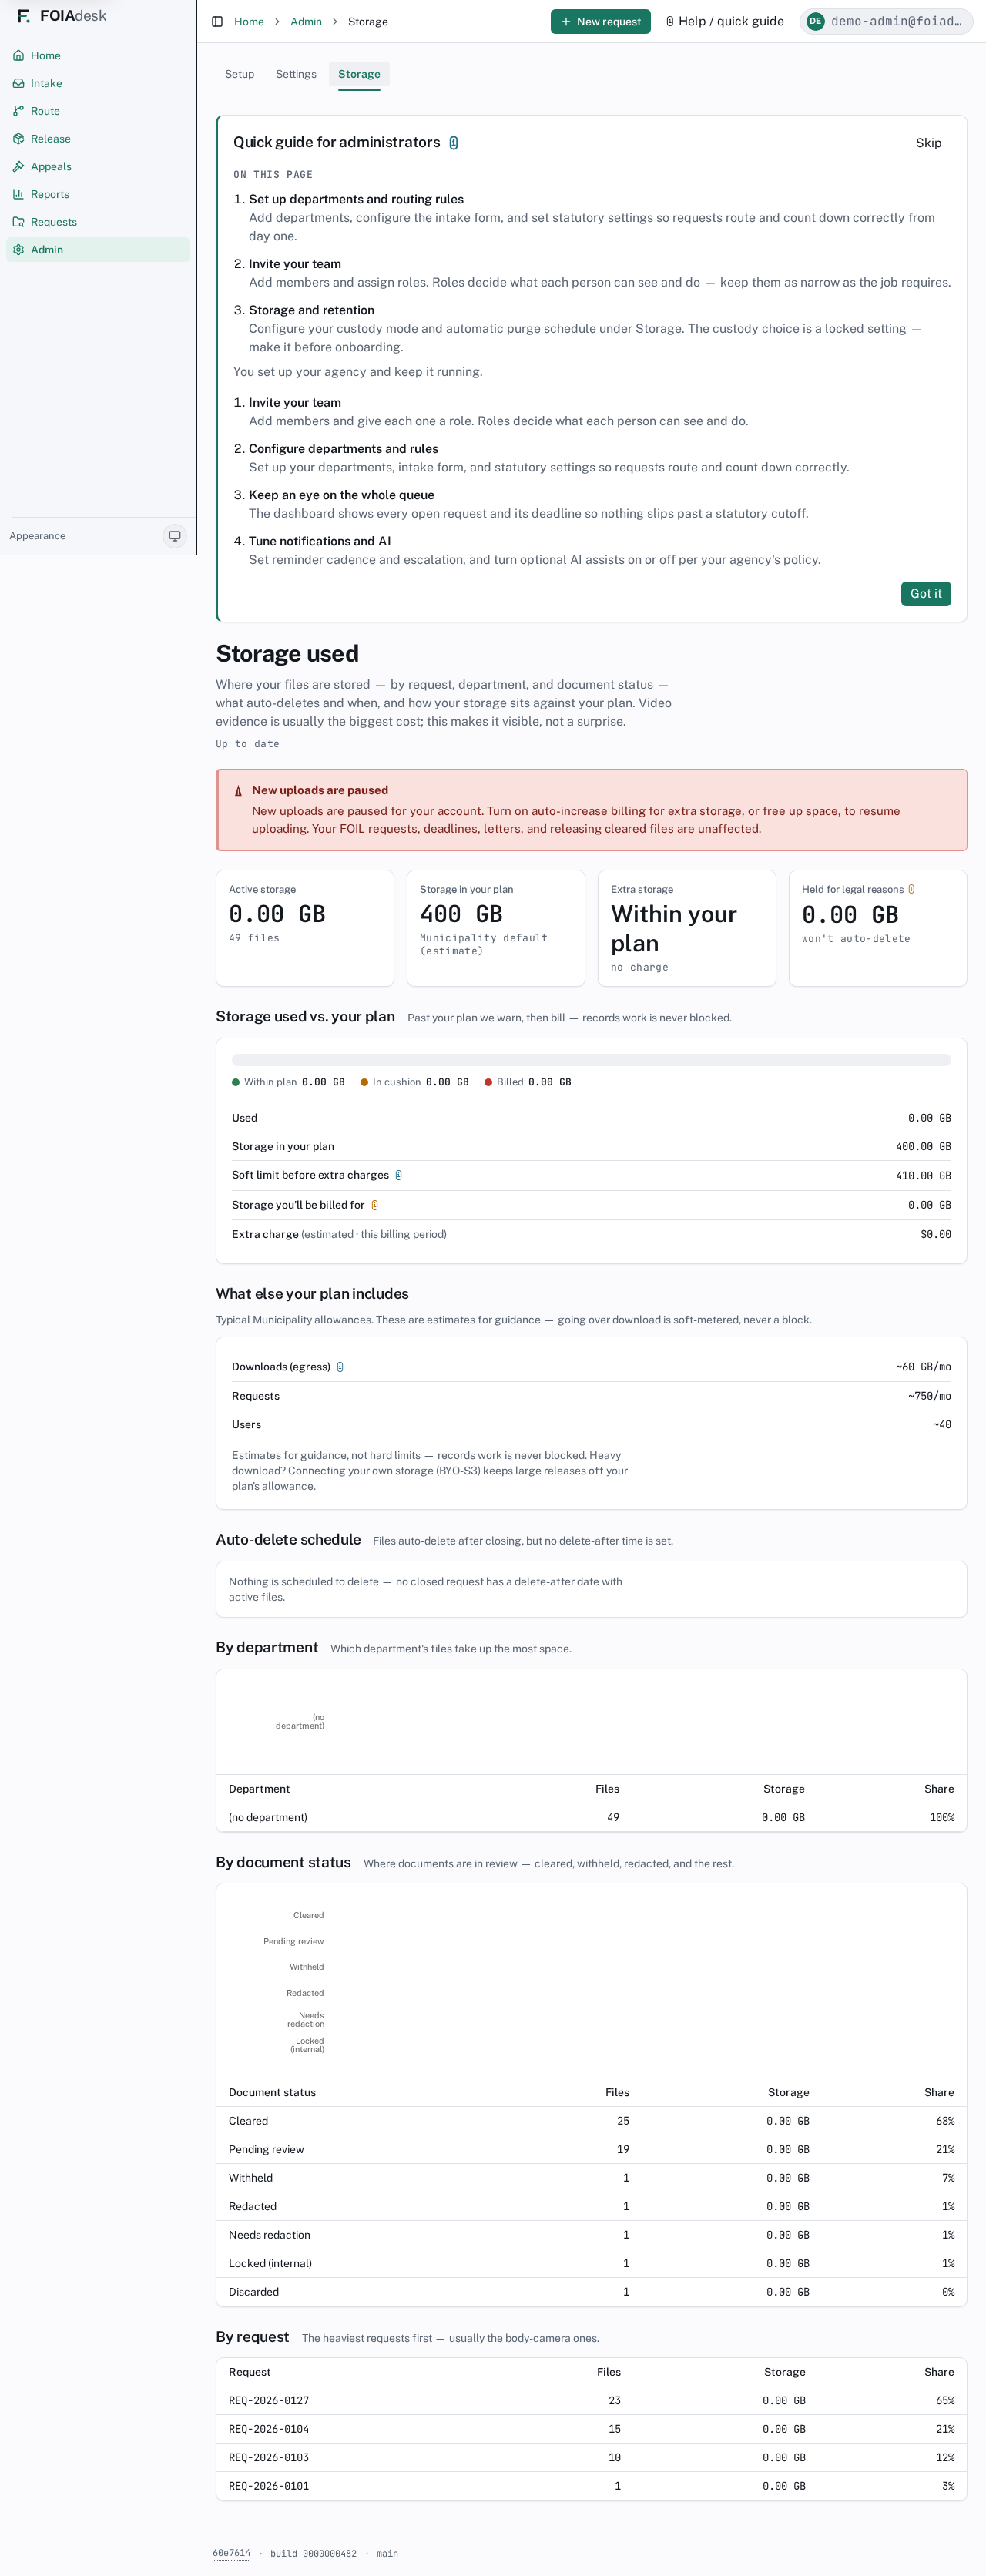
Step 4 — Storage & custody
You control two things separately: how files are kept (your custody mode and purge timing) and how much you are storing (a live usage view).
Choose your custody mode
Set this under Settings → Routing & review → Where files are stored. Pick how files are kept and, for auto-delete, how long after a request closes (30, 60, or 90 days):
Auto-delete after closing (default) — files are removed a set time after a request closes.
Keep long-term (paid) — files are kept long term.
Your own storage — your files live in your own cloud storage account; FOIAdesk holds only pointers and audit, never the bytes. (You connect the bucket under Integrations → Your own storage.)
Dedicated bucket (isolated) — a single-tenant storage bucket we provision for you inside our environment, so your files are physically separated from every other agency without you running your own cloud account. This is an isolation tier your FOIAdesk operator turns on and provisions for you; once it is active, all of your file uploads, in-app views, and release downloads use that dedicated bucket automatically, and the same release gate and purge rules still apply.
See what you are storing
The Storage tab is your usage view — total storage used against your plan, broken down by department, document status, and request, with a banner if new uploads are paused because you are over your plan. Going over never blocks records work; it prompts you to add a storage block or switch to your own bucket (see Billing, below).
The Storage tab: storage used against your plan, broken down by department, document status, and request.
Guided setup
The Setup tab walks a new agency through the above in order, so nothing essential is missed on day one.
The guided Setup checklist for a new agency.
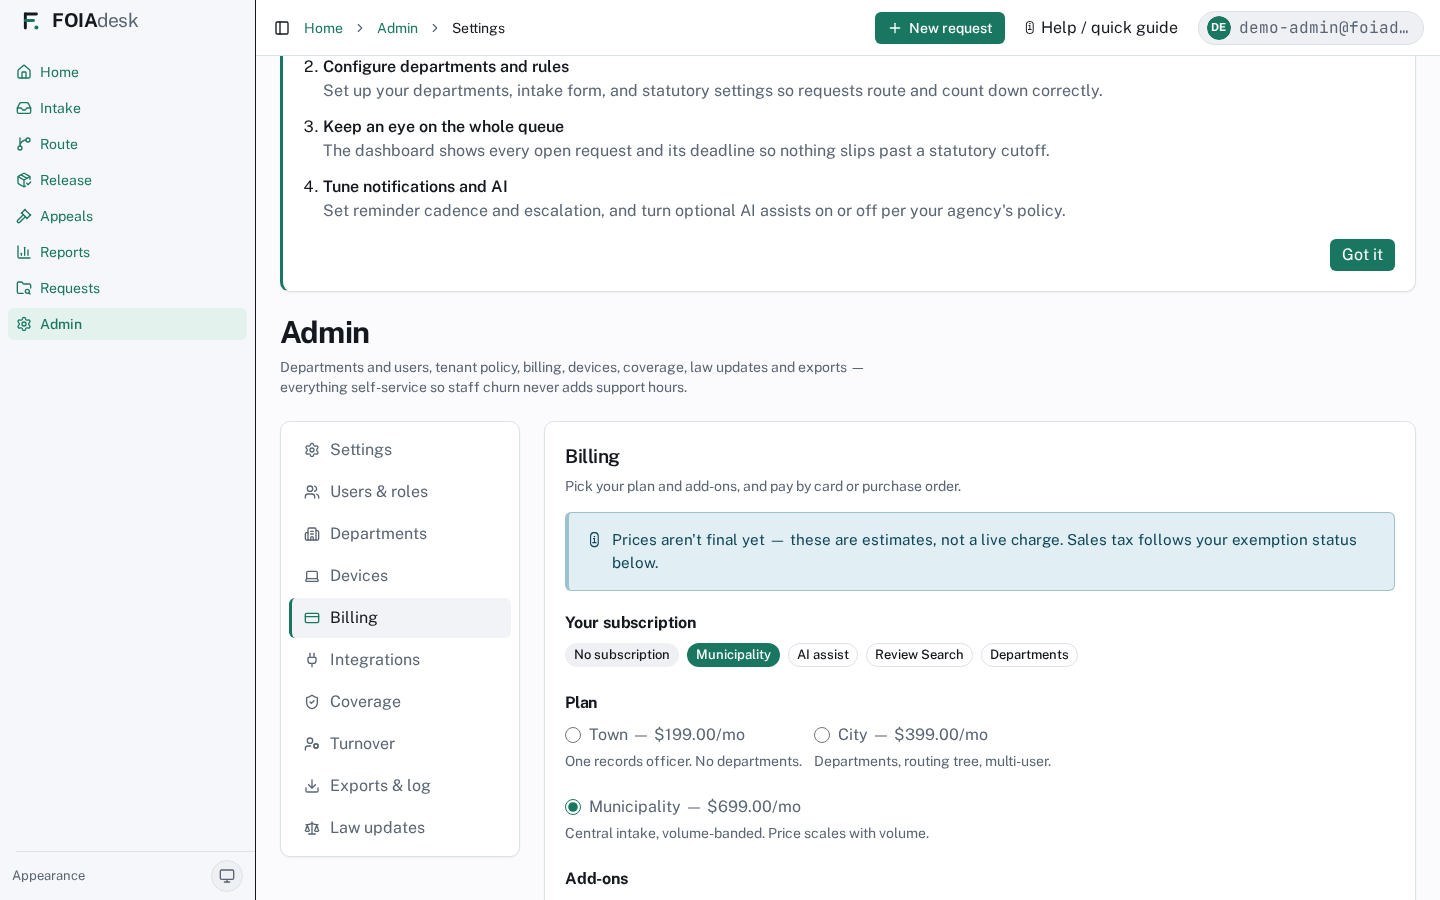
Billing
Billing shows your plan and add-ons. The three plan tiers are Town $199/mo, City $399/mo, and Municipality $699/mo (volume-banded). On top of any tier you can add AI assist ($75/mo) and Review Search ($80/mo), plus the storage, AI-usage, and processing blocks covered below. Plan changes that affect entitlements are owned by the subscription, not edited by hand here.
Billing: plan and add-ons.
i
Prices are estimates, not a live charge. The Billing screen shows what your plan and add-ons would cost; sales tax follows the exemption status you set there (most municipal agencies are exempt — tick My agency is sales-tax exempt and record your certificate). If your agency is on an operator-negotiated contract, Billing shows those agreed terms read-only instead of a plan picker.
Storage blocks and your own bucket
Long-term storage past your automatic purge horizon is sold in blocks: a 500 GB block at $149/month or a 1 TB block at $249/month (the 1 TB block is cheaper per gigabyte). Buy as many as you need; the Billing page shows your current storage used against the blocks in your plan.
If you store a lot of large files — video, body-cam footage, big mailbox exports — the recommended option is to bring your own S3 bucket (BYO-S3) instead. It is free: the files live in your agency's own AWS account, so heavy storage never lands on a FOIAdesk bill. Choose Your own storage under Settings → Routing & review → Where files are stored, then connect the bucket under Integrations → Your own storage. Going over the storage in your plan never blocks records work — it only prompts you to add a block or switch to BYO-S3.
AI assist usage
The AI assist add-on includes 1,000,000 tokens a month. Usage is metered in billing tokens, and heavier models draw more per word than lighter ones — using the most capable model burns roughly 1.7× the billing tokens of the standard model for the same work — so the meter reflects what each request actually costs. The Billing page shows an AI assist used line: your billing tokens used this month against the included allowance plus any blocks you've added.
When you go past the included allowance, extra usage is sold as $15 blocks of 1,000,000 tokens. Running out never blocks records work — at most it pauses the AI assistant until you add a block, and the manual path (routing, drafting, releasing) is always available.
Processing usage
Two kinds of heavy work are metered together as processing minutes: exploding a mailbox or archive (a PST, MBOX, or ZIP) into individually reviewable messages and attachments, and running OCR on scanned or image-only documents. Your plan includes a monthly processing allowance — Town 300 / City 1,500 / Municipality 5,000 minutes — and the Billing page shows a Processing used line: minutes used this month against your included allowance plus any blocks you've added, with the mailbox/archive minutes and the OCR pages shown separately.
OCR is counted by page (the page cost is what dominates OCR) and converted into the same minute allowance, so a single block tops up either kind. When you go past the included allowance, extra usage is sold as $49 blocks of 1,000 processing minutes. Going over never blocks records work — the mailbox still explodes and OCR still runs; it only prompts you to add a block.
Devices
Devices lists every computer and app signed in to your agency — the desktop client on a clerk's machine, a shared front-desk browser, and so on. Each row shows the device name (for example CLERK-PC-01), who set it up, when it was last used, and whether it is active or signed out.
Rename a device to something you recognise, so the list stays readable.
Sign out a device when it's lost, replaced, or no longer trusted. It is blocked within about an hour, and it can be set up again later.
A device used by more than one person is marked Shared computer. Before sensitive actions — releasing or withholding files — the person is asked to sign in again, so a walk-up machine can't act on someone else's session.
i
A computer appears here the first time someone signs in from the desktop app or a front-desk browser. You never register devices by hand.
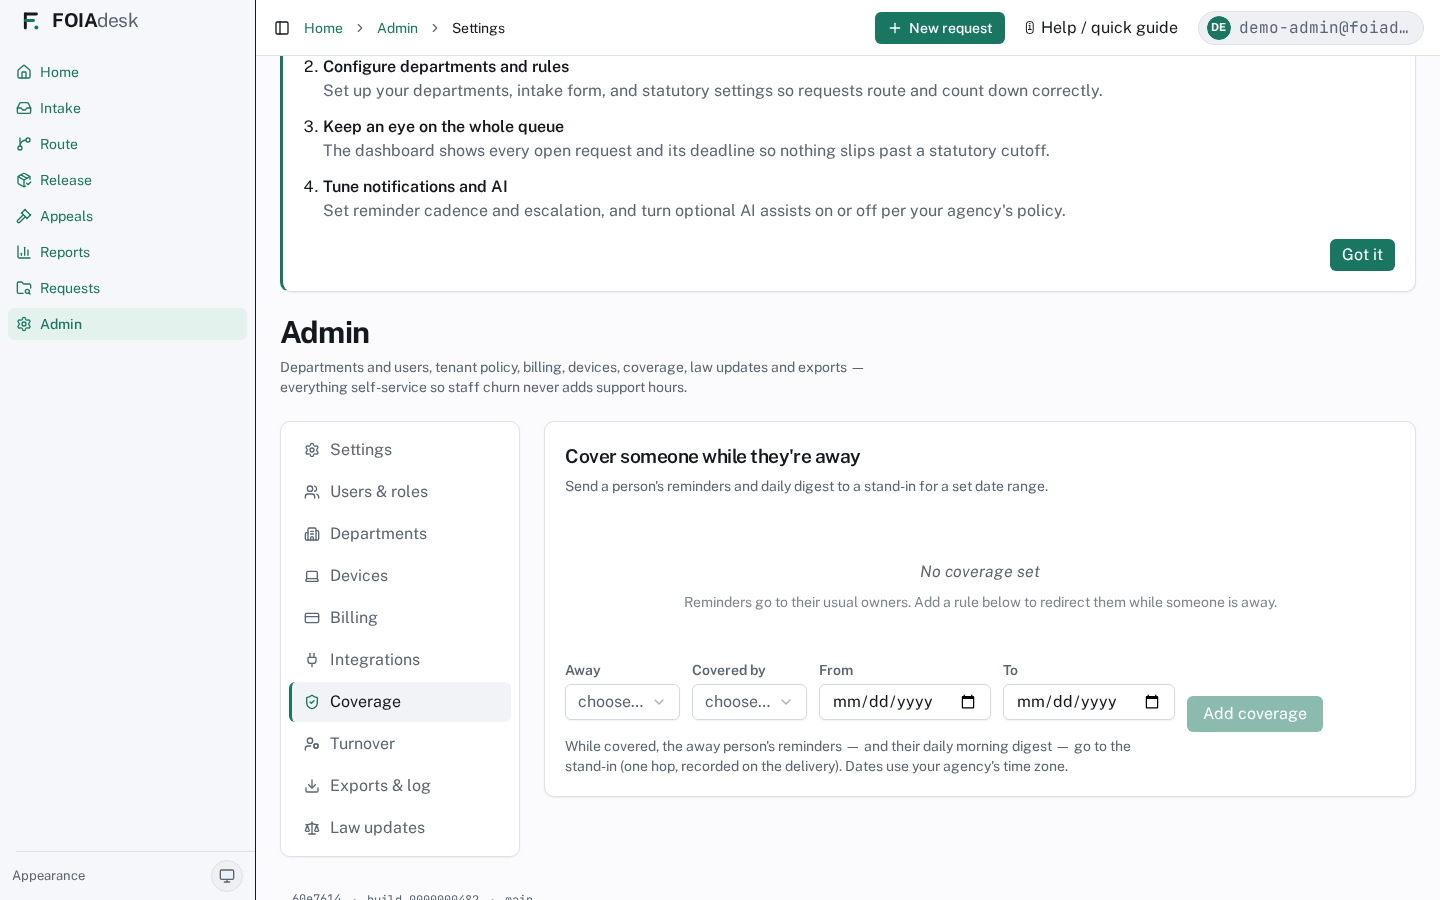
Coverage — cover someone while they're away
When a staff member is on leave, Coverage redirects their deadline reminders and daily digest to a stand-in for a set date range — so nothing sits unread in an empty inbox while a statutory clock runs.
Coverage: send an away person's reminders and daily digest to a stand-in for a set date range.
To add a rule, pick the person who is Away, who they are Covered by, and the From and To dates, then click Add coverage. While the rule is active, the away person's reminders and their morning digest go to the stand-in — one hop, recorded on each delivery. Dates use your agency's time zone.
FOIAdesk watches the rules for you and flags two hazards so coverage never quietly fails:
◐ Due soonOverlapping coverage — two rules redirect the same person on the same days, so it's unclear who is covering. Remove or adjust one.
Past coverage — a rule whose dates have already ended no longer affects anything; you can tidy it away.
i
Coverage only moves reminders and the digest — it never reassigns the work itself or grants the stand-in any access they didn't already have. It's a notification hand-off, not a permission change.
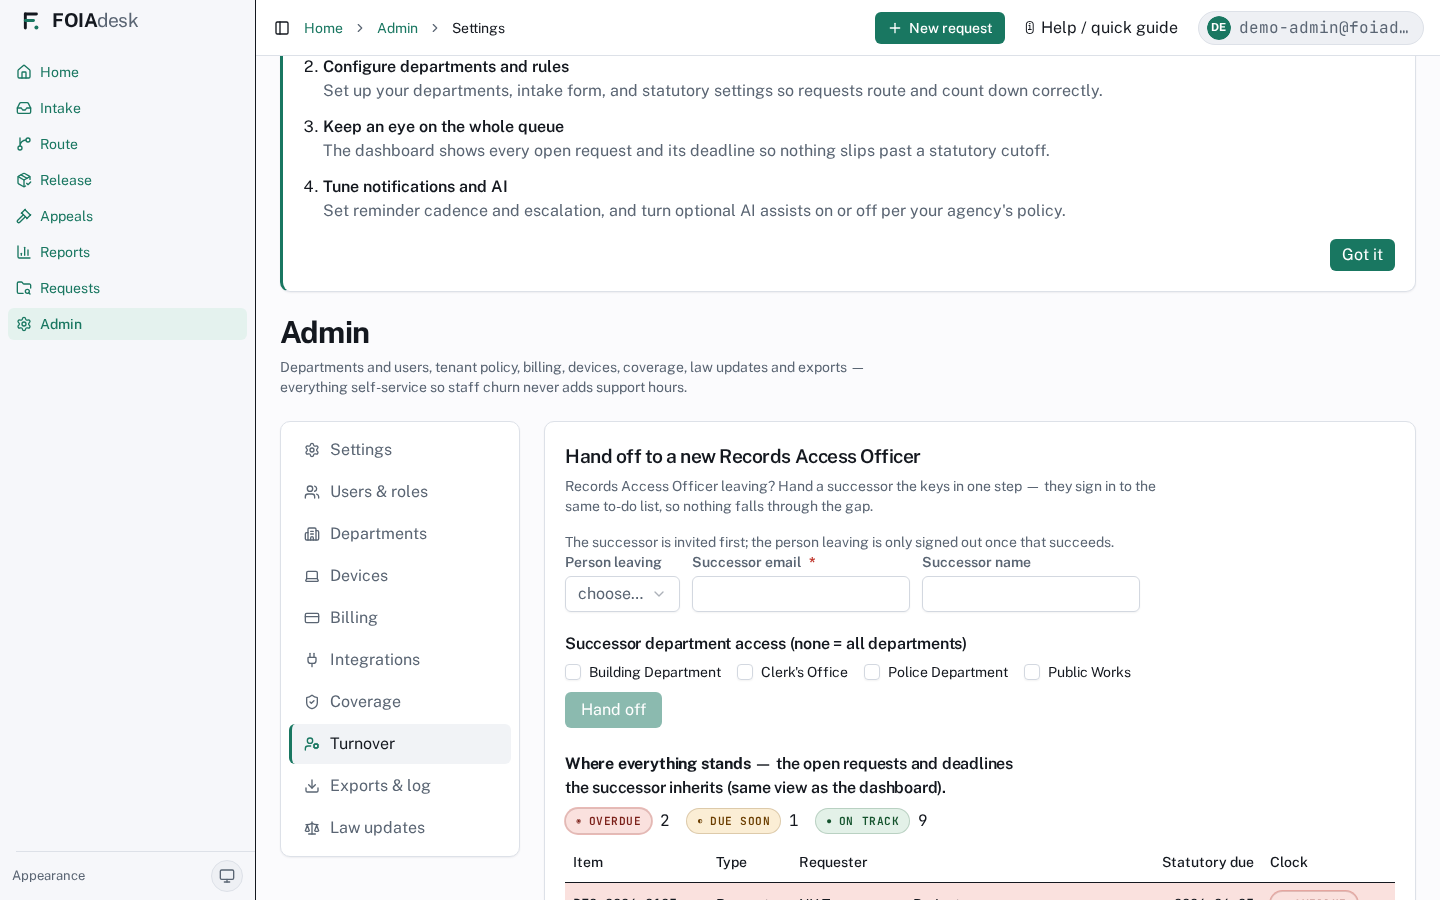
Turnover — hand off to a new records officer
When your Records Access Officer leaves, Turnover hands the successor the keys in one step, so open work never falls into the gap between two people.
Turnover: retire the outgoing records officer and hand the successor the same state-of-the-desk the dashboard shows.
Choose the Person leaving from your current records officers.
Enter the Successor email (and name). If they aren't a records officer yet, invite them first under Users & roles.
Optionally tick which departments the successor should cover (leave all unticked to give them every department).
Click Hand off.
The successor is invited first; the person leaving is only signed out once that succeeds — so there is never a moment with no one holding the desk. Below the form, Where everything stands shows the exact open requests and deadlines the successor inherits — the same ◉ Overdue / ◐ Due soon / ● On track counts and open-items table as the dashboard — so the new officer arrives to a clear picture, not a mystery.
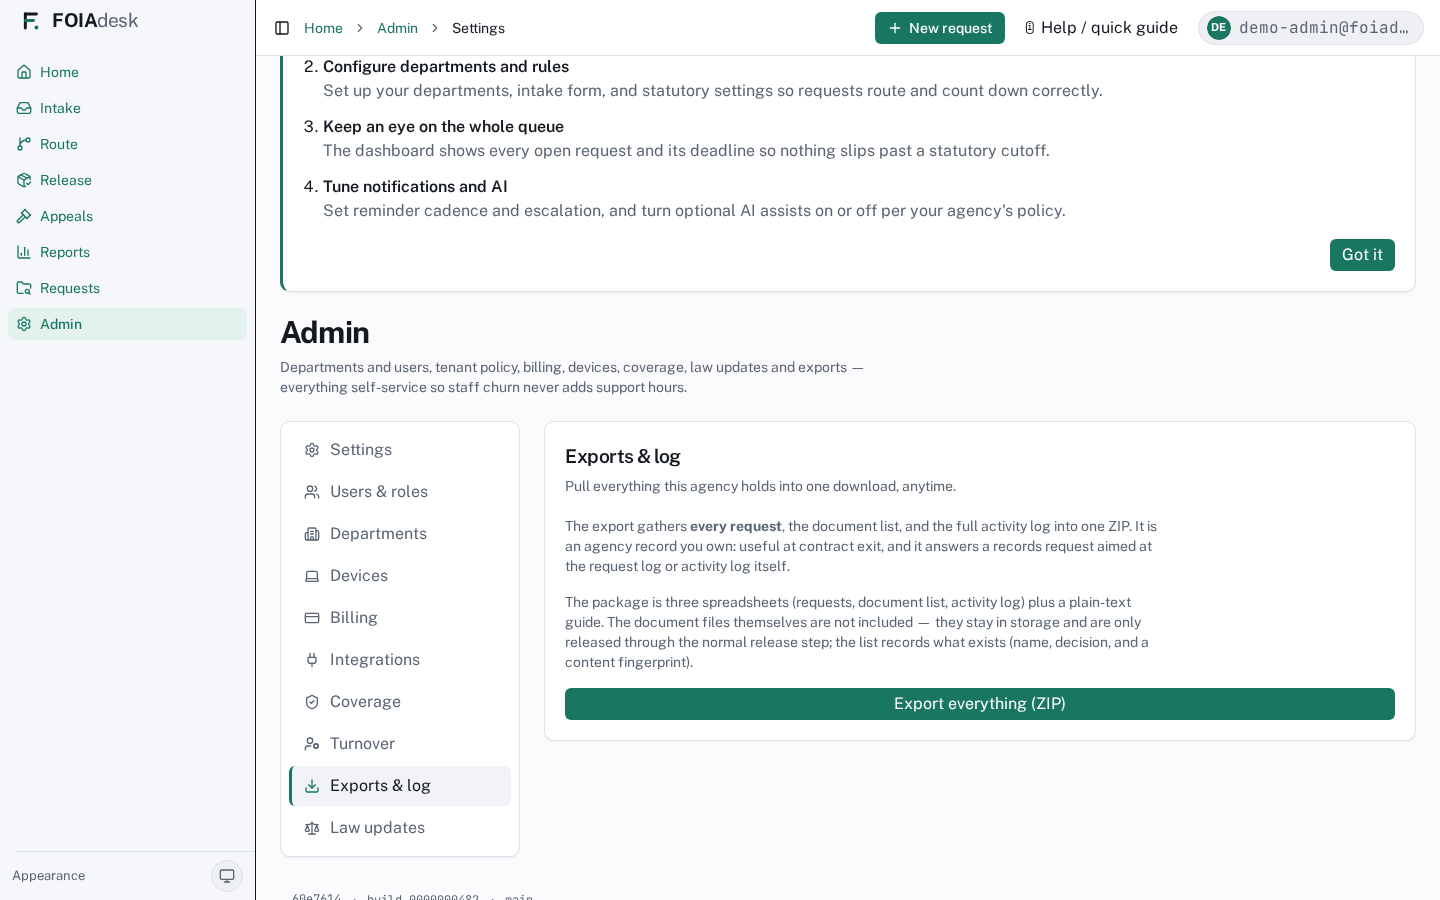
Exports & activity log
Exports & log pulls everything your agency holds into one download, any time — useful at contract exit, and the answer when a records request is aimed at your request log or activity log itself.
Exports & log: pull every request, the document list, and the full activity log into one ZIP.
Click Export everything (ZIP) and FOIAdesk assembles a package of three spreadsheets — requests, the document list, and the activity log — plus a plain-text guide. It is an agency record you own outright.
i
The files themselves are not in the export. The document list records what exists — each file's name, its decision, and a content fingerprint — but the document bytes stay in storage and are only ever handed out through the normal release step. The export never becomes a side door around the release gate.
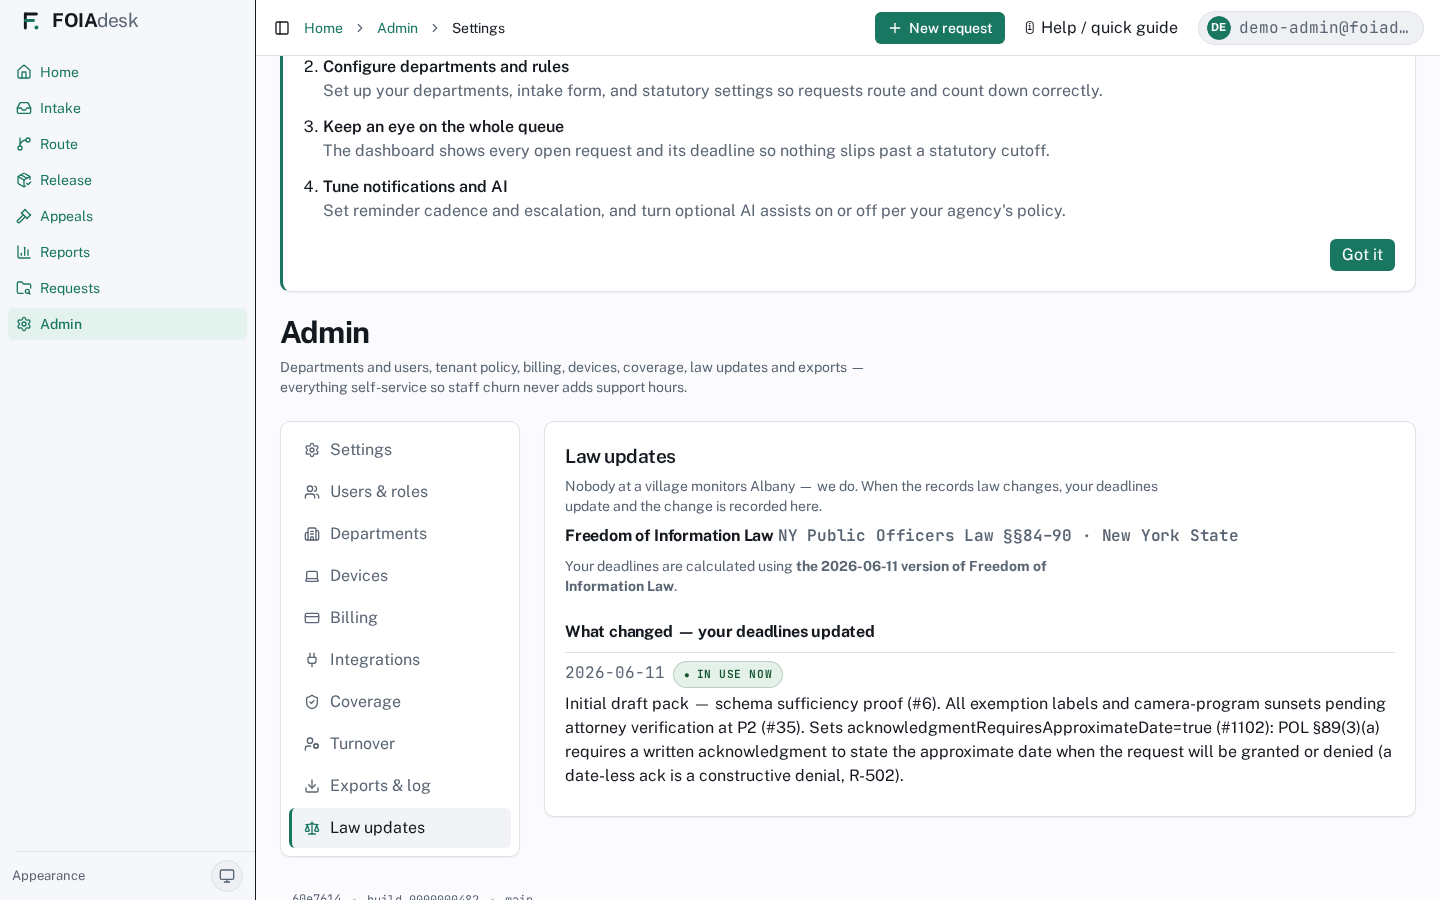
Keeping statute rules current
FOIAdesk runs deadlines from a statute pack — the law encoded as data. When the law changes, Law updates lets you review and adopt a new pack without a software release. This is what keeps every clock legally correct.
Law updates: review and adopt statute-pack changes as data, not code.
✓
You never edit raw rules or JSON. Statute packs, AI configuration, and reminder policies all have generating screens — author them in the UI, and load the existing version to revise it.
⬢ FOIAdesk operator (platform)
FOIAdesk operator
You run the platform itself — bringing new agencies on board, keeping the deadline law current, and watching the health of every tenant — without ever reading a single agency's records.
The operator role is not an agency role. It belongs to the FOIAdesk team that runs the service for everyone. Your workspace is the operator console, a separate application from the one your customers use. You bring new agencies on board, keep the statute rules current, and watch the health of the whole fleet — but a hard line runs through everything you do: you work with counts and settings, never with an agency's actual requests or files.
i
A separate, locked door. The operator console is a different sign-in from the agency app, on its own account pool, and multi-factor sign-in is always required — there is no operator without a second factor. It is reached at a separate web address (under /console) and is never indexed by search engines. None of an agency's case data flows through it.
Your line you never cross
Everything in the console reads agency metadata — how many requests a tenant has, what plan they are on, whether their bill is current, whether a background job failed. It never reads the contents of a request, a document, or a release. The one exception is deliberate and gated: consented support (see View as, below), where an agency administrator has explicitly let you step into their workspace to help.
Signing in and finding your way
You sign in to the console and land on Overview — the fleet at a glance. A left navigation rail lists every section; clicking one swaps the view (only the section you pick is shown). The sections are:
Section
What it is for
Overview
The whole fleet in one strip of numbers — tenants, monthly revenue, churn risk, past-due bills, ops alerts, cost alarm, AI spend, email bounces.
New tenant
Bring a brand-new agency into being and create its first administrator.
Lifecycle
Move a tenant through its stages (pilot, active, suspended, and so on).
Statute packs
Author and publish the encoded law every agency's deadline clock runs on.
AI
Set, per feature, which model is used and the exact wording of each prompt.
Tenants
The cross-tenant list — search, filter, and open per-tenant configuration, consented support, or provisioning status.
Billing catalog
Manage the Stripe product/price catalog and set per-tenant contract prices.
Ops
Platform health and the maintenance levers — search index, virus-scanner rebuild, demo reseed, portal DNS, self-hosted domains.
Delivery
The log of outbound email and notifications, so you can see what went out and what bounced.
Email box
The platform inbox for mail sent to non-agency addresses (support, billing, catch-all) — read-only, never a tenant request.
Announcements
Compose and publish in-product announcements to tenants.
Bringing a new agency on board
New tenant is the one path that creates an agency from nothing. It is a short, guided form, and because it cannot be undone from here, it ends with a confirmation step before anything is written. You fill in:
Identity & plan — the agency's permanent id (a lowercase slug that can never be reused), its display name, what kind of agency it is, and the plan tier (Town, City, or Municipality).
Custody — where the agency's files will live: short custody (auto-purge after closing, the default), paid retention, the agency's own storage bucket, or a dedicated isolated bucket.
Statute pack — the encoded law its deadline clock will run on, pinned to a published pack and version.
First admin — the email of the agency's first administrator. They are created in the agency account pool and emailed a temporary password automatically.
Billing — whether the tenant is self-hosted and whether billing is console-managed (an operator-locked contract) rather than self-serve.
When you confirm, the tenant, its billing intent, an audit record, and the first administrator are all created together, and the new admin receives their invite. From there the agency does its own setup (see Getting started and the Tenant administrator page).
✓
The id is forever. The tenant id is permanent and can never be reused once provisioned — pick it carefully. The display name can change later; the id cannot.
The tenant list, configuration, and consented support
Tenants is the cross-tenant roster. Each row shows the agency's name, plan, custody mode, billing state, and request count. You can search by name or id and filter by plan, custody, or billing status, and the list pages as the fleet grows. From a row you can open three things:
Configure — the agency's per-tenant settings (feature flags, entitlements, and the like).
View as — consented support. You can step into an agency's workspace to help only when that agency's administrator has granted access; this is the single path that ever shows you live agency content, and it is recorded.
Provisioning — the live status of a per-tenant resource being set up (for example, a dedicated storage bucket being provisioned).
Keeping the law current
The deadline clock that is the heart of the whole product runs on a statute pack — the law written as data, not code. From Statute packs you author and publish new versions, and from AI you tune which model and prompt wording each AI feature uses. Both publish as new, immutable versions, so an agency can adopt a change deliberately and you always have a record of exactly what was in force when.
Watching the fleet
Overview and Ops are where you keep the service healthy. Overview's number strip turns loud when something needs attention — a past-due bill, an ops alert, a cost anomaly, a run of email bounces. Ops holds the maintenance levers: the search index status and rebuild, the virus-scanner rebuild, the demo-tenant reseed, the portal DNS target agencies point their custom domains at, and self-hosted domain management. Delivery is the outbound-email log and Email box is the inbound platform inbox for support and billing mail.
i
The operator console talks only to the platform's own operator services — never to the agency app's data API. That separation is structural: there is no path from this console into another tenant's request data except the consented View as above.
⬡ RAO / intake
Records access officer & intake
You take in every request, start its clock, acknowledge it, and route it to the departments that hold the records — keeping the whole-request overview as it moves.
You work mainly in three places in the left navigation: Intake (log a new request), Route (acknowledge and send to departments), and the request hub you reach by opening any request. The deadline clock is the spine of all of it — it starts the moment you save, and it keeps running no matter where the request is.
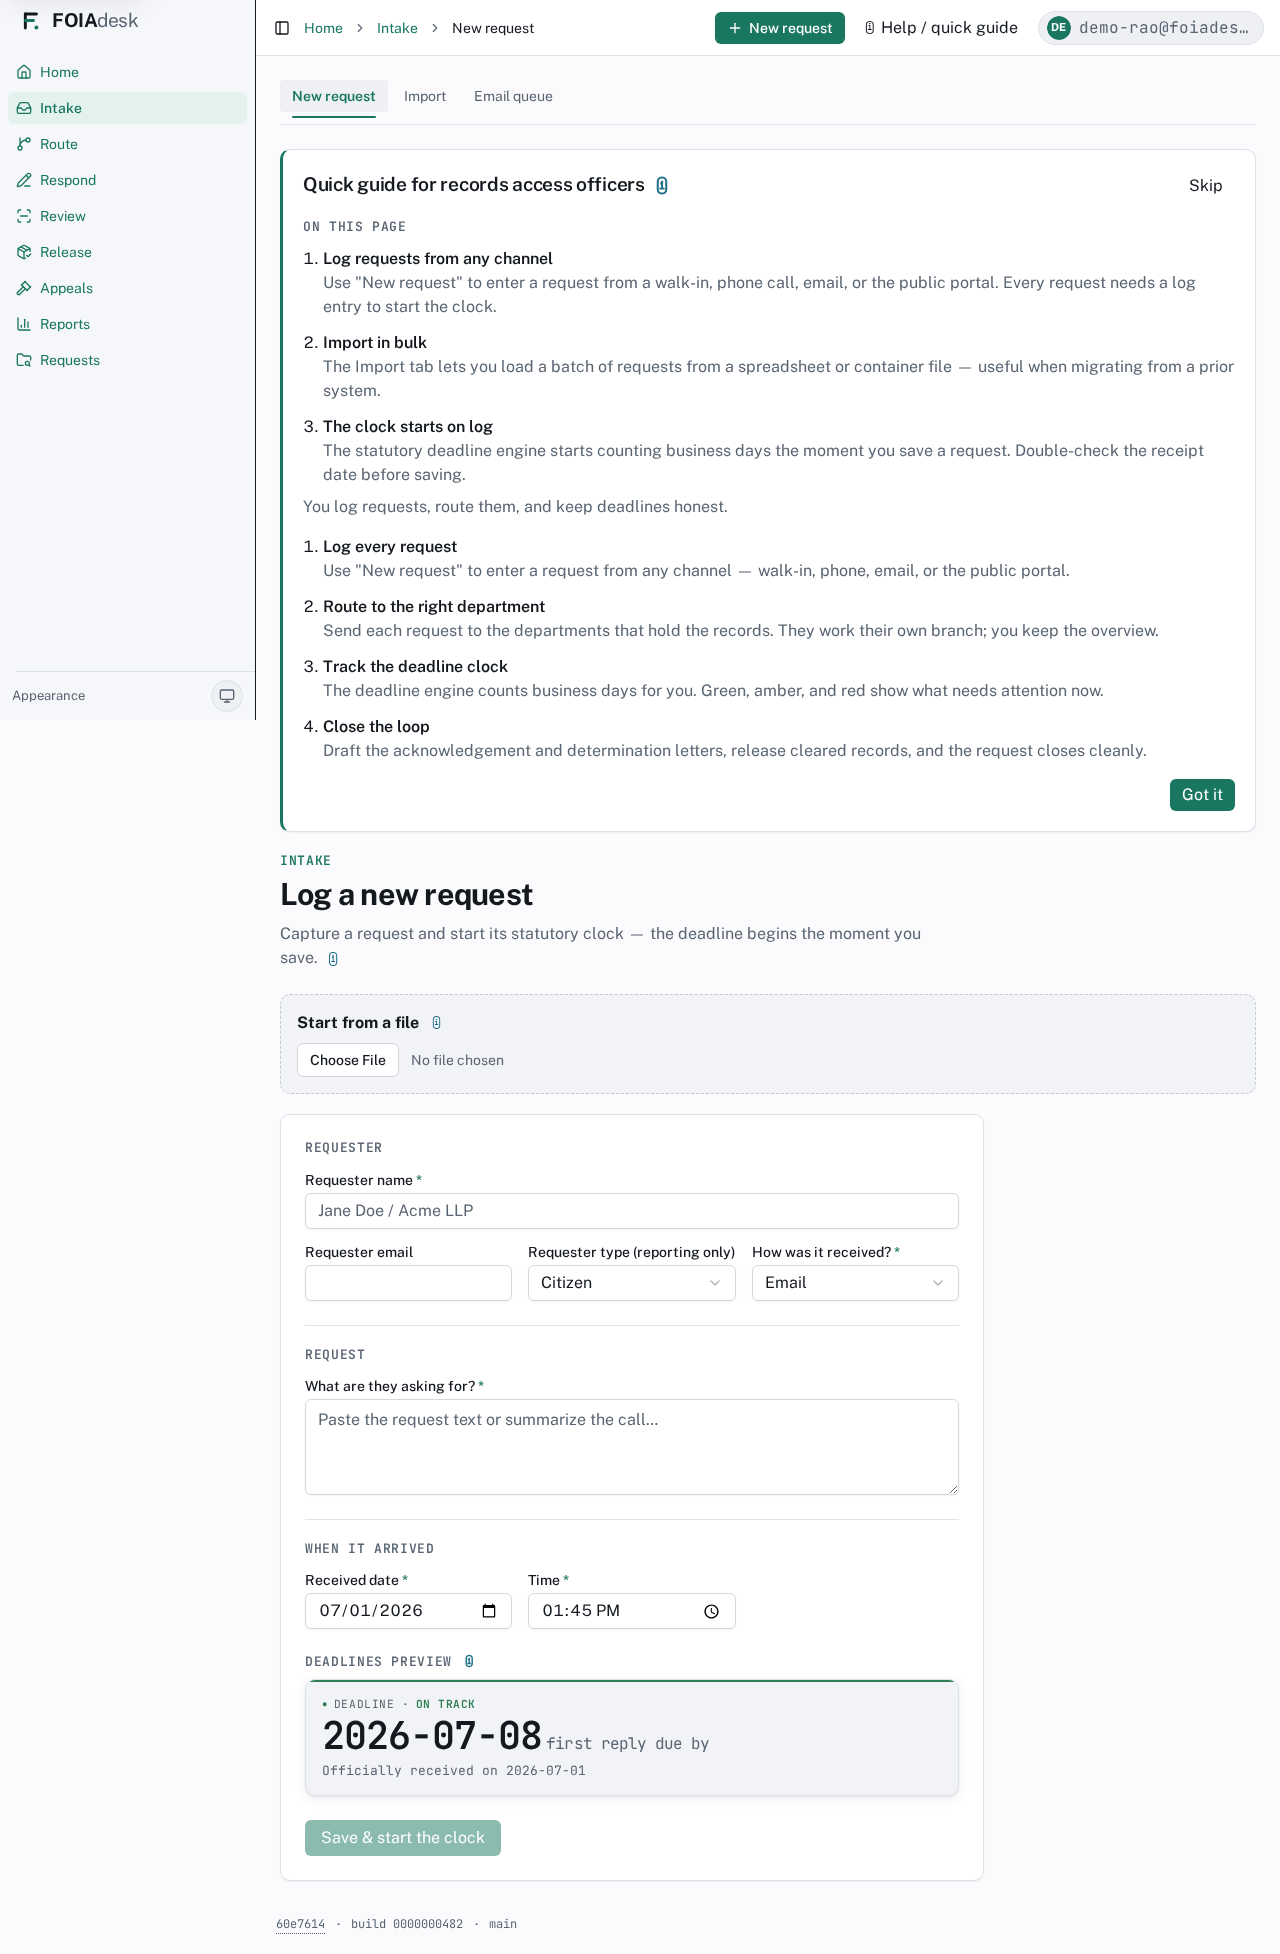
Step 1 — Log the request
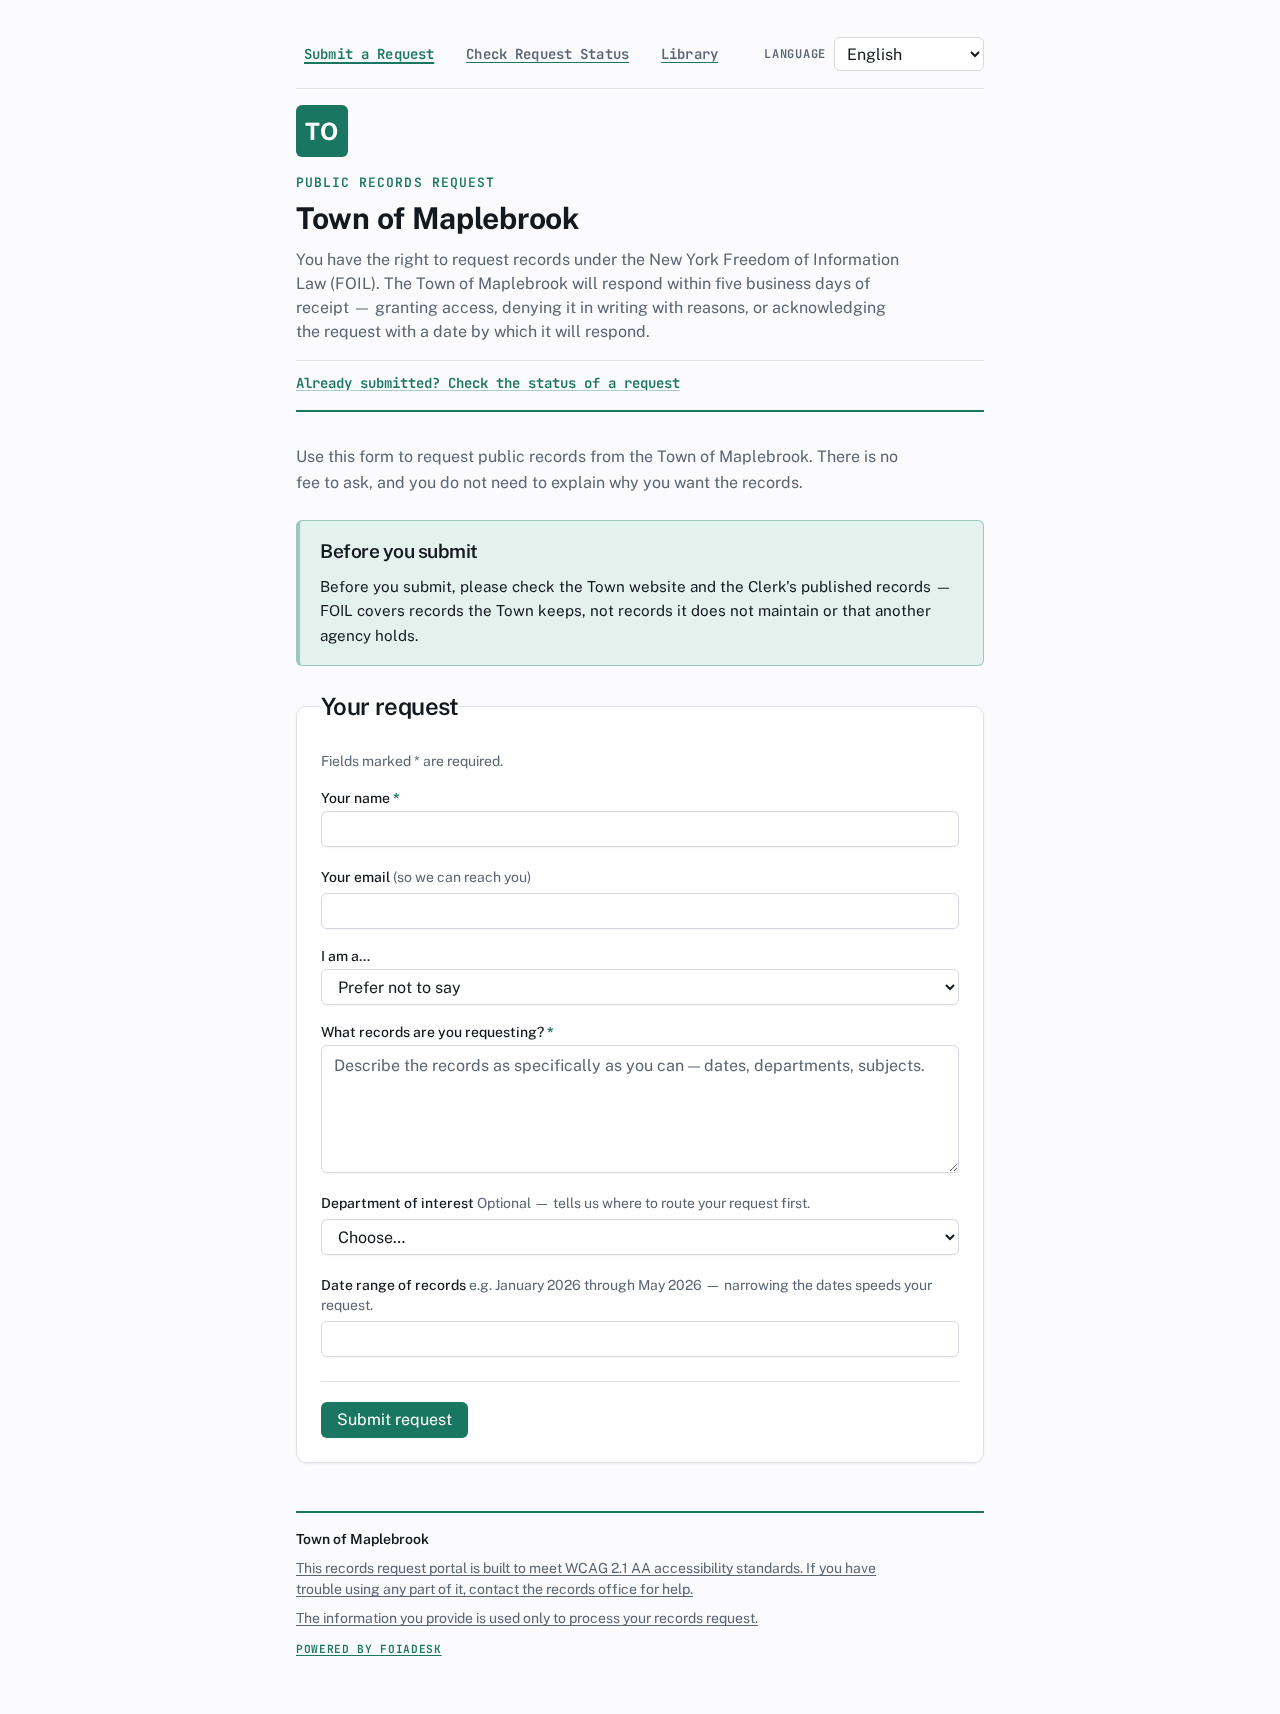
Every request goes through you, whatever channel it arrived on — walk-in, phone, email, or the public portal. Open Intake. It has three tabs across the top — New request, Import, and Email queue. Stay on New request to type one in, and fill in the form.
Log a new request: requester details, the request text, when it arrived, and a live deadline preview.
Enter the requester name, and their email if you have it.
Set requester type (reporting only) and how it was received — email, phone, walk-in, or portal.
Paste or summarize what they are asking for.
Set the received date and time. The clock starts from this, so get it right — backdate a request that arrived earlier than today.
Watch the Deadlines preview compute the statutory due date as you type, then click Save & start the clock.
!
The clock starts when you save. Double-check the received date and time before you save — the preview shows exactly which due date you are committing to. Once saved, the deadline runs whether or not the request has been acknowledged or routed.
Bring in a backlog from a spreadsheet
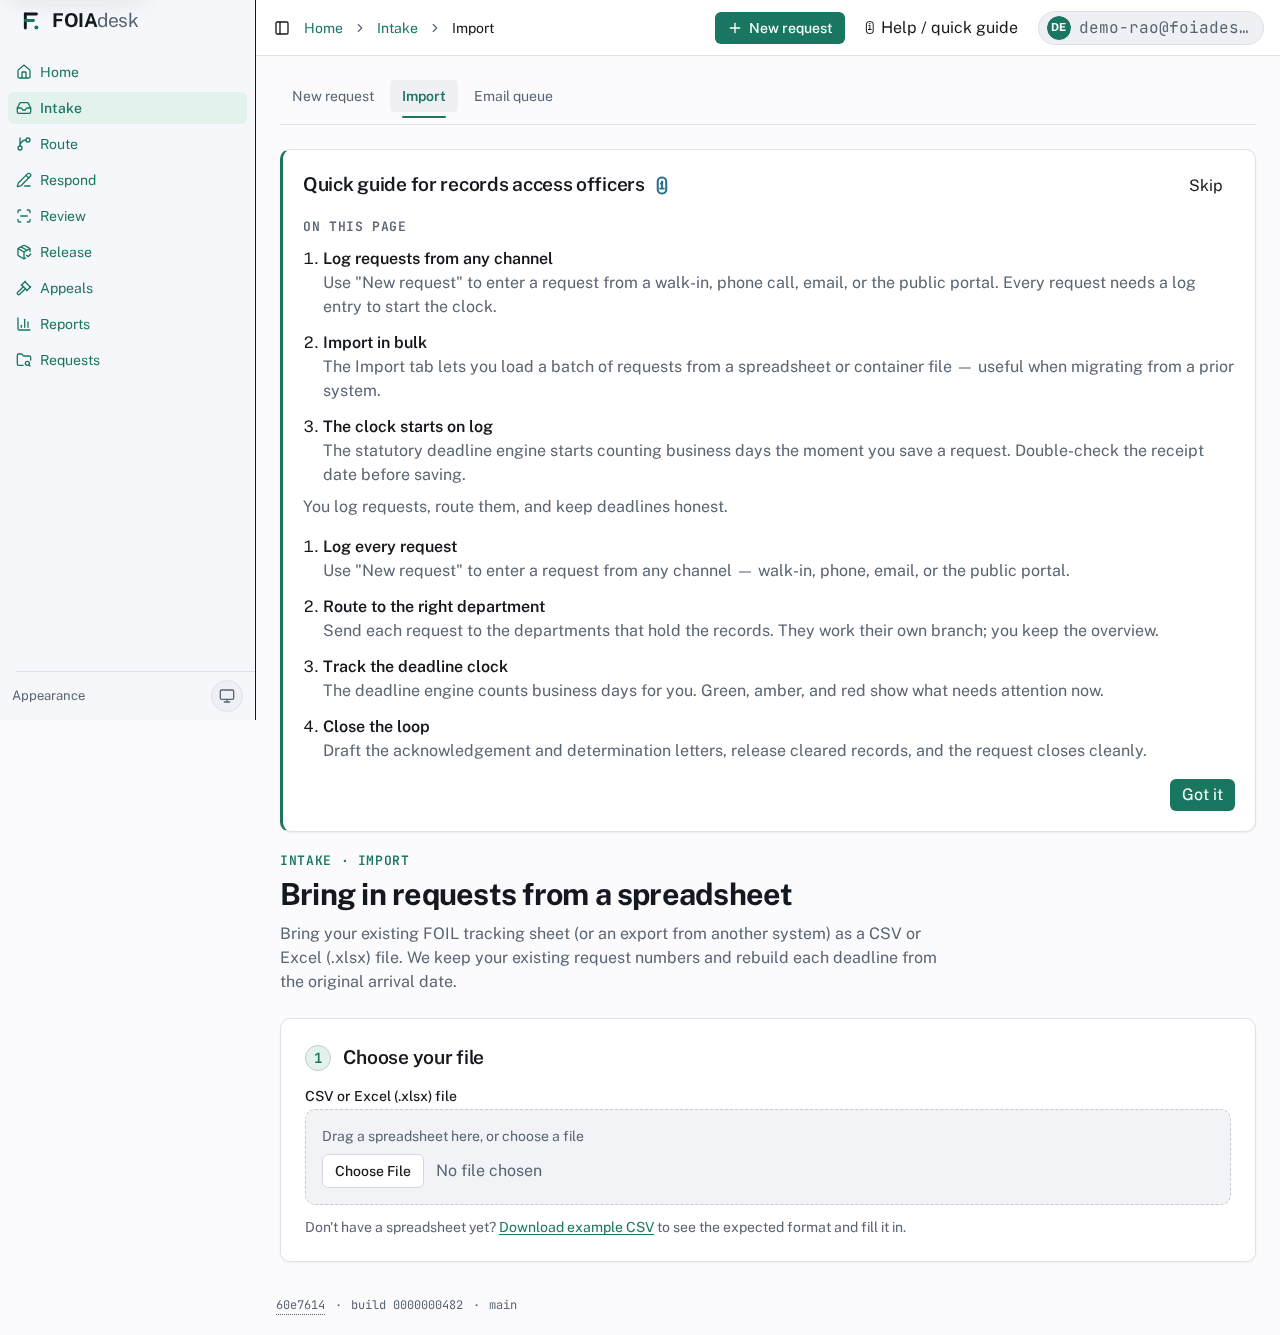
If you are moving to FOIAdesk from another system — or you keep a FOIL tracking spreadsheet — the Import tab loads a whole batch at once instead of retyping each request. It accepts a CSV or Excel (.xlsx) file, keeps your existing request numbers, and rebuilds each deadline from the original arrival date.
The Import tab: drag a spreadsheet in or choose a file, with a downloadable example CSV showing the expected format.
Import walks you through three steps:
Choose your file. Drag a spreadsheet in or pick one. Don't have one yet? Download example CSV to see the exact columns and fill it in. If a workbook has more than one tab, you pick which worksheet to import.
Match your columns. FOIAdesk auto-maps common headers; you confirm or adjust which spreadsheet column feeds each field. Requester name, Request text, and Arrival date are required (marked with a *); the rest are optional. Migrating from a known system? A preset can pre-map the columns for you.
Preview. Every row is checked before anything is created. A running tally shows how many are ready, how many already exist (skipped, never duplicated), and how many have problems. Fix a flagged row right in the preview with Fix row — no need to edit your spreadsheet. Rows with no arrival time default to 09:00, and the preview tells you so.
When it looks right, click Import. Imported rows keep their existing request number and their deadlines start running immediately. If Import spots near-identical rows, it offers them as a possible campaign to review — nothing is grouped automatically.
i
Import is for a backlog, not a live email. To pull in a single request that arrived by email, promote it from the Email queue (below) — that captures the original message and its attachments as files. Use Import when you have many requests in a sheet.
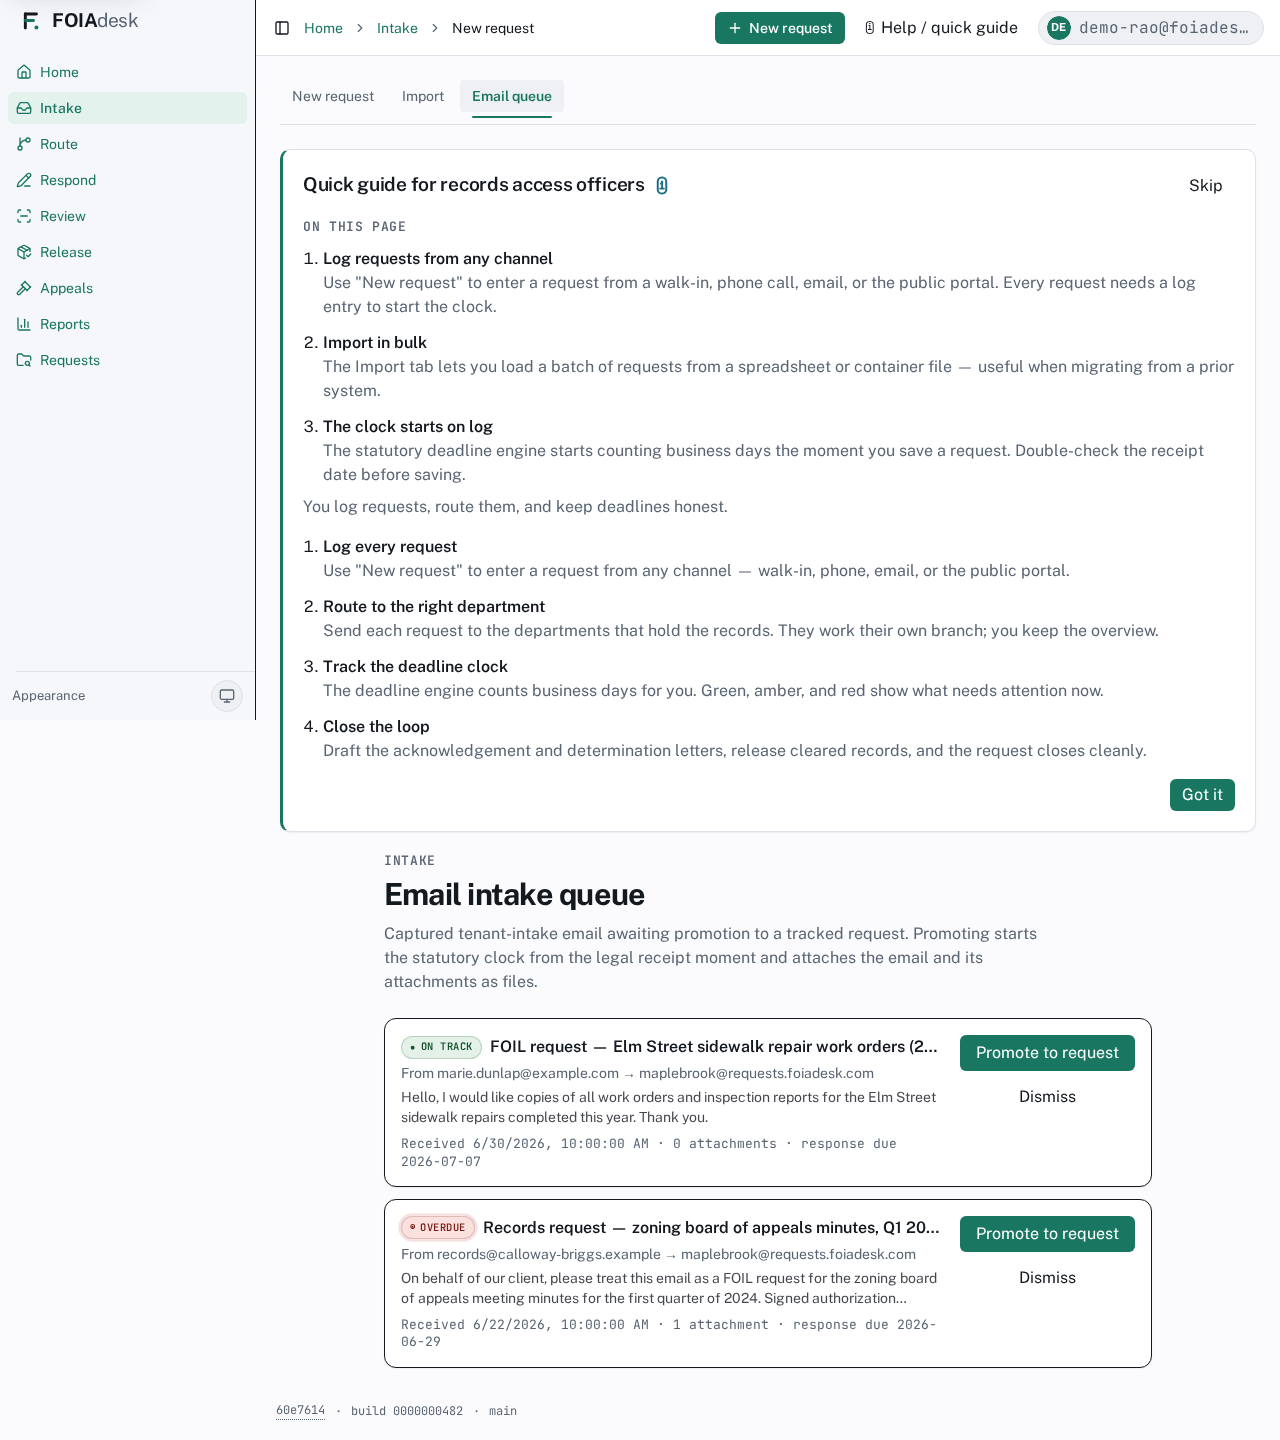
Requests that arrive by email
Requesters can email a FOIL request straight to your agency's submission address (see the administrator section, Your email submission address). Mail sent there lands in the Email queue tab — never filed automatically. Each queued email shows its arrival time and a response clock running from the moment it arrived.
The Email intake queue: captured emails awaiting promotion to a tracked request — nothing is filed automatically.
When you are ready, promote a queued email: that starts the statutory clock from the legal receipt moment and attaches the original email and its attachments to the new request as files.
Step 2 — Acknowledge before you route
New York requires you to acknowledge a request, with an approximate date for your response, before it goes anywhere. FOIAdesk enforces this: you cannot route a request until it has been acknowledged. You can acknowledge in two places — from the request hub under Record what happened (We acknowledged the request), or right on the Route panel itself (see Step 3), where the Acknowledge button lets you send the requester an acknowledgement letter — or just mark it acknowledged if you handed one over in person — without leaving the routing screen.
The legal deadline does not pause while you acknowledge — it keeps running — so acknowledge promptly.
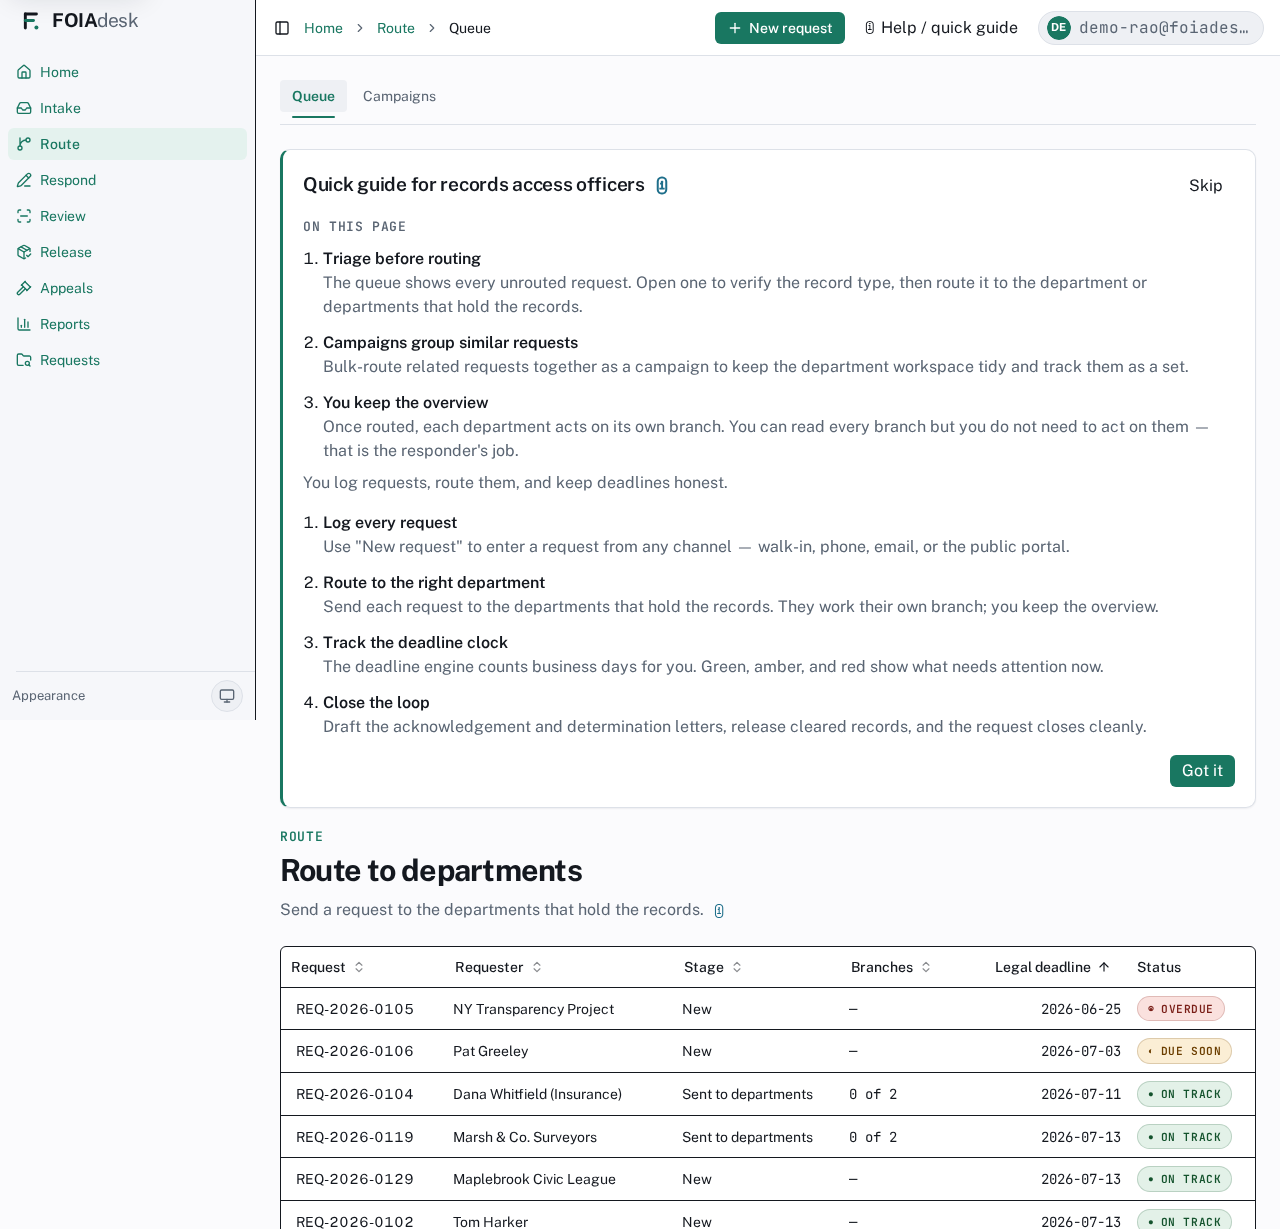
Step 3 — Route to the departments that hold the records
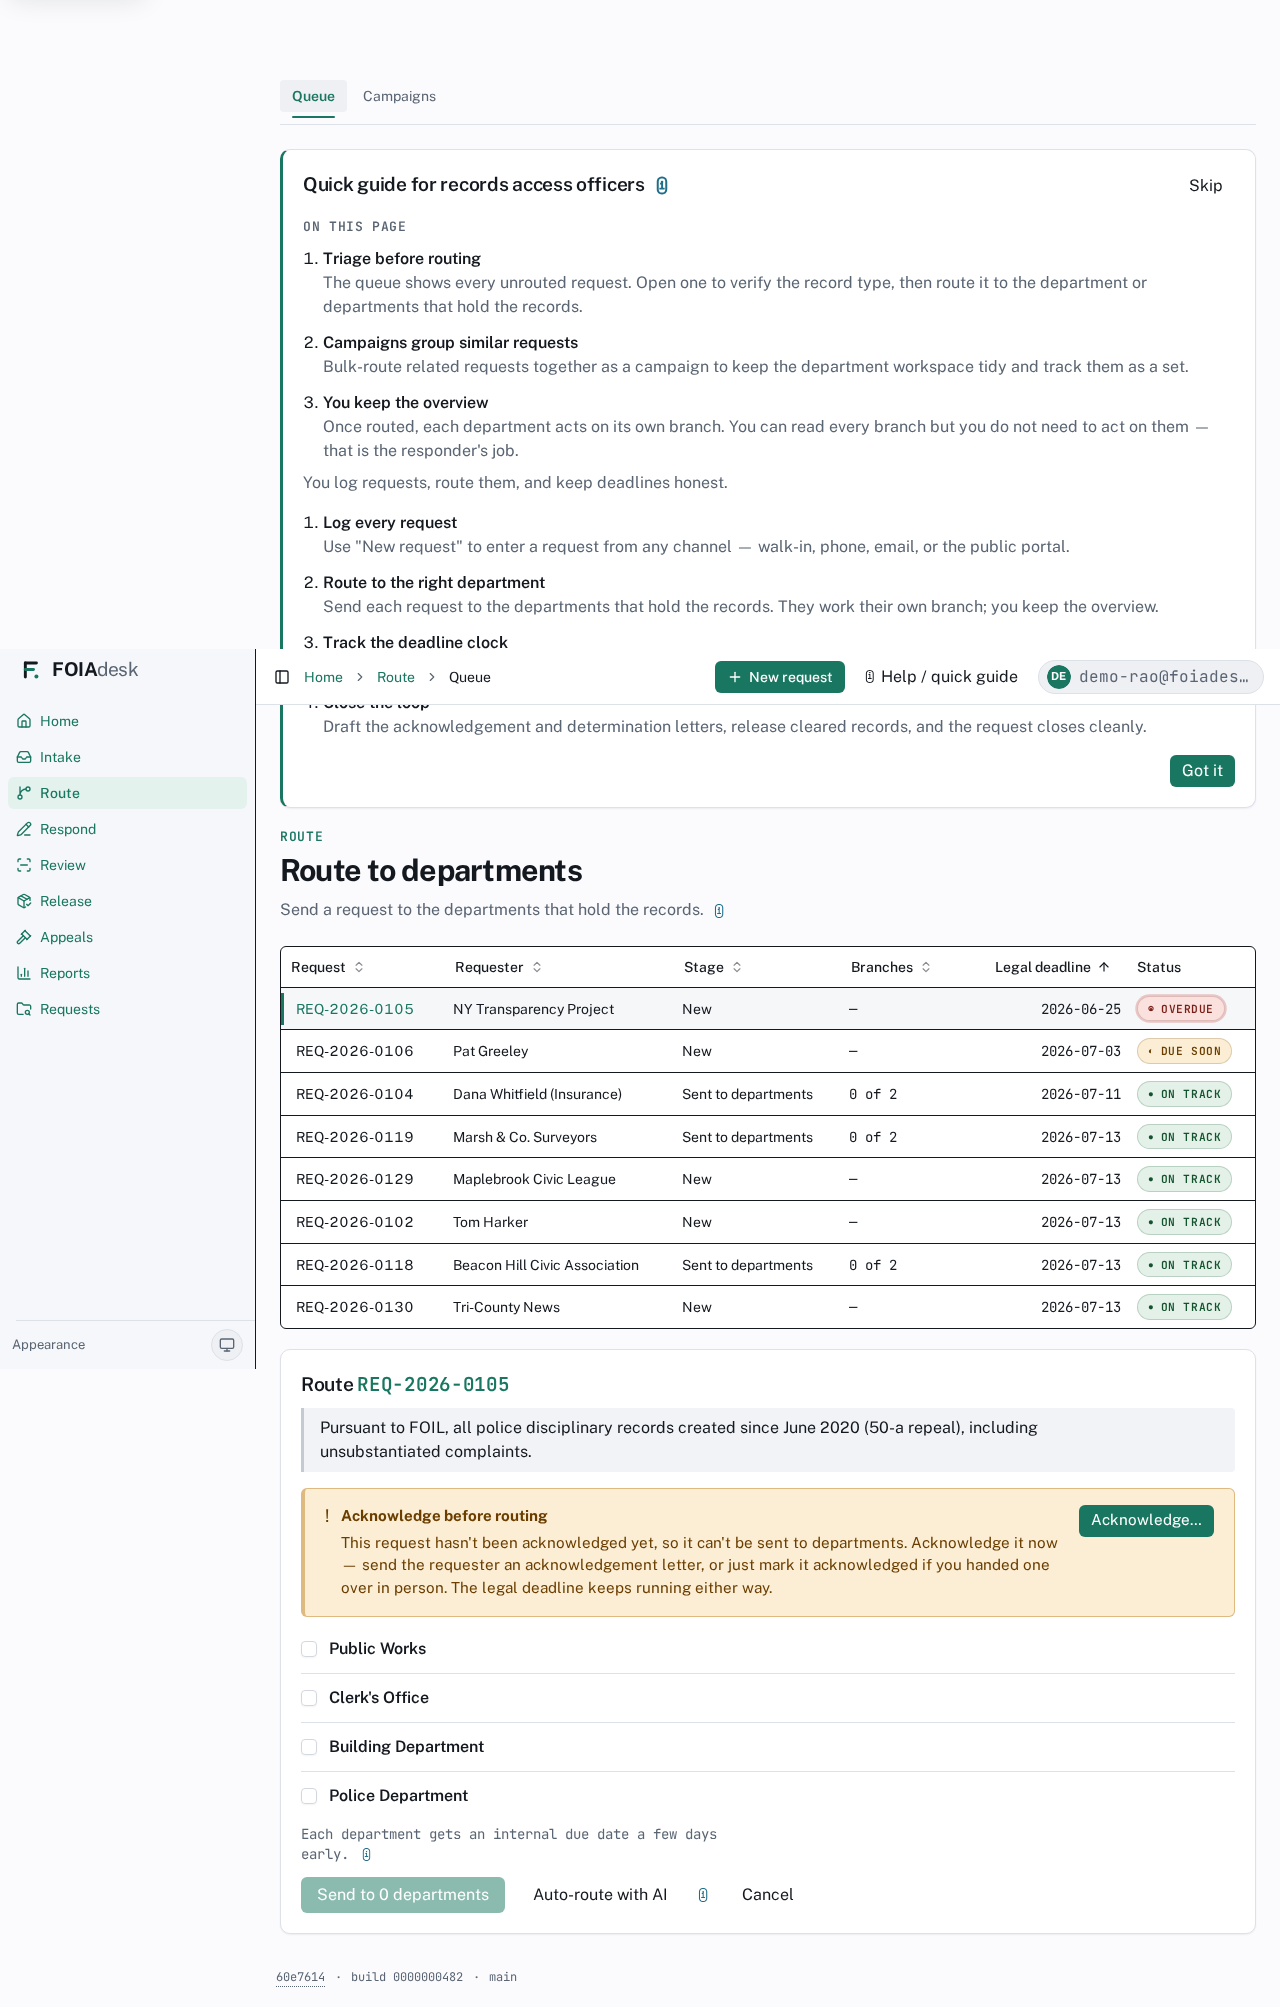
Open Route. The Queue lists every request with its Stage (New, or Sent to departments), how many Branches it has gone to, its Legal deadline, and a traffic-light Status — ◉ Overdue, ◐ Due soon, or ● On track.
The Route queue: every request with its stage, branch count, legal deadline, and traffic-light status.
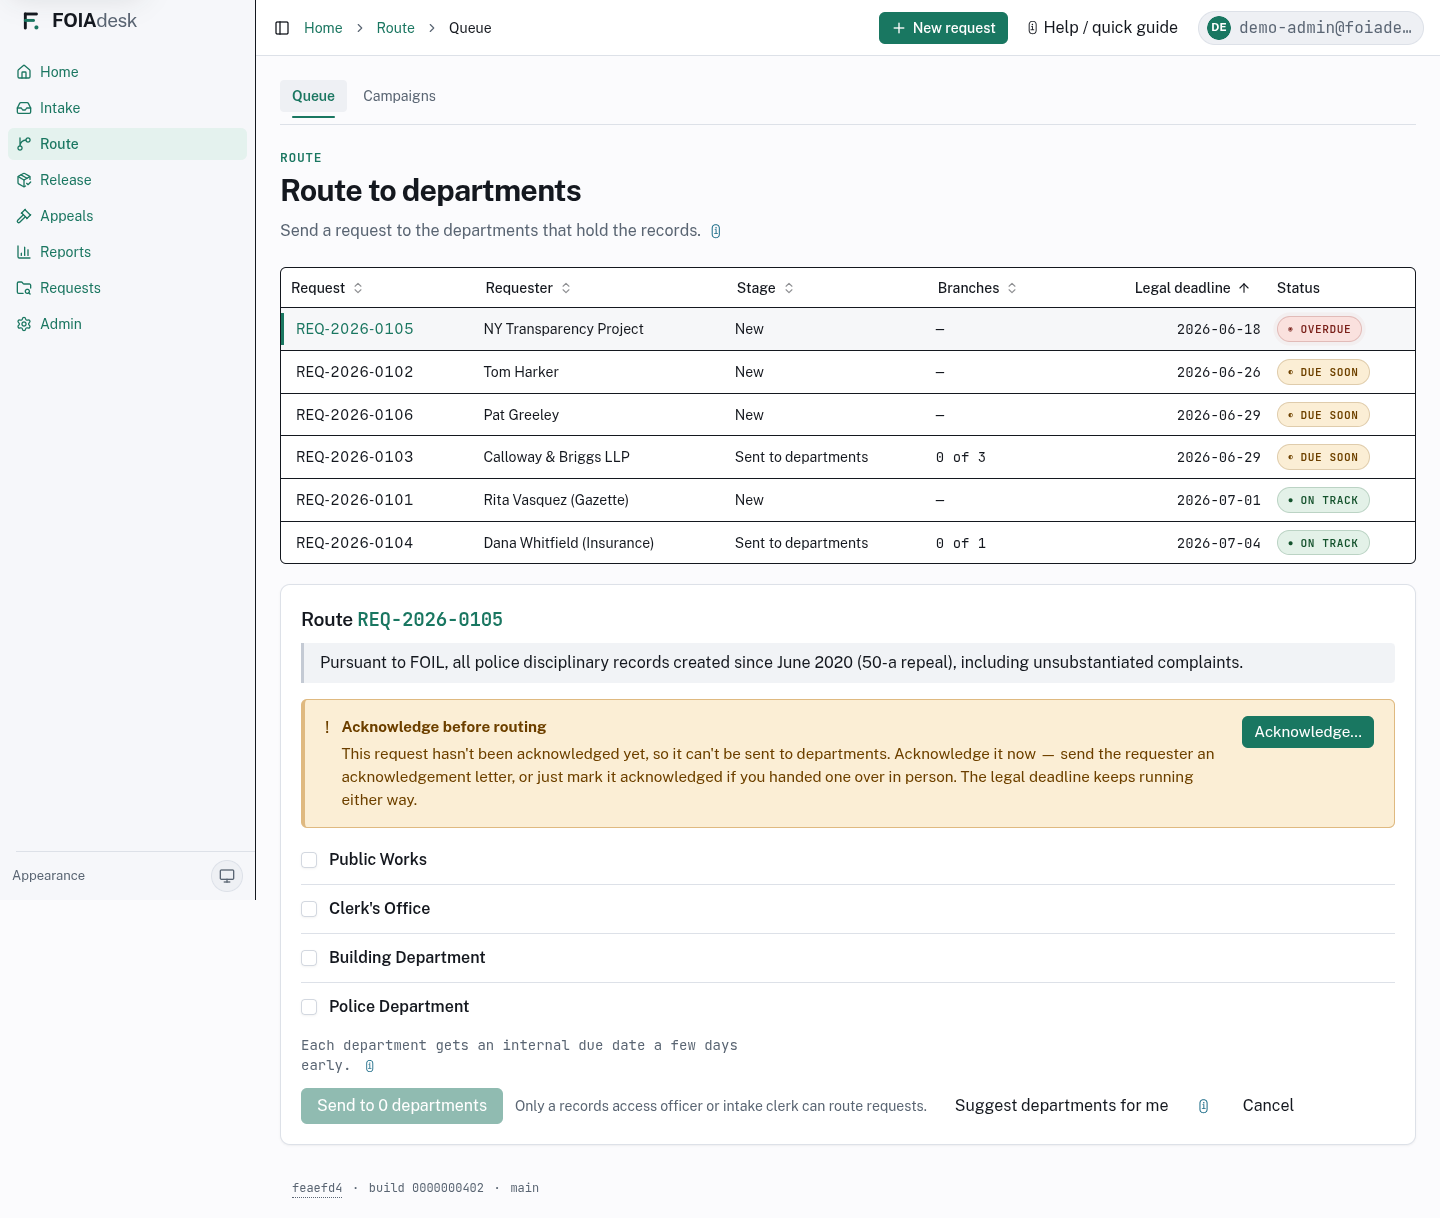
Click a request to open its route panel. If it has not been acknowledged yet, an Acknowledge before routing notice blocks routing until you do — with an Acknowledge button right there so you can clear the gate without leaving the screen. Once it is acknowledged, choose the departments that hold the records and send.
A request's route panel: the acknowledge-before-routing gate with its inline Acknowledge button, department checkboxes, and the send and auto-route controls.
Acknowledge the request if you have not already — use the Acknowledge button on the panel.
Check the box for each department that holds responsive records — you can pick several.
Click Send to departments.
Each department then works its own branch and you keep the overview. Departments can see their siblings' branches unless your agency restricts that.
Let AI propose the departments
When AI assist is turned on for your agency, an Auto-route with AI button sits beside Send to departments on the route panel. It reads the request and sorts the departments for you.
The route panel with the acknowledge-before-routing gate, department checkboxes, and the Auto-route with AI button beside Send.
Clicking it does two things at once:
Departments it is highly confident about (at least 85% sure) are routed right away — the work is dispatched for you. This is the one AI action that changes a request on its own, and it is always reversible: a banner appears with an Undo button for a short window.
Less-certain guesses are held as suggestions. They appear under Less-certain AI suggestions, each on its own card with a confidence figure (for example ◐ 72% confidence). For each one you choose Accept & send, Modify before sending (which pre-ticks that department in the checklist so you can adjust), or Dismiss. Nothing is routed from a suggestion until you say so.
i
Routing by hand always works. The checkboxes are always available whether or not you have AI assist. If the model can't be reached — or AI routing isn't part of your plan — the button simply tells you in plain language and you route with the checkboxes. Departments whose records match the request text also carry a small Suggested marker next to their checkbox, as a hint; the box still starts unticked and the choice is yours.
Campaigns — handle look-alike requests together
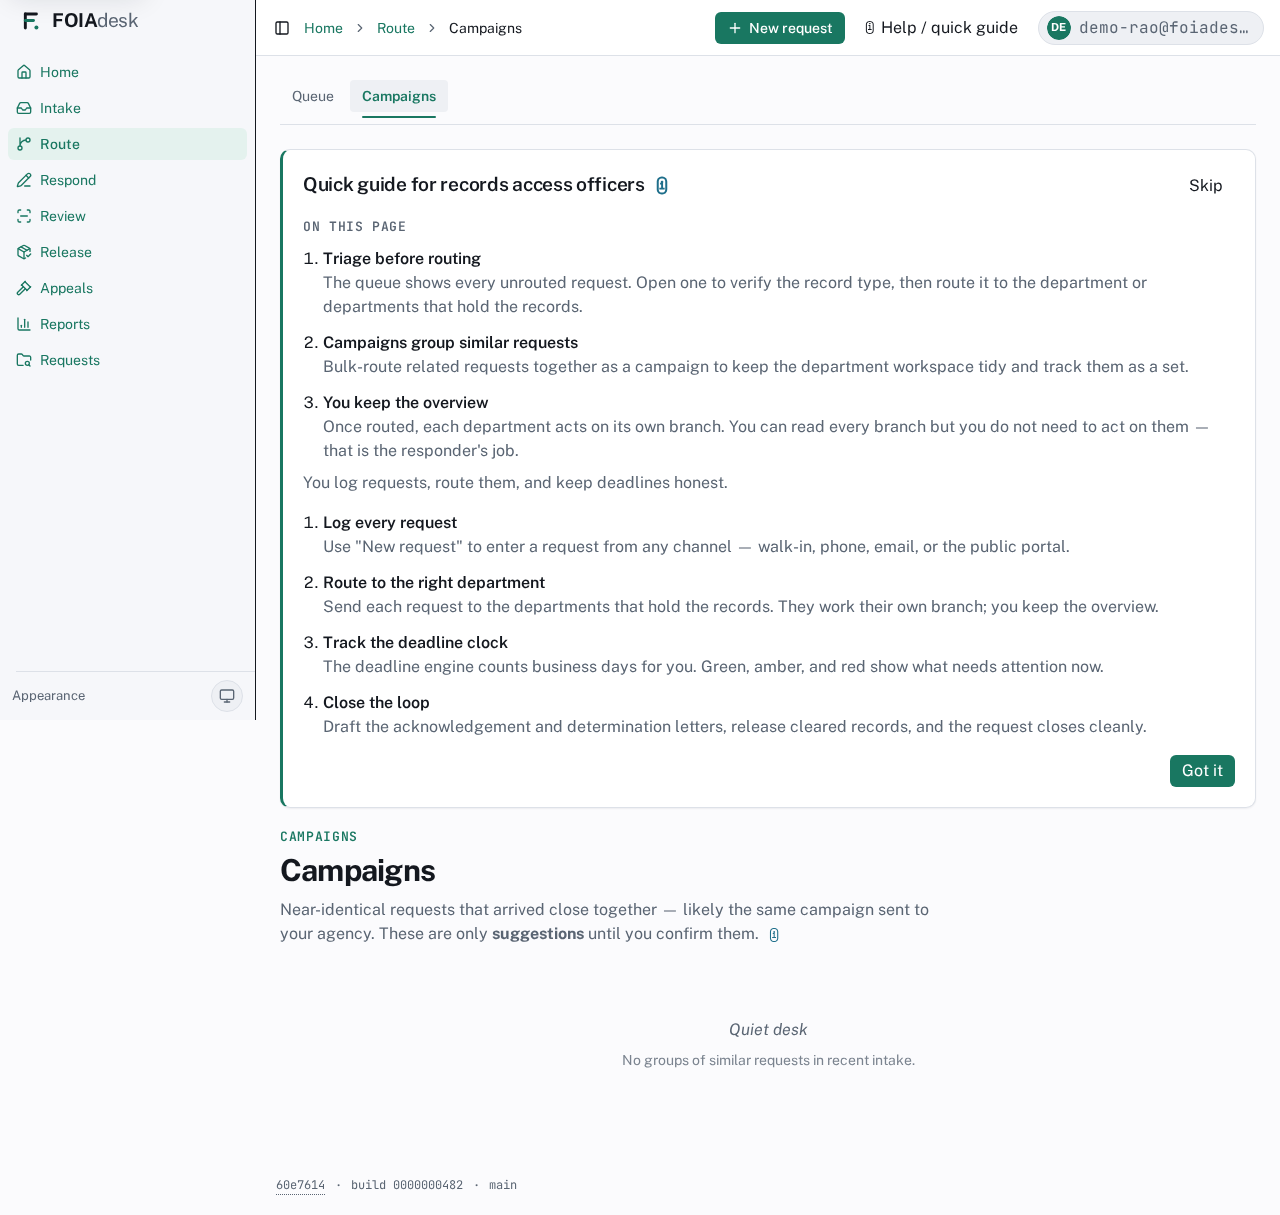
When many requesters ask for the same records around the same time — a write-in campaign, say — the Campaigns tab in Route groups the near-identical requests it spots in recent intake so you can act on them as a set instead of one at a time.
The Campaigns tab in Route: groups of near-identical requests that arrived close together, surfaced as suggestions to handle as a set.
The groups are only suggestions until you confirm them — nothing is merged or routed behind your back. When the desk is quiet and nothing looks alike, the tab simply says so.
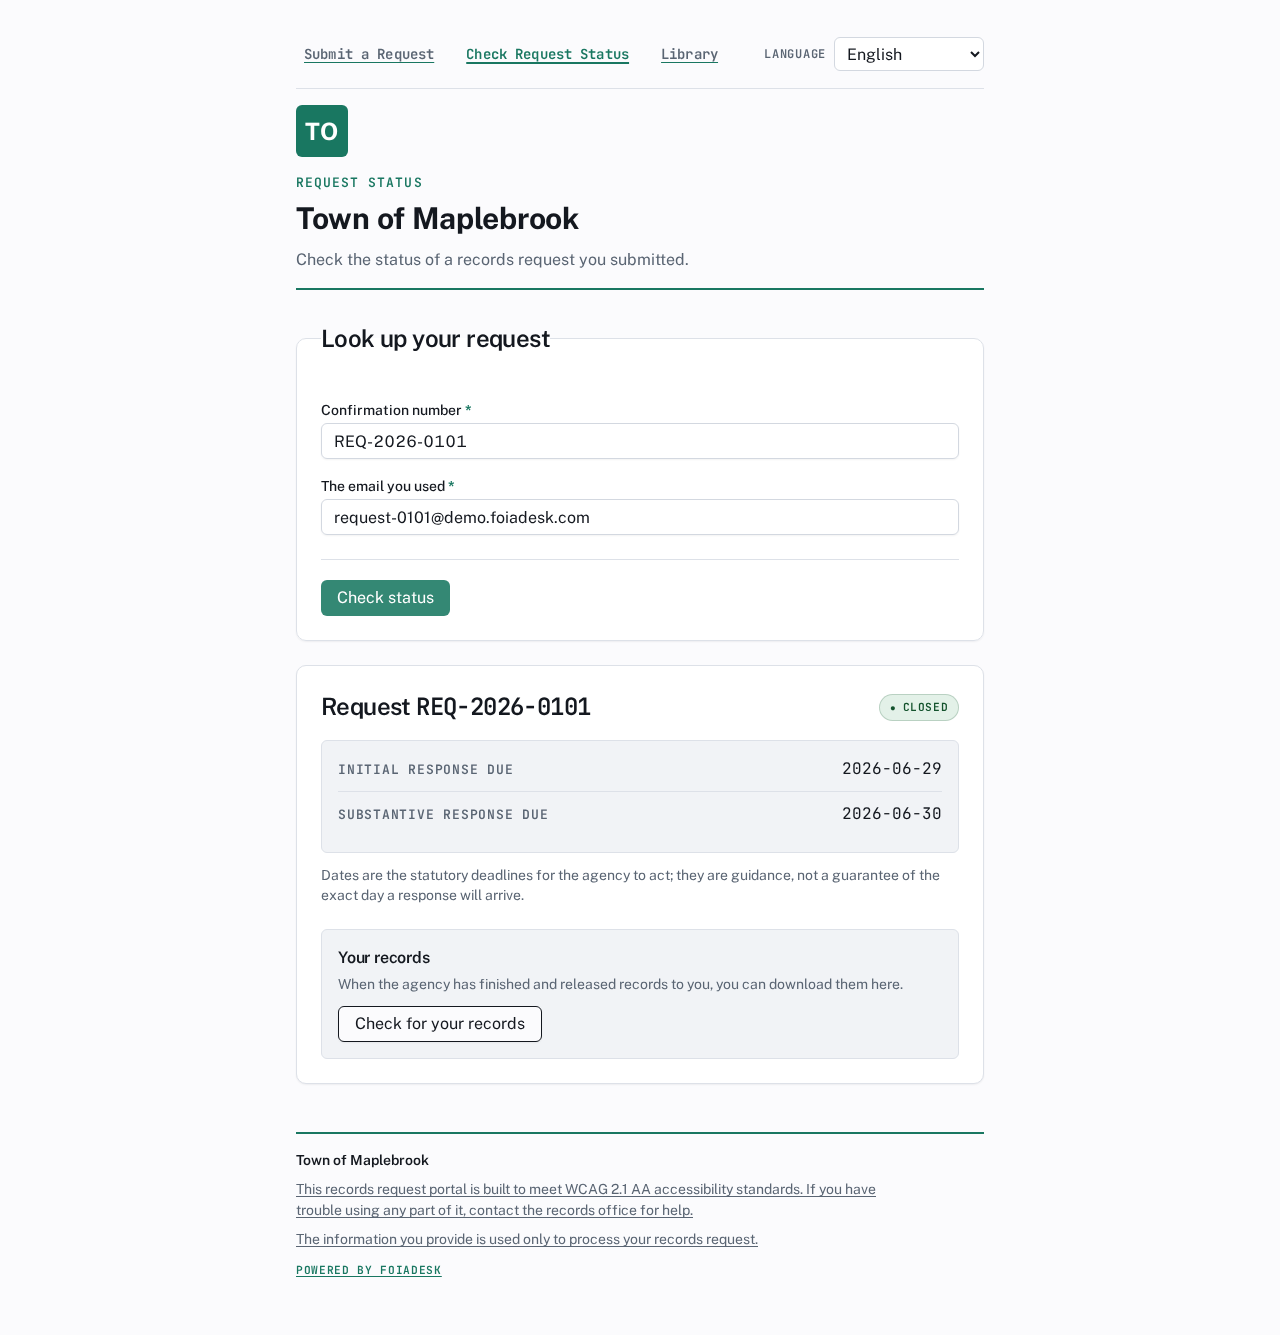
Step 4 — Track the deadline and close the loop
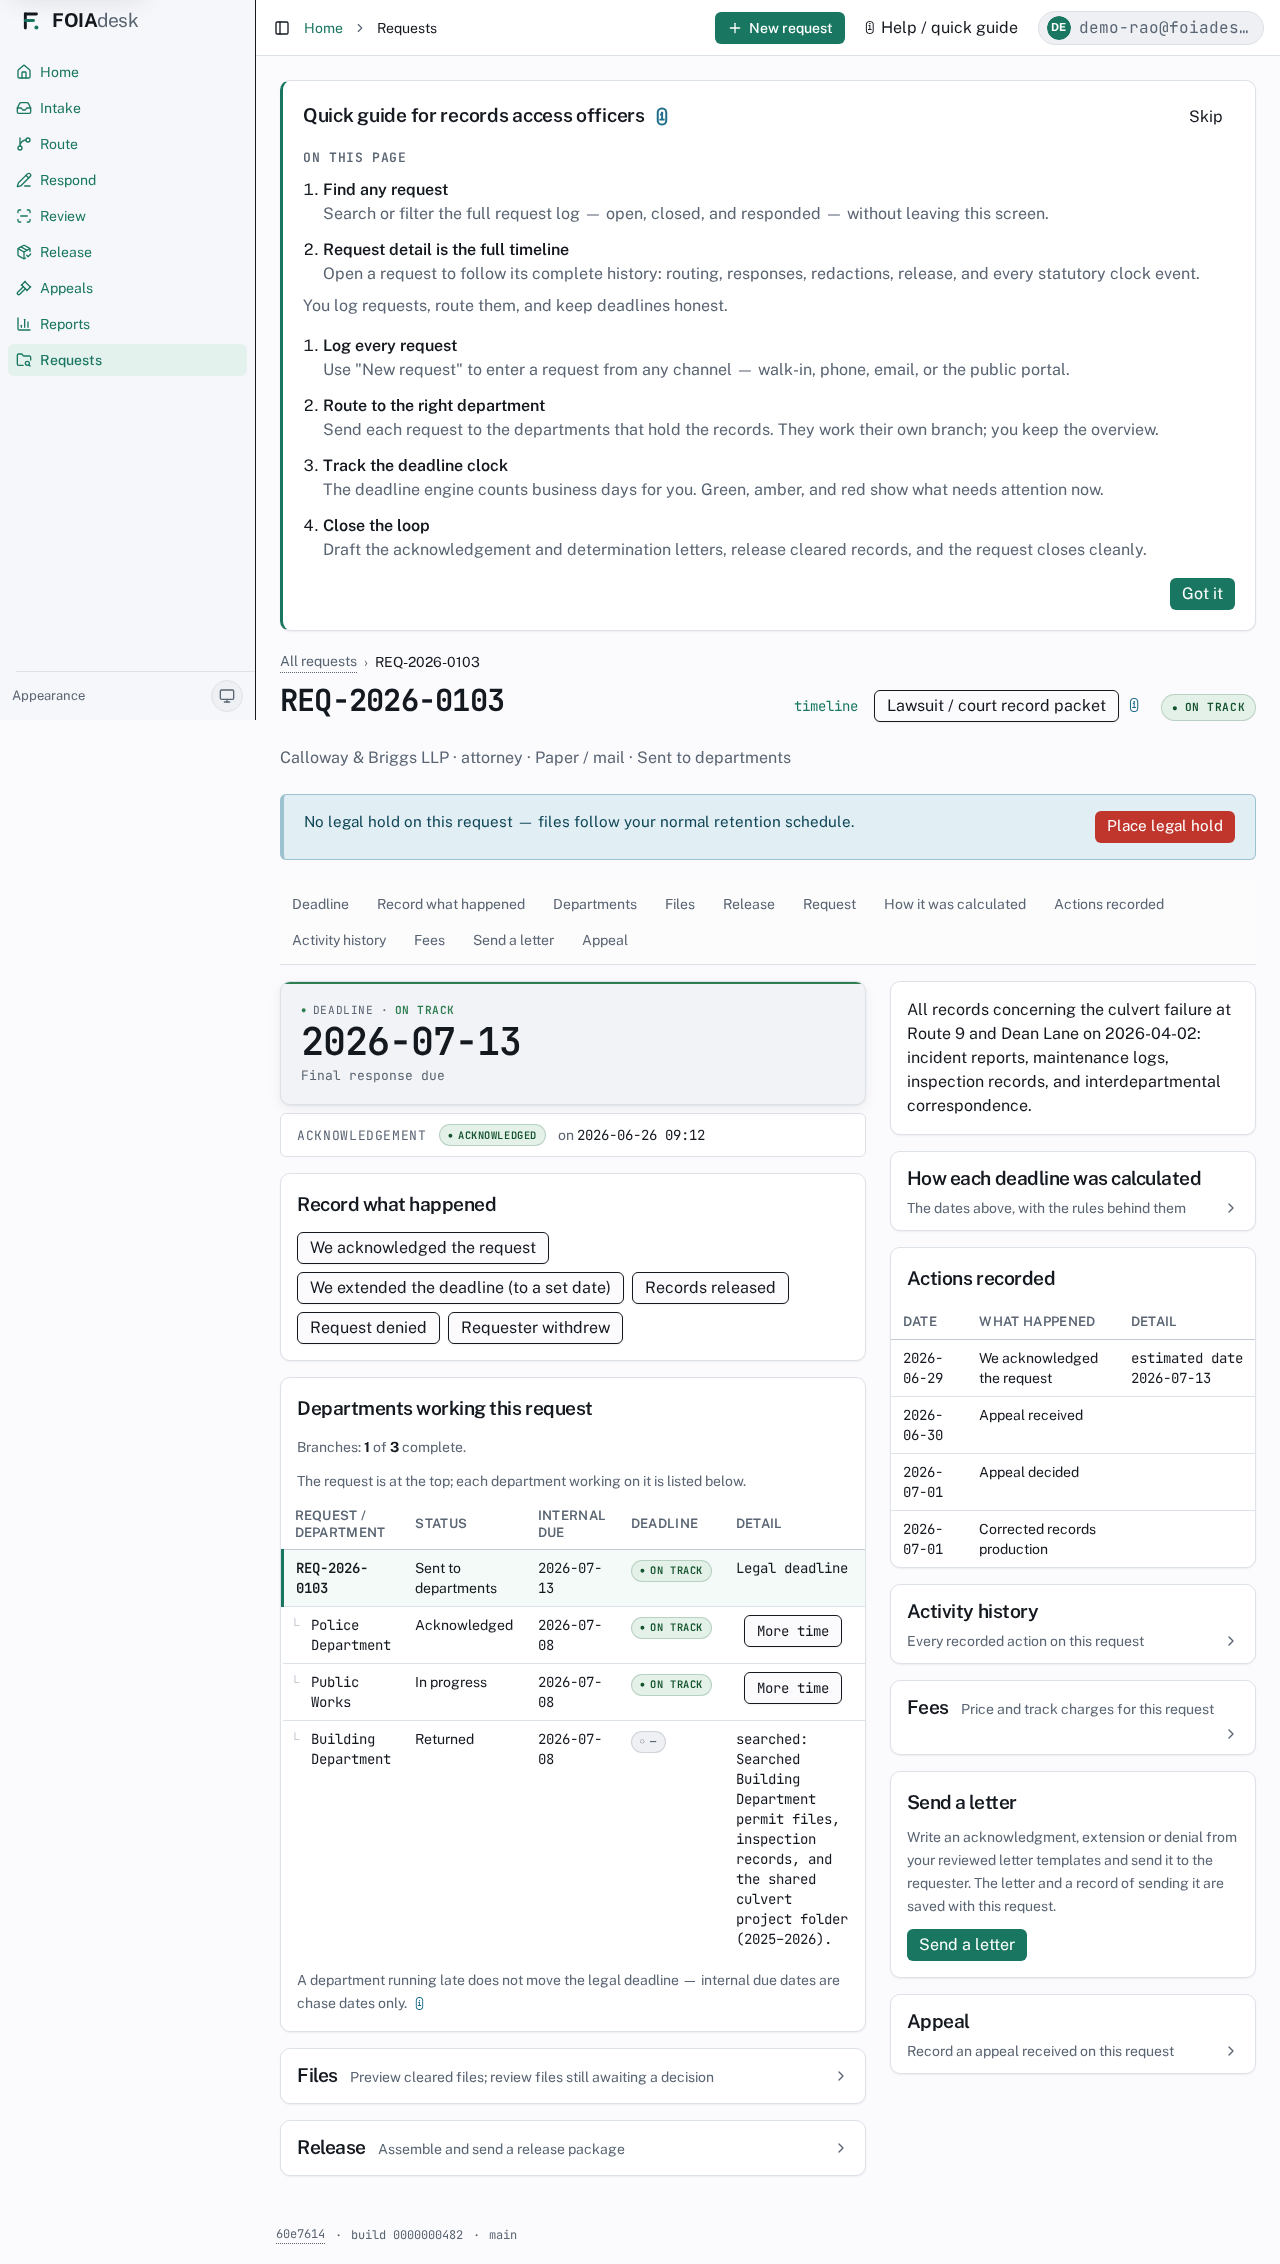
Open any request to reach its hub — the single screen where you see the deadline, record what happened, and act.
The request hub: deadline instrument, the actions you record, the departments working the request, and how each deadline was calculated.
The hub gives you:
The deadline instrument — the countdown and traffic-light state for this request.
Record what happened — log that you acknowledged, extended the deadline, released records, denied the request, or that the requester withdrew.
Departments working this request — each branch with its own internal due date and status, so you can see who is behind.
How each deadline was calculated — the plain-language math behind every date, for the record.
Activity history, Fees, Release, Send a letter, and Appeal.
Watch the traffic-light states across your queue and act before anything turns ◉ Overdue.
Fees and prepayment
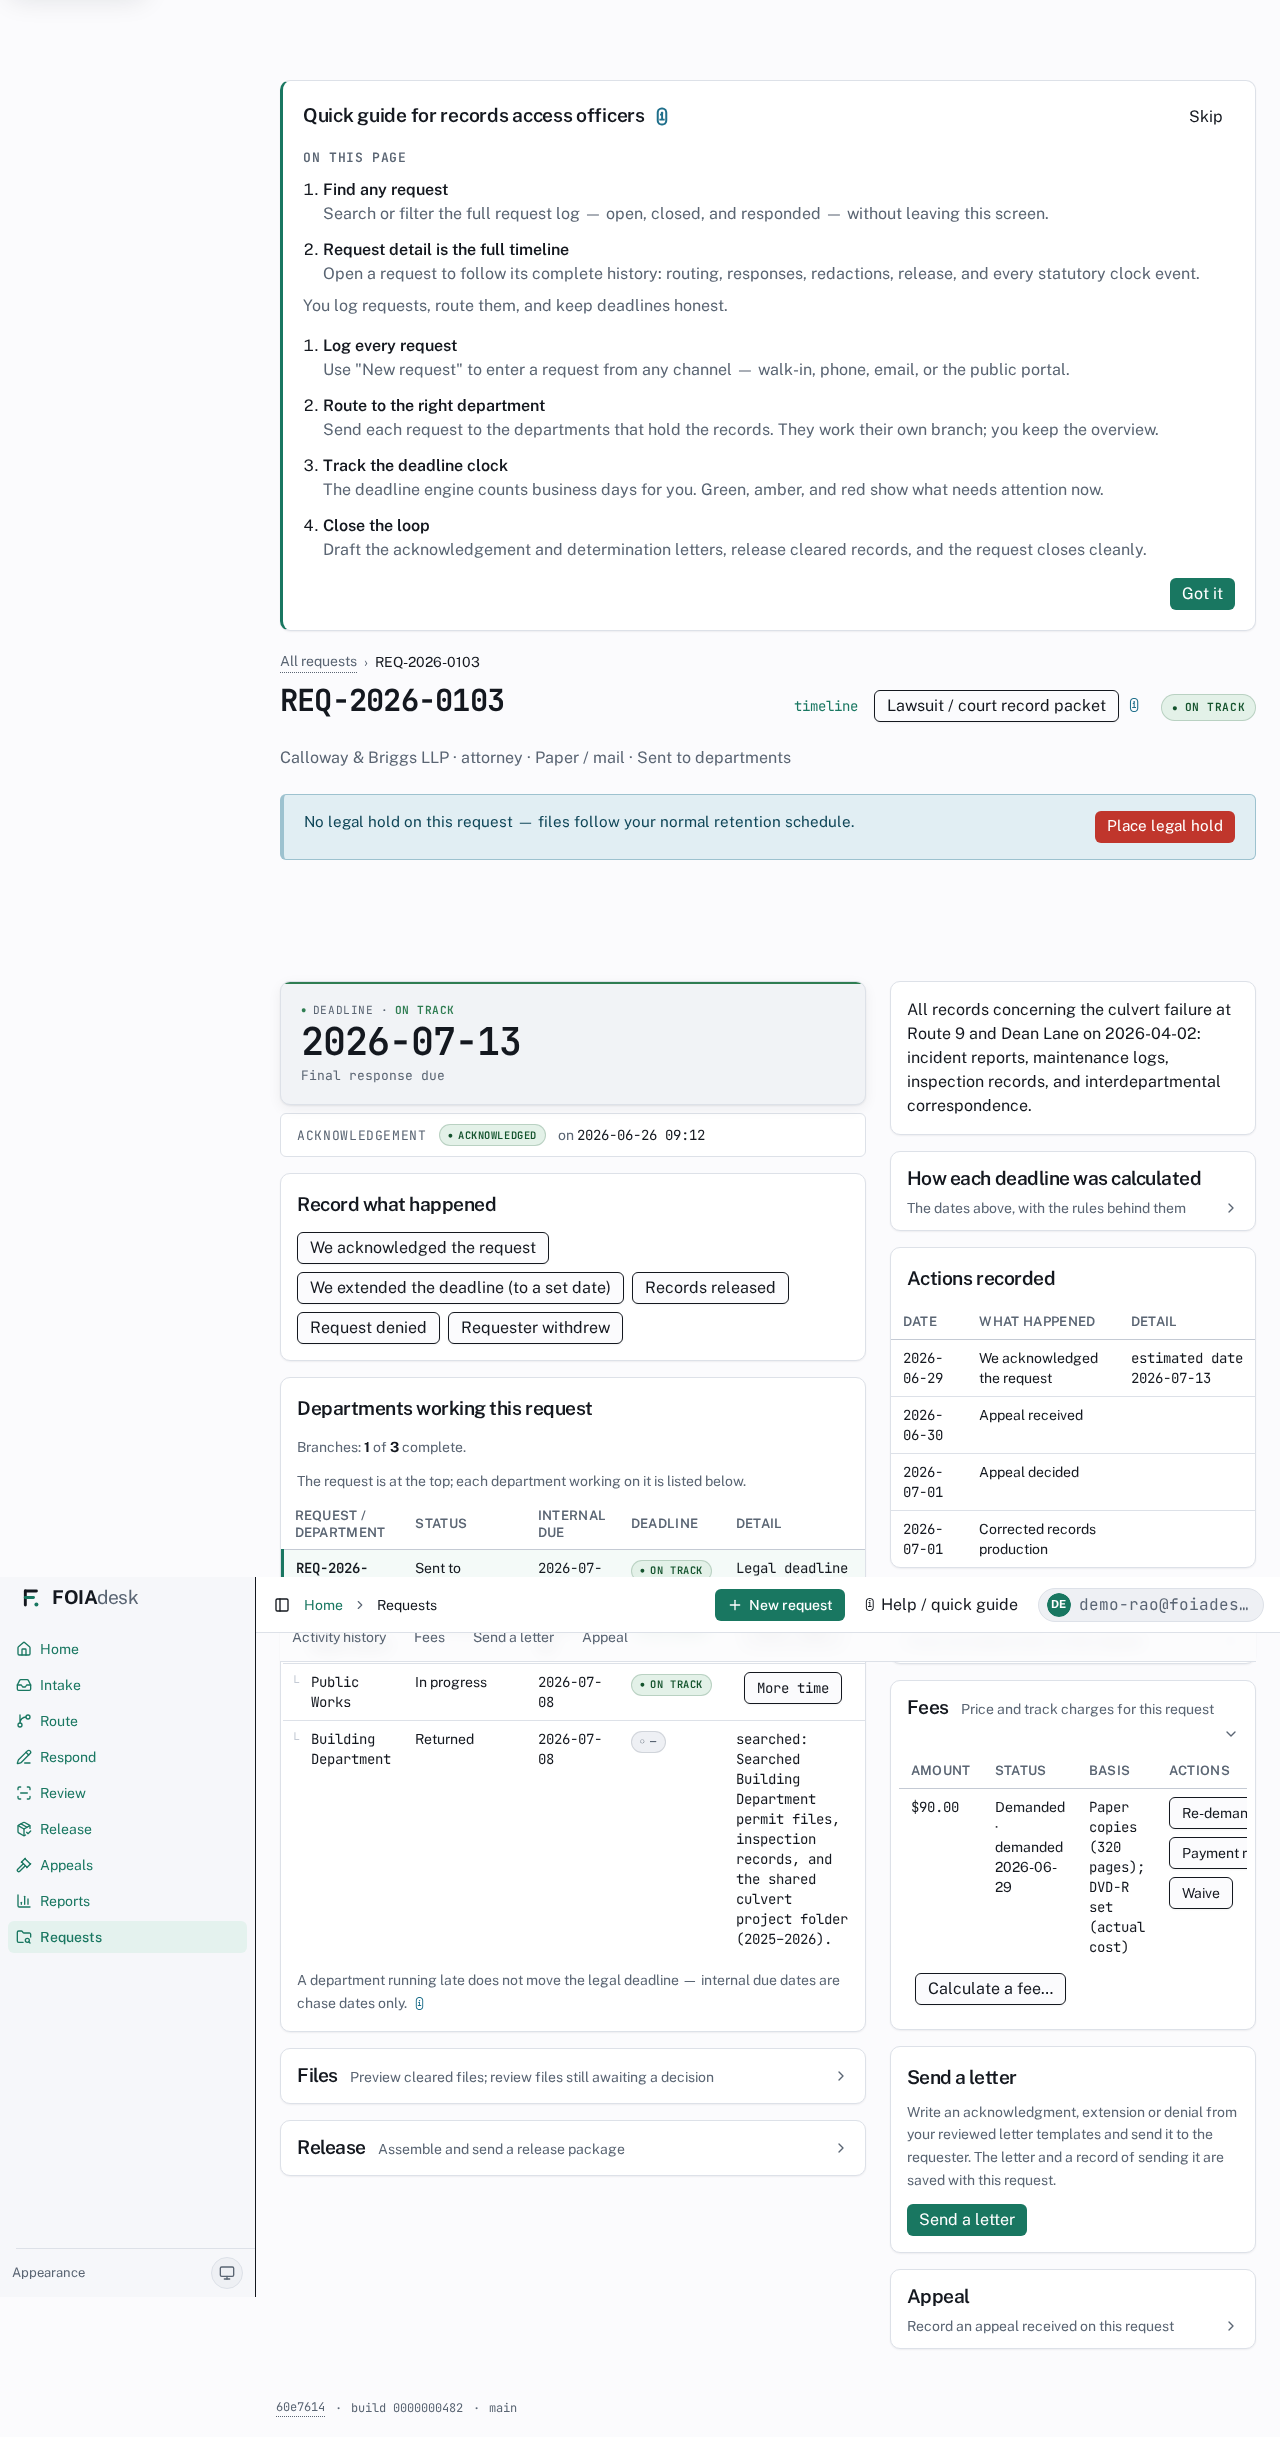
Open Fees on the hub to price and track charges for a request. FOIAdesk records fees — it does not collect payment. Your finance office still takes the money; the panel keeps the paper trail so the request's history is complete.
Click Calculate a fee… to open the calculator, enter what applies — paper pages, staff hours, postage, media, or another cost — and Record fee. The rates come from your agency's fee settings (for example $0.25 per page, with the first hours of staff time free), and a live preview totals the line items as you type. Each recorded fee lands in the ledger with an Amount, a Status, its Basis, and the actions you can take.
A fee moves through four statuses — ◐ Pending, Demanded, Paid, and Waived — using the buttons in the Actions column:
Send demand (it reads Re-demand if you have demanded once already) records that you have asked the requester to prepay.
Payment received marks the fee Paid once your finance office confirms the money is in.
Waive clears the charge without payment.
The Fees panel on a request: each charge with its amount, status, basis, and the Re-demand, Payment received, and Waive actions.
i
Demanding prepayment holds delivery, not the clock. When you demand prepayment, a banner reminds you that delivery is on hold until the payment is recorded — recording Payment received clears it. A fee never moves the statutory deadline; it only pauses handing the records over.
Waiving a fee
Use Waive on any fee you decide not to charge — a small de-minimis amount, a public-interest waiver, or a charge you would rather not pursue. Waiving takes effect immediately and does not hold delivery.
Your agency can also set a fee-waiver threshold in fee settings so that any charge at or under that amount is born waived — the line items are still recorded for the demand letter, but the balance is zero and no one has to click Waive. This automatic waiver is off unless an administrator sets a threshold above zero.
Step 5 — Send your letters
Close the loop from the same hub. Under Send a letter you produce the acknowledgement, extension, and determination letters the law requires.
In the request hub, find Send a letter.
Pick the letter type and review the generated draft.
Send it — a copy is saved to the request's record automatically.
The letters and notices your agency emails are styled with your branding (your name, logo, and accent colour) when you have set it, and a clean neutral FOIAdesk style otherwise — so what the requester receives looks like it came from your office.
Approving department letters
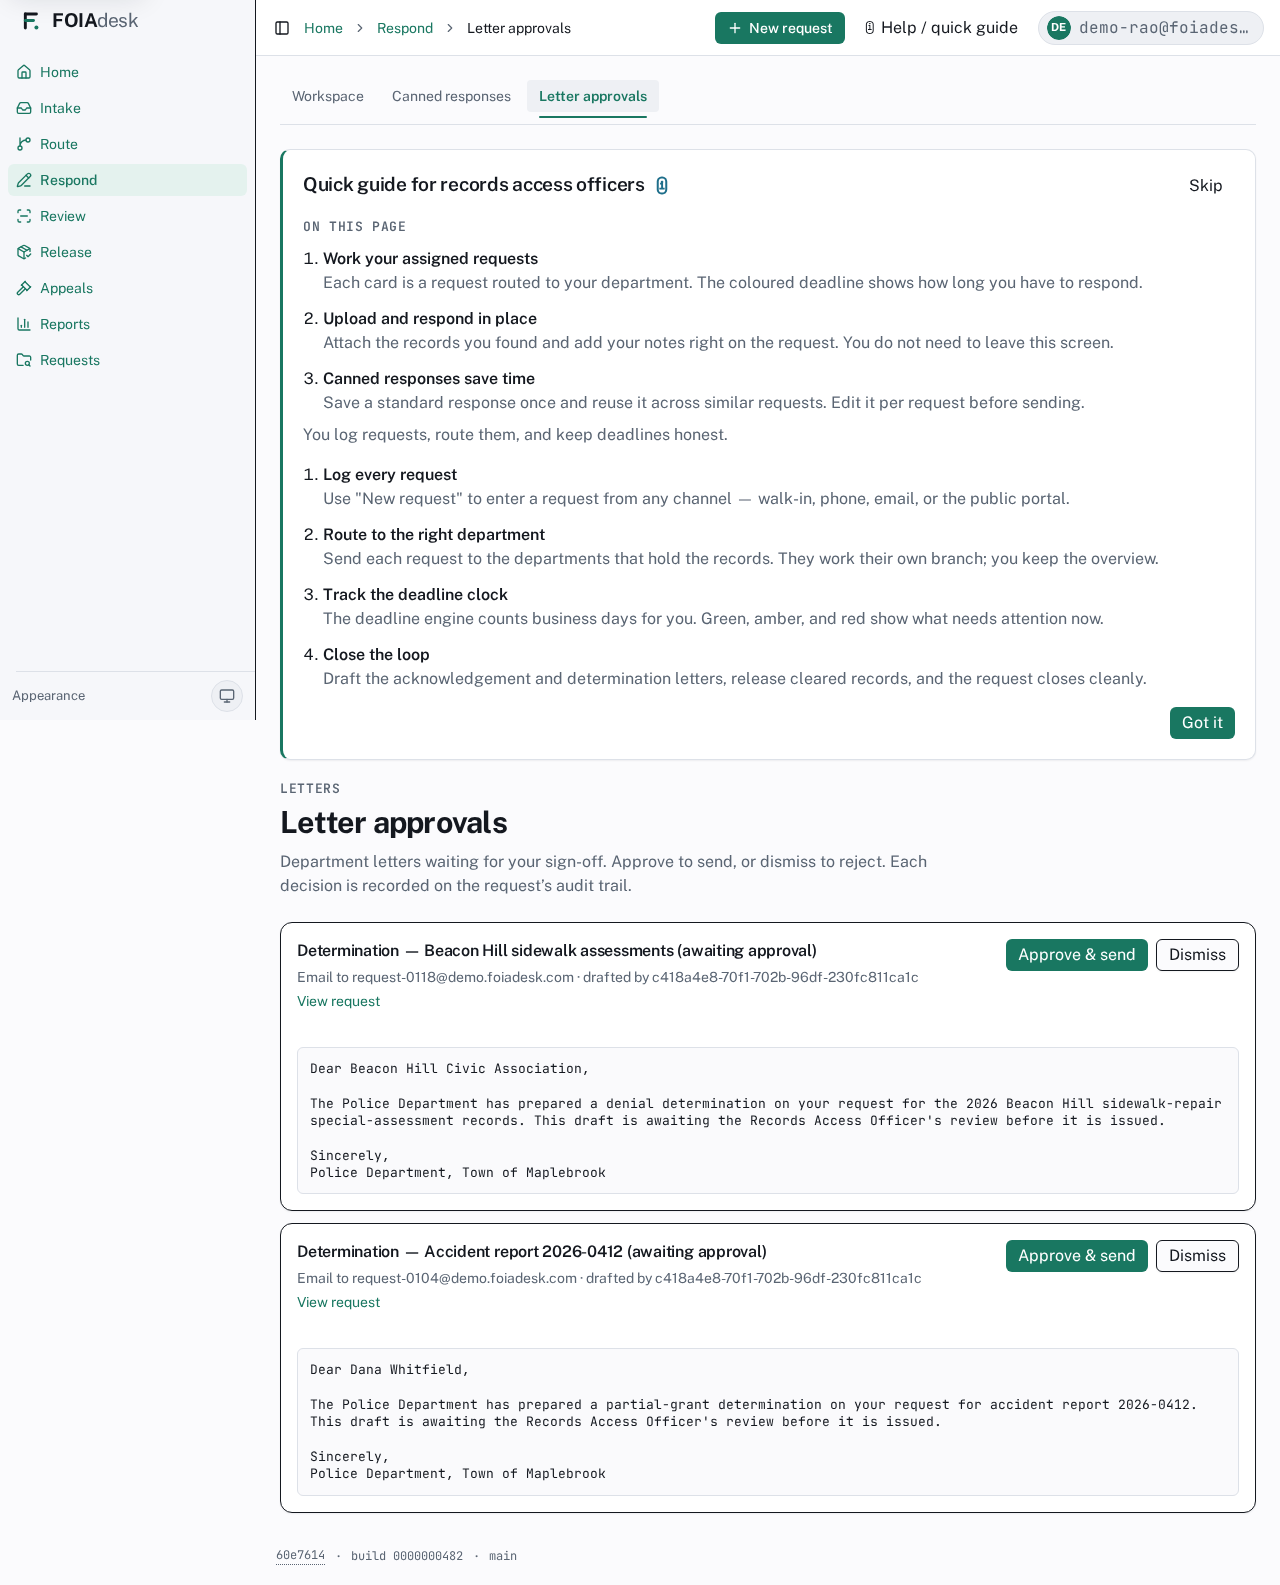
When a department responder drafts a determination or other letter, it does not go out on its own — it waits for your sign-off. Open Letter approvals (in the Respond area) to find every letter awaiting review.
Letter approvals: each pending letter shows who drafted it, where it will go, and a full preview, with Approve & send and Dismiss.
Each card shows the subject, who drafted it, whether it goes out as an email or a letterhead PDF, a View request link, and the full draft. Read it, then either:
Approve & send — FOIAdesk sends the letter (or produces the PDF) and records your approval on the request's audit trail.
Dismiss — reject the draft so it is never sent. You confirm first, and the decision is recorded too.
i
Only a records access officer approves. Department responders can draft letters, but the sign-off is yours. If your agency turns this requirement off, responders' letters send directly — otherwise they queue here for you.
i
If an address stops accepting mail. When an earlier email to a requester bounced or was marked as spam, an ⚠ Undeliverable badge appears next to that address — on the request and in the Send a letter window. It is a warning, not a wall: it never blocks you from sending, but it is your cue to reach the requester another way. (The badge shows colour + the ⚠ glyph + the word, never colour alone.)
Reusable canned responses
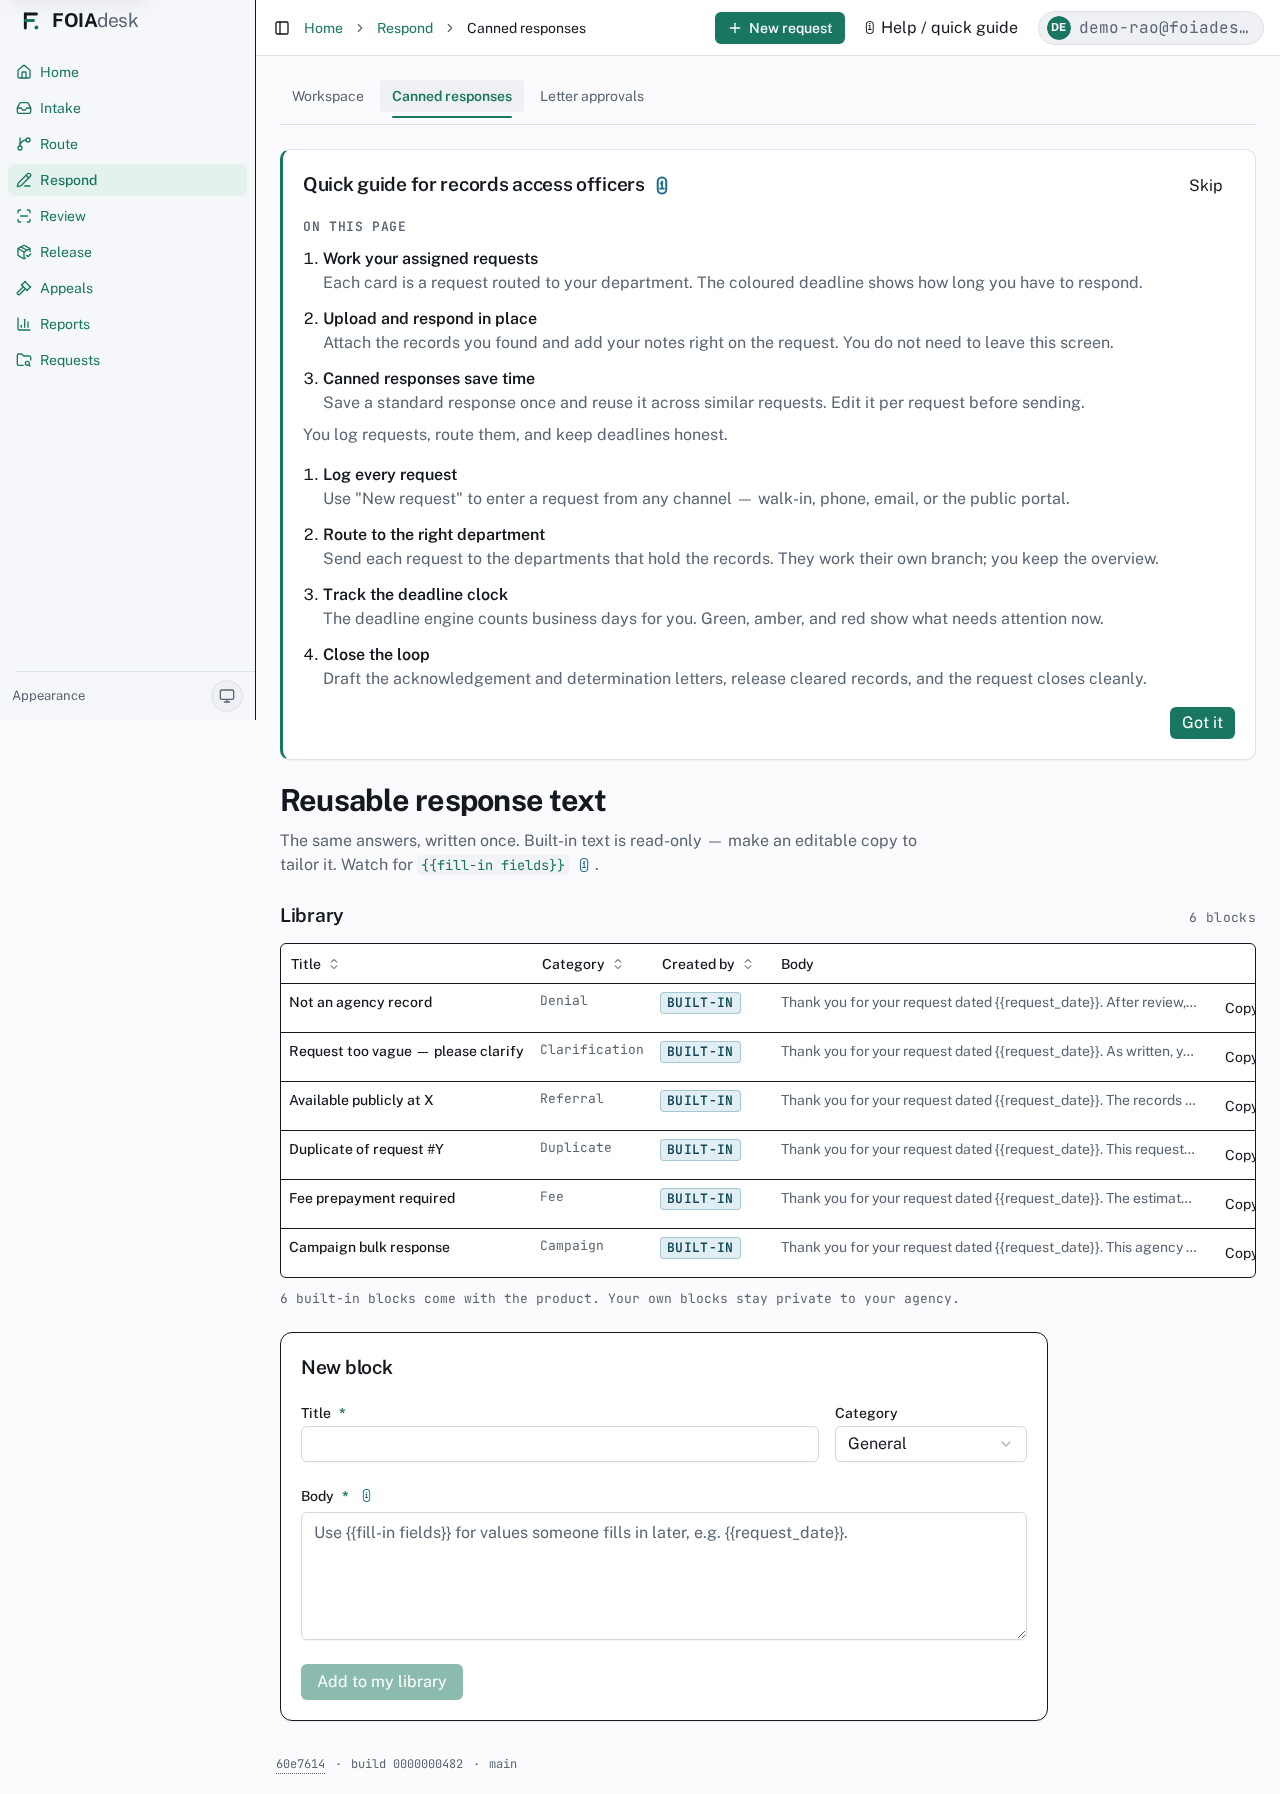
For the answers you write again and again — "not an agency record", "your request is too vague", "available publicly at…" — the Canned responses library (in the Respond area) keeps a stock of reusable text so you never retype them.
The Canned responses library: reusable text blocks with a title, category, and body, plus a form to add your own.
The library holds two kinds of block:
Built-in blocks ship with the product and cover the common replies (denial, clarification, referral, duplicate, fee, campaign). They are read-only — to tailor one, use Make an editable copy, which drops it into the editor below for you to change.
Your own blocks, which you create with New block and which stay private to your agency.
Watch for {{fill-in fields}} — placeholders like {{request_date}} stay in the text until you fill them when you use the block, so one saved answer fits many requests. Copy any block's text with Copy text, and edit or delete your own blocks at any time.
Tuning your alerts
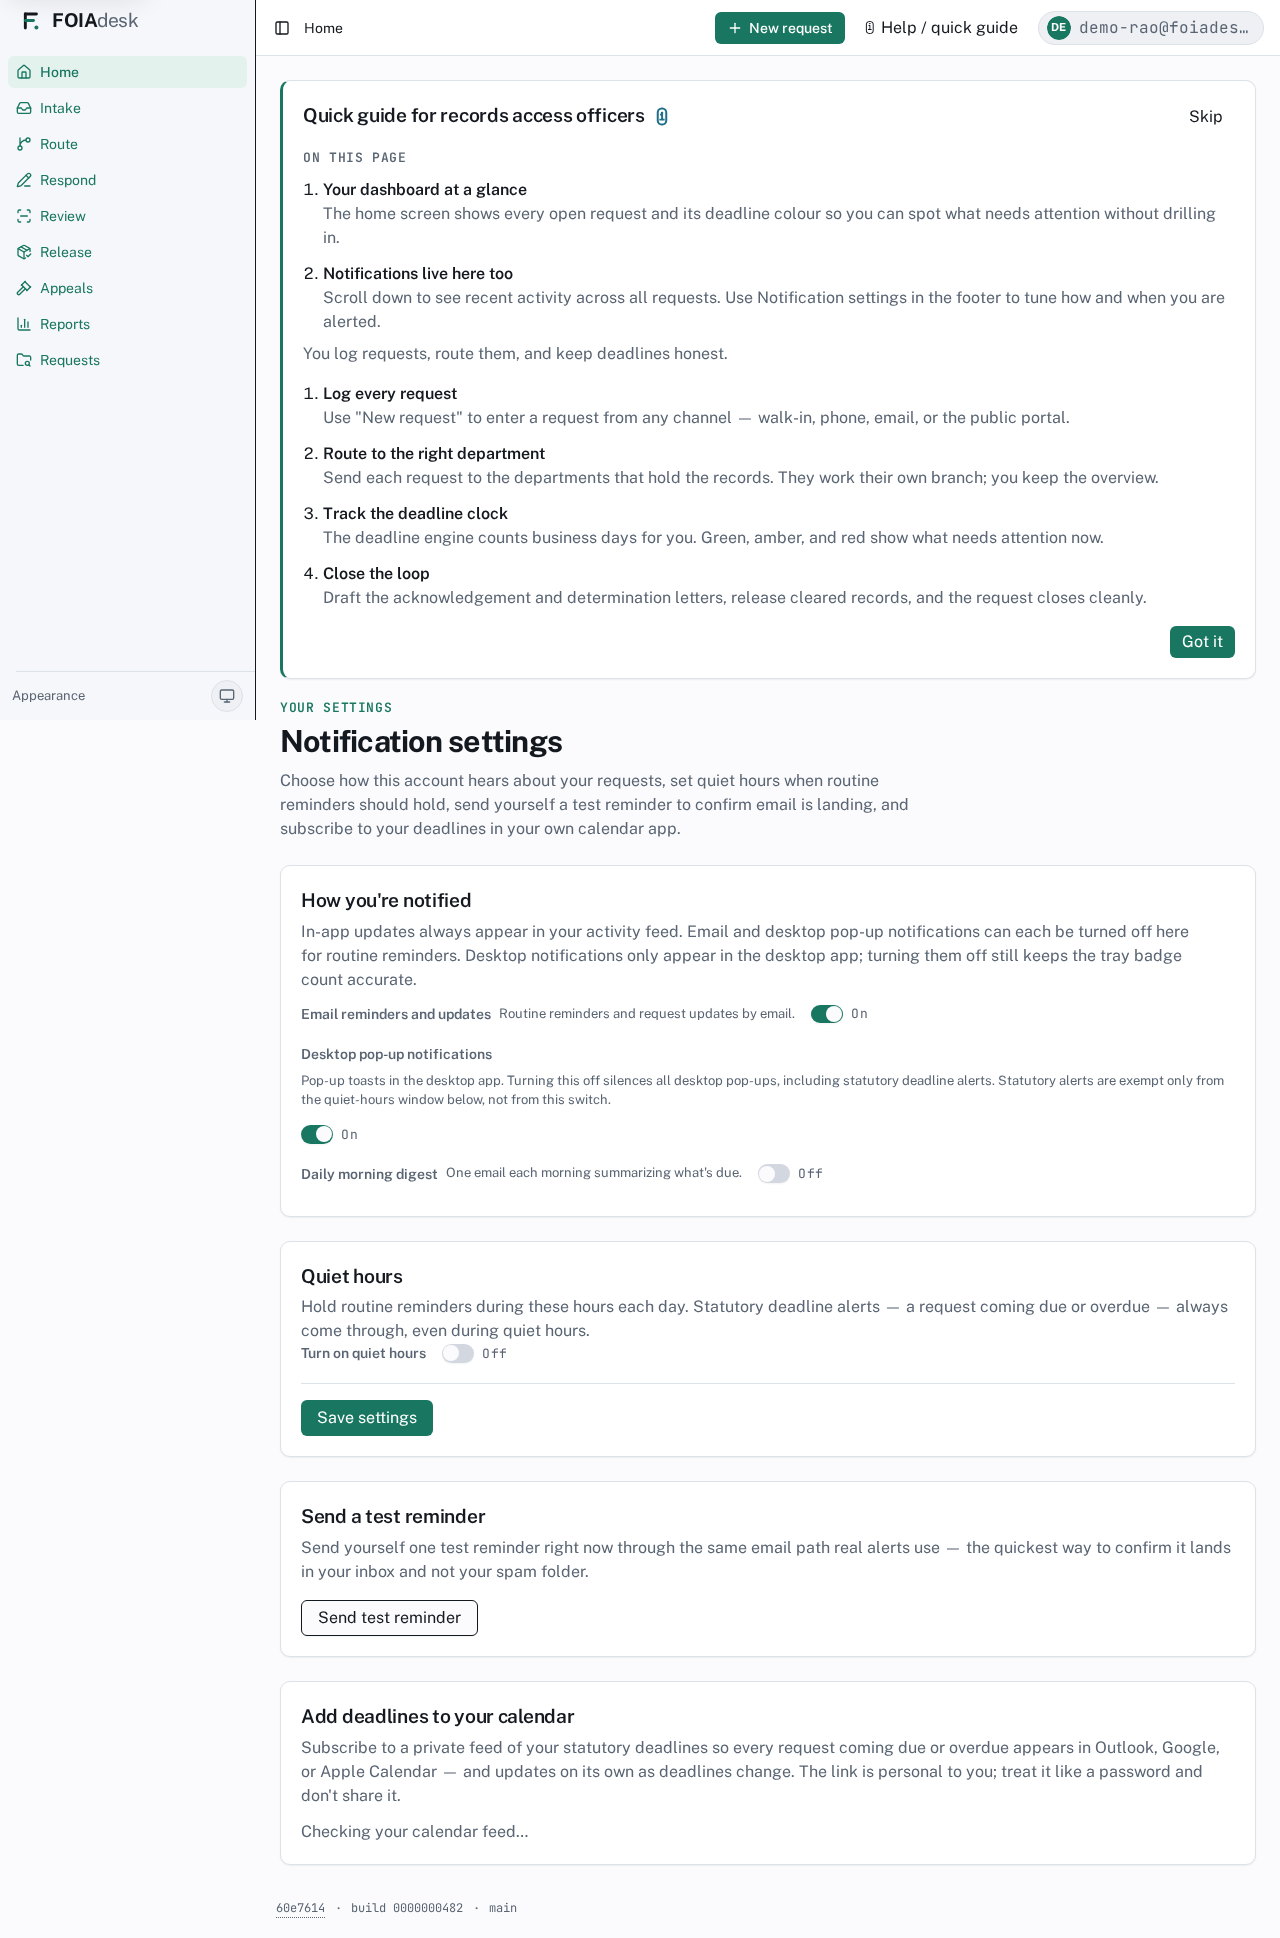
Choose how FOIAdesk tells you about your requests from Notification settings (in your account menu). Set it once and it follows you.
Notification settings: toggles for how you're notified, quiet hours, a Save settings button, a test-reminder button, and a calendar subscription.
How you're notified. In-app updates always appear in your activity feed. You can switch off routine Email reminders and updates and Desktop pop-up notifications, and turn on a Daily morning digest — one email each morning summarising what's due.
Quiet hours. Hold routine reminders during set hours each day. Statutory deadline alerts — a request coming due or overdue — always come through, even during quiet hours.
Save settings applies your choices; a Saved confirmation appears.
Send test reminder emails you one reminder right now, through the same path real alerts use — the quickest way to confirm they land in your inbox and not your spam folder.
Add deadlines to your calendar gives you a private feed to subscribe to in Outlook, Google, or Apple Calendar, so your statutory due dates show up there and update themselves. The link is personal to you — treat it like a password.
!
Statutory alerts are protected. Quiet hours only hold routine reminders. A request coming due or overdue always reaches you, so tuning your alerts can never make you miss a deadline.
✓
Everything lives on one request. Intake starts it, Route moves it, and the hub is where you acknowledge, track every branch, and send every letter — so the request's full history stays in one place.
◫ Department responder
Department responder
Everything you need is on one screen — your assignments, their deadlines, and the records you upload to answer them.
When a request reaches your department, it shows up in My assignments — a single workspace built just for you. There is no menu to navigate and nothing to set up. You see the work that's yours, act on it in place, and move on.
Your one screen
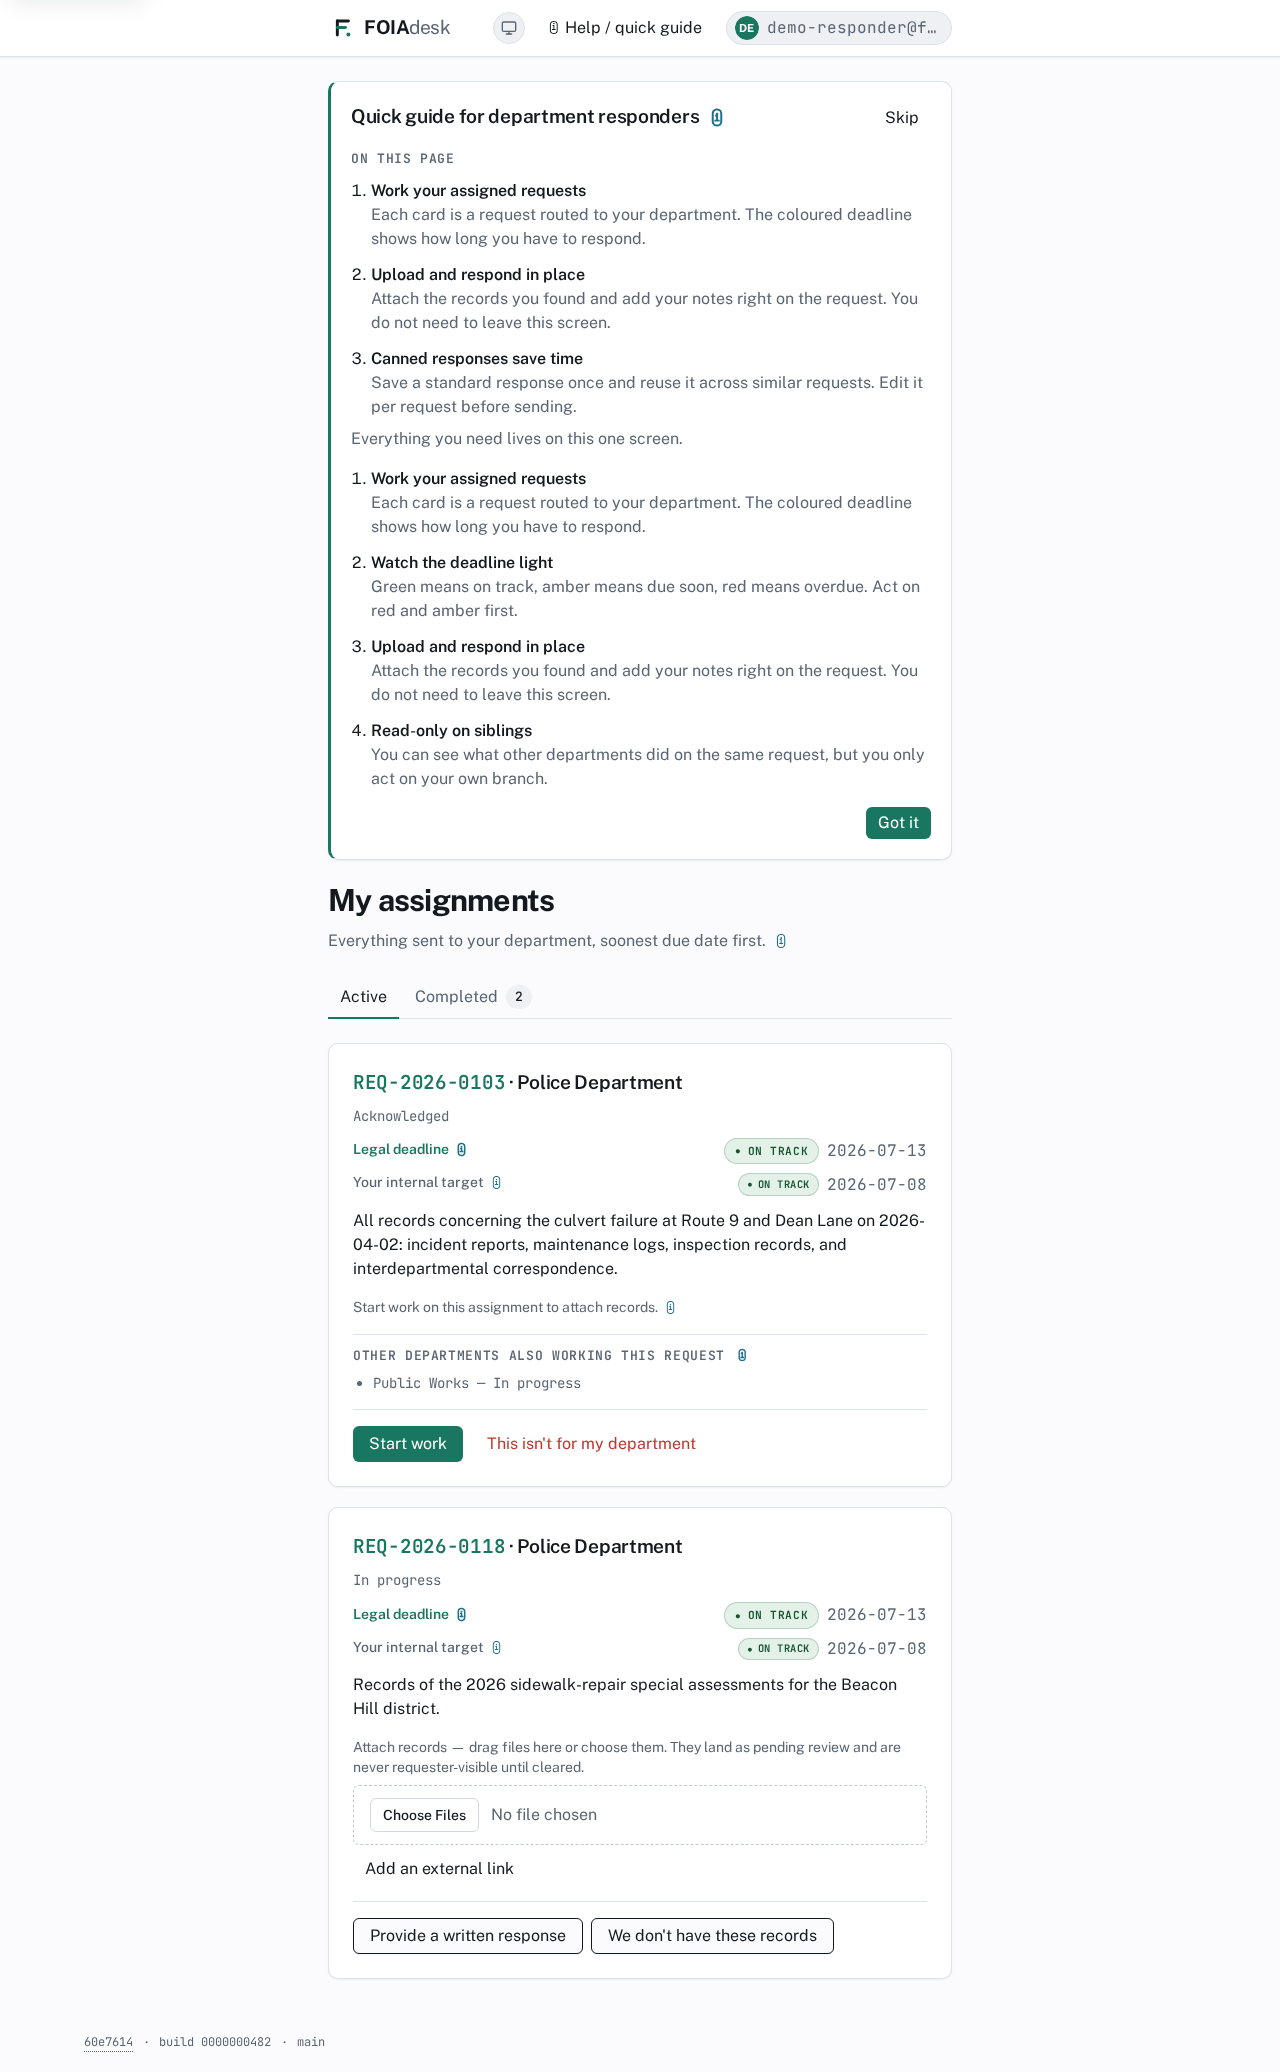
My assignments shows everything sent to your department, soonest due date first, across two tabs:
Active — the assignments you still have to work: newly routed, acknowledged, or in progress.
Completed — a read-only history of the branches you have finished, most recent first. A small count sits on the tab.
My assignments: the Active and Completed tabs, each card a request routed to your department with its legal deadline, your internal target, and the actions you take in place.
The single screen is the design, not a limitation. Responders get a deliberately focused workspace so the work is always in front of you and nothing competes for your attention. You never have to hunt for a request or learn where things live.
What to work on first
Each card carries two dates, each with its own traffic-light colour:
Legal deadline — the statutory date the agency must answer by. It sits on the request itself and never moves because a department runs late. Missing it is a legal violation.
Your internal target — the date your records officer wants your part back, set a few days earlier as a safety buffer. It is an internal goal, not the legal deadline.
Work the cards from the most urgent down.
✓
Act on ◉ Overdue cards first, then ◐ Due soon, and finally ● On track. The colour is the whole signal — you never have to calculate a date yourself.
Working an assignment
You handle each request without leaving this screen. A card moves through three steps, and the right buttons appear at each one.
Acknowledge the assignment so the agency knows you have picked it up.
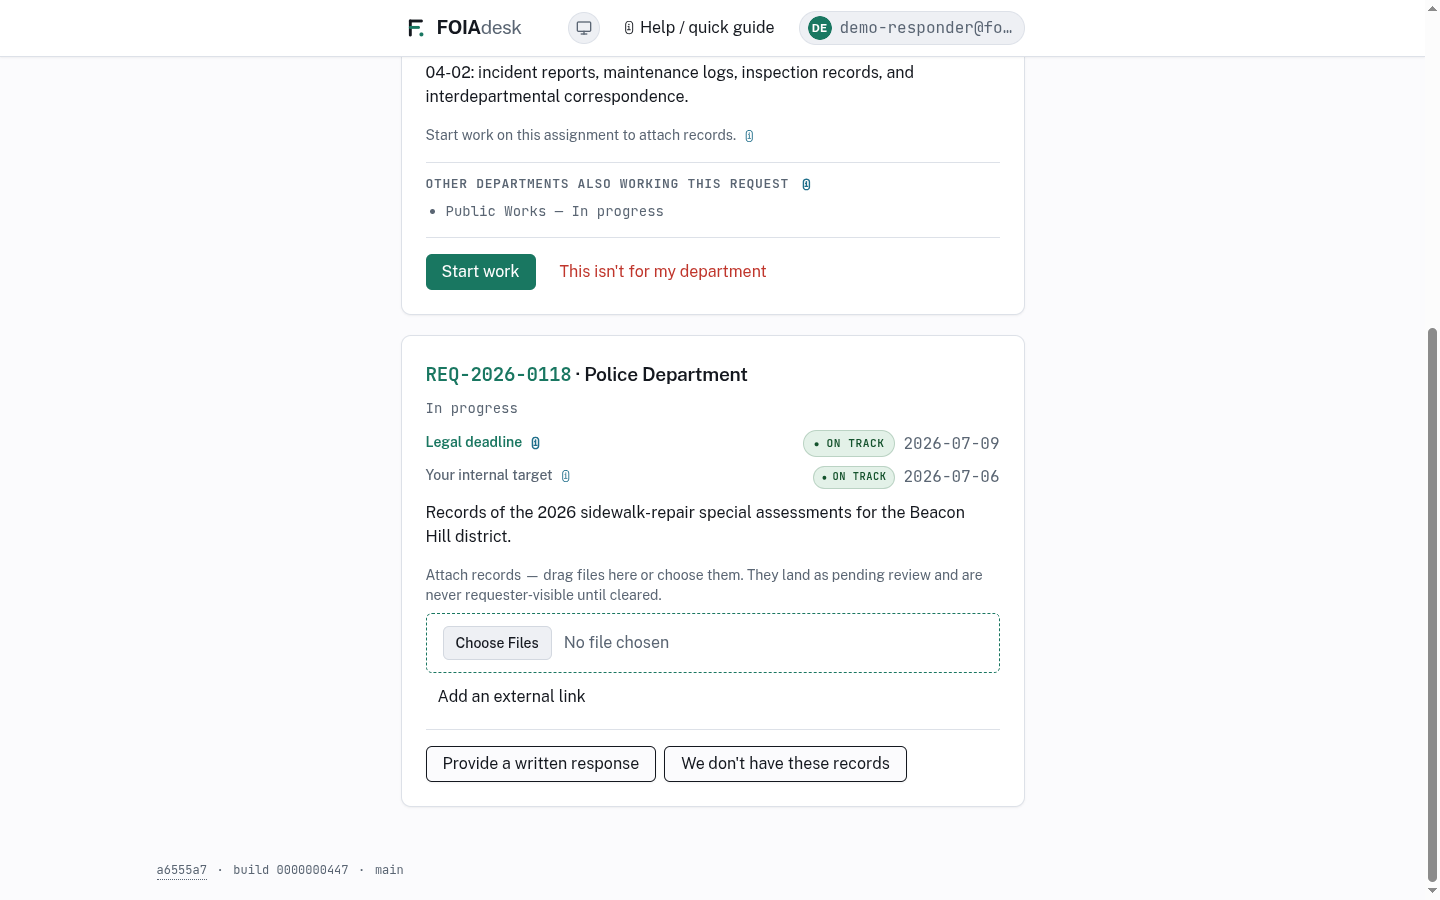
Start work — this unlocks the records area on the card. (Until you do, the card reads "Start work on this assignment to attach records.")
Gather the records your department holds, attach them, and finish your branch.
An assignment that has been started: the attach-records area with Choose Files and Add an external link, and the buttons that finish the branch.
Attaching records
Once you have started work, an Attach records area appears. Drop files into it or use Choose Files — they land as pending review and are never visible to the requester until a reviewer clears them. If a record lives somewhere else — a body-camera system or a shared drive — use Add an external link to attach the URL instead of a copy.
Each attached record shows its review state and virus-scan status, and lets you add three advisory flags — PII, Legal, or Exempt — to warn the reviewer what to look for. The flags are reminders only; they never block your work or decide anything on their own. You cannot redact or release a file yourself — that is the reviewer's job downstream.
Finishing your branch
When your records are attached, close out your part of the request with the button that fits the situation:
These are all my records — the everyday finish. You confirm with a short note (for example, "All 12 responsive emails and the permit file are attached"), and the branch returns to the records officer and moves to your Completed tab.
Provide a written response — when the answer is words, not files. Pick a starting point (write your own, or a saved canned response) and type your response. Choose Record this response to log it for the records officer, or Record & draft a letter to also write to the requester — that letter is held for the records officer to approve before it goes out.
We don't have these records — when your department holds nothing responsive. You note where you looked, and the branch closes with that attestation.
✓
For requests you answer the same way again and again, the canned response picker in Provide a written response drops a saved block of text straight in, ready to tailor — no retyping.
Seeing the rest of the request
A request can go to more than one department at once. Your card shows a read-only note — Other departments also working this request — with each sibling's status, so you can see what they have done. You only ever act on your own branch; sibling departments' work is there for context, never for you to change.
i
What you attach and note stays on your department's part of the request. Other departments handle theirs the same way, and a records officer brings it all together at the end.
If it isn't yours
Sometimes a request is routed to the wrong department. When that happens — before you start work, and while no files are attached — use This isn't for my department instead of acknowledging it. You give a short reason ("These records belong to Public Works"), then Send back to the records officer. The branch leaves your queue and returns for re-routing. The agency's deadline for the request keeps running the whole time, so send it back promptly.
◰ Reviewer
Reviewer
You decide what is released, redacted, or withheld — document by document, before anything reaches a requester.
The reviewer workspace is Review in the left navigation. Your job is to work through the files responders have gathered, read each one, black out anything exempt, and set a disposition — release, redact, or withhold. Nothing reaches a requester until you have cleared it.
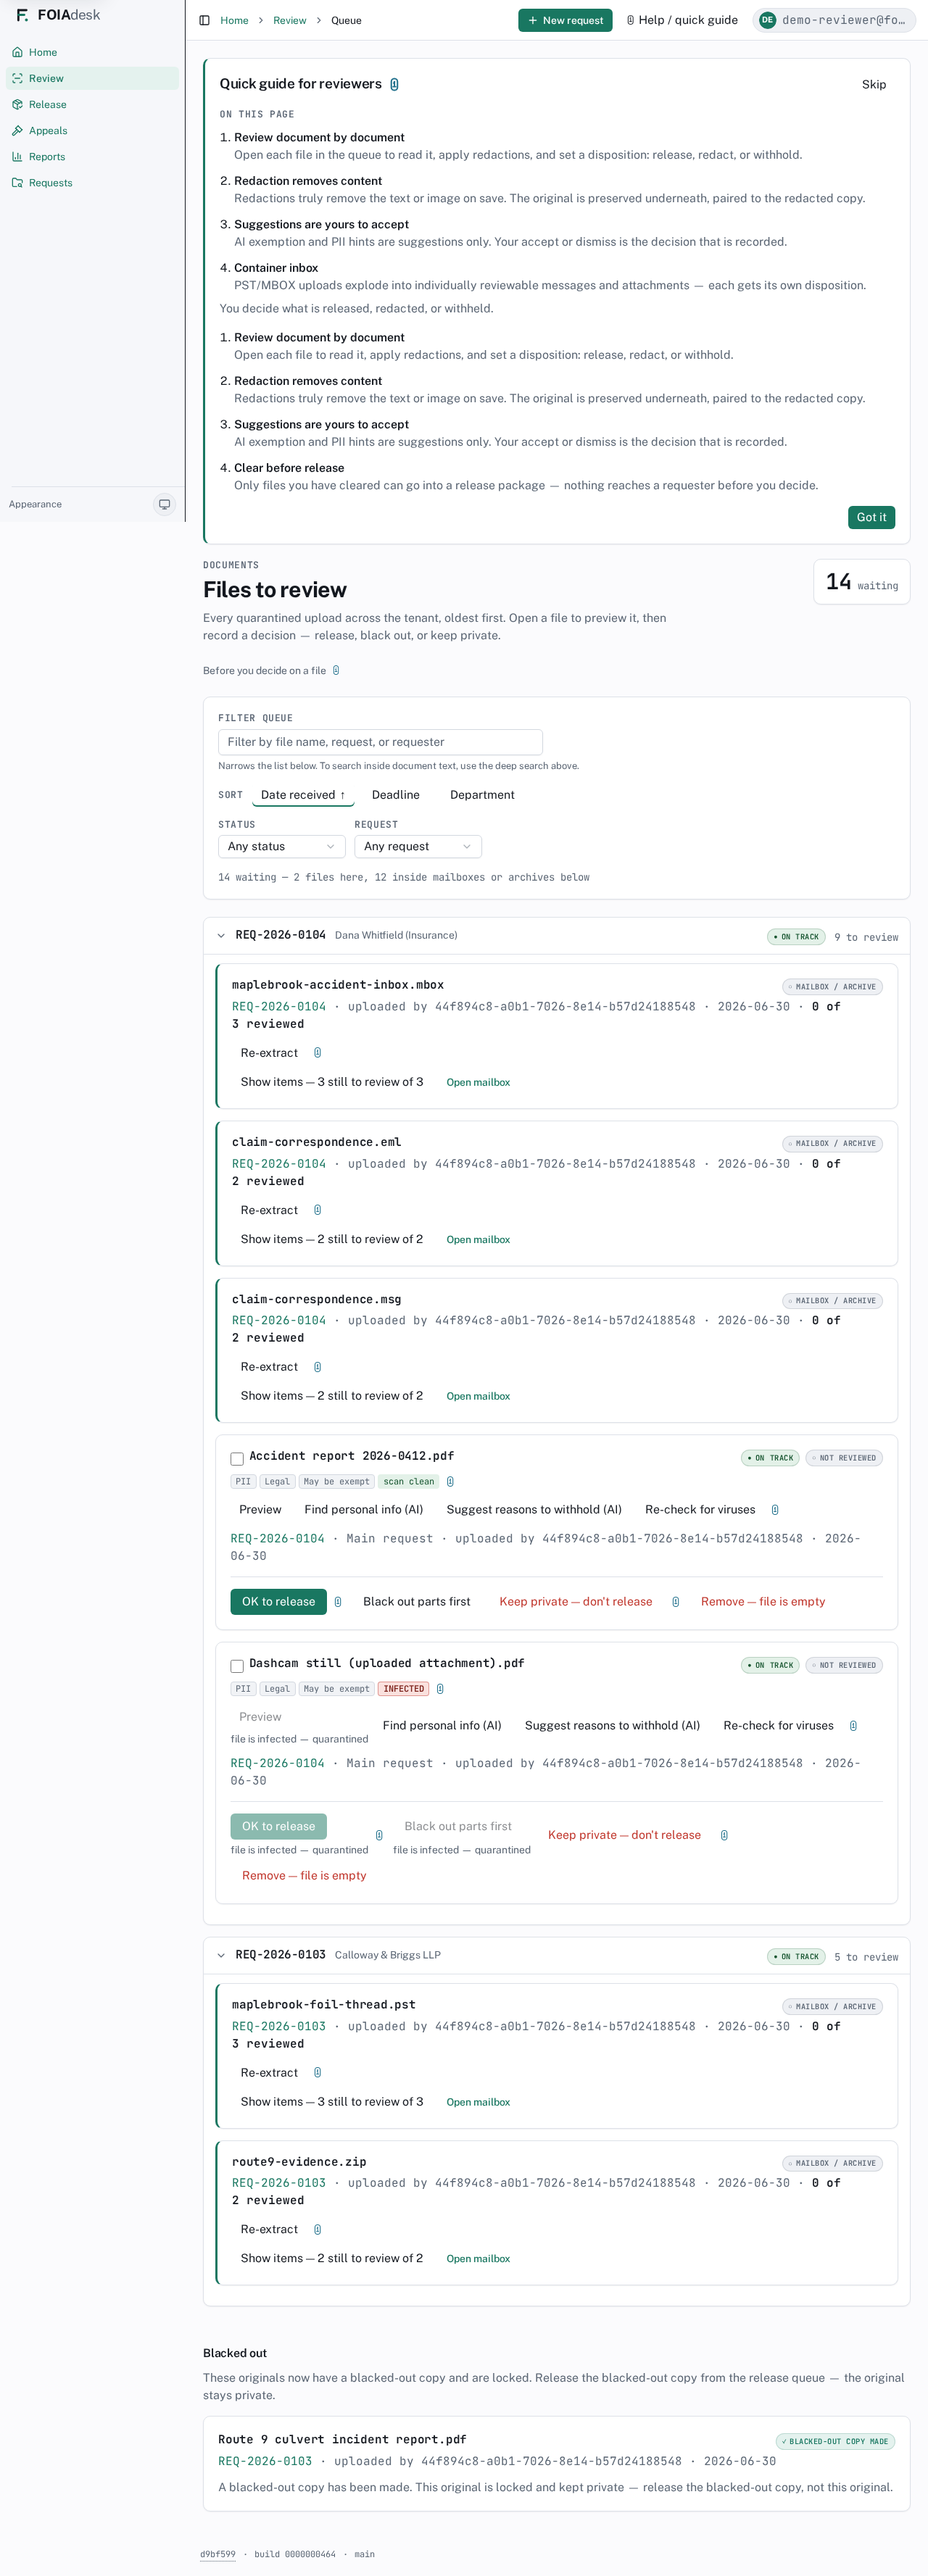
Your review queue
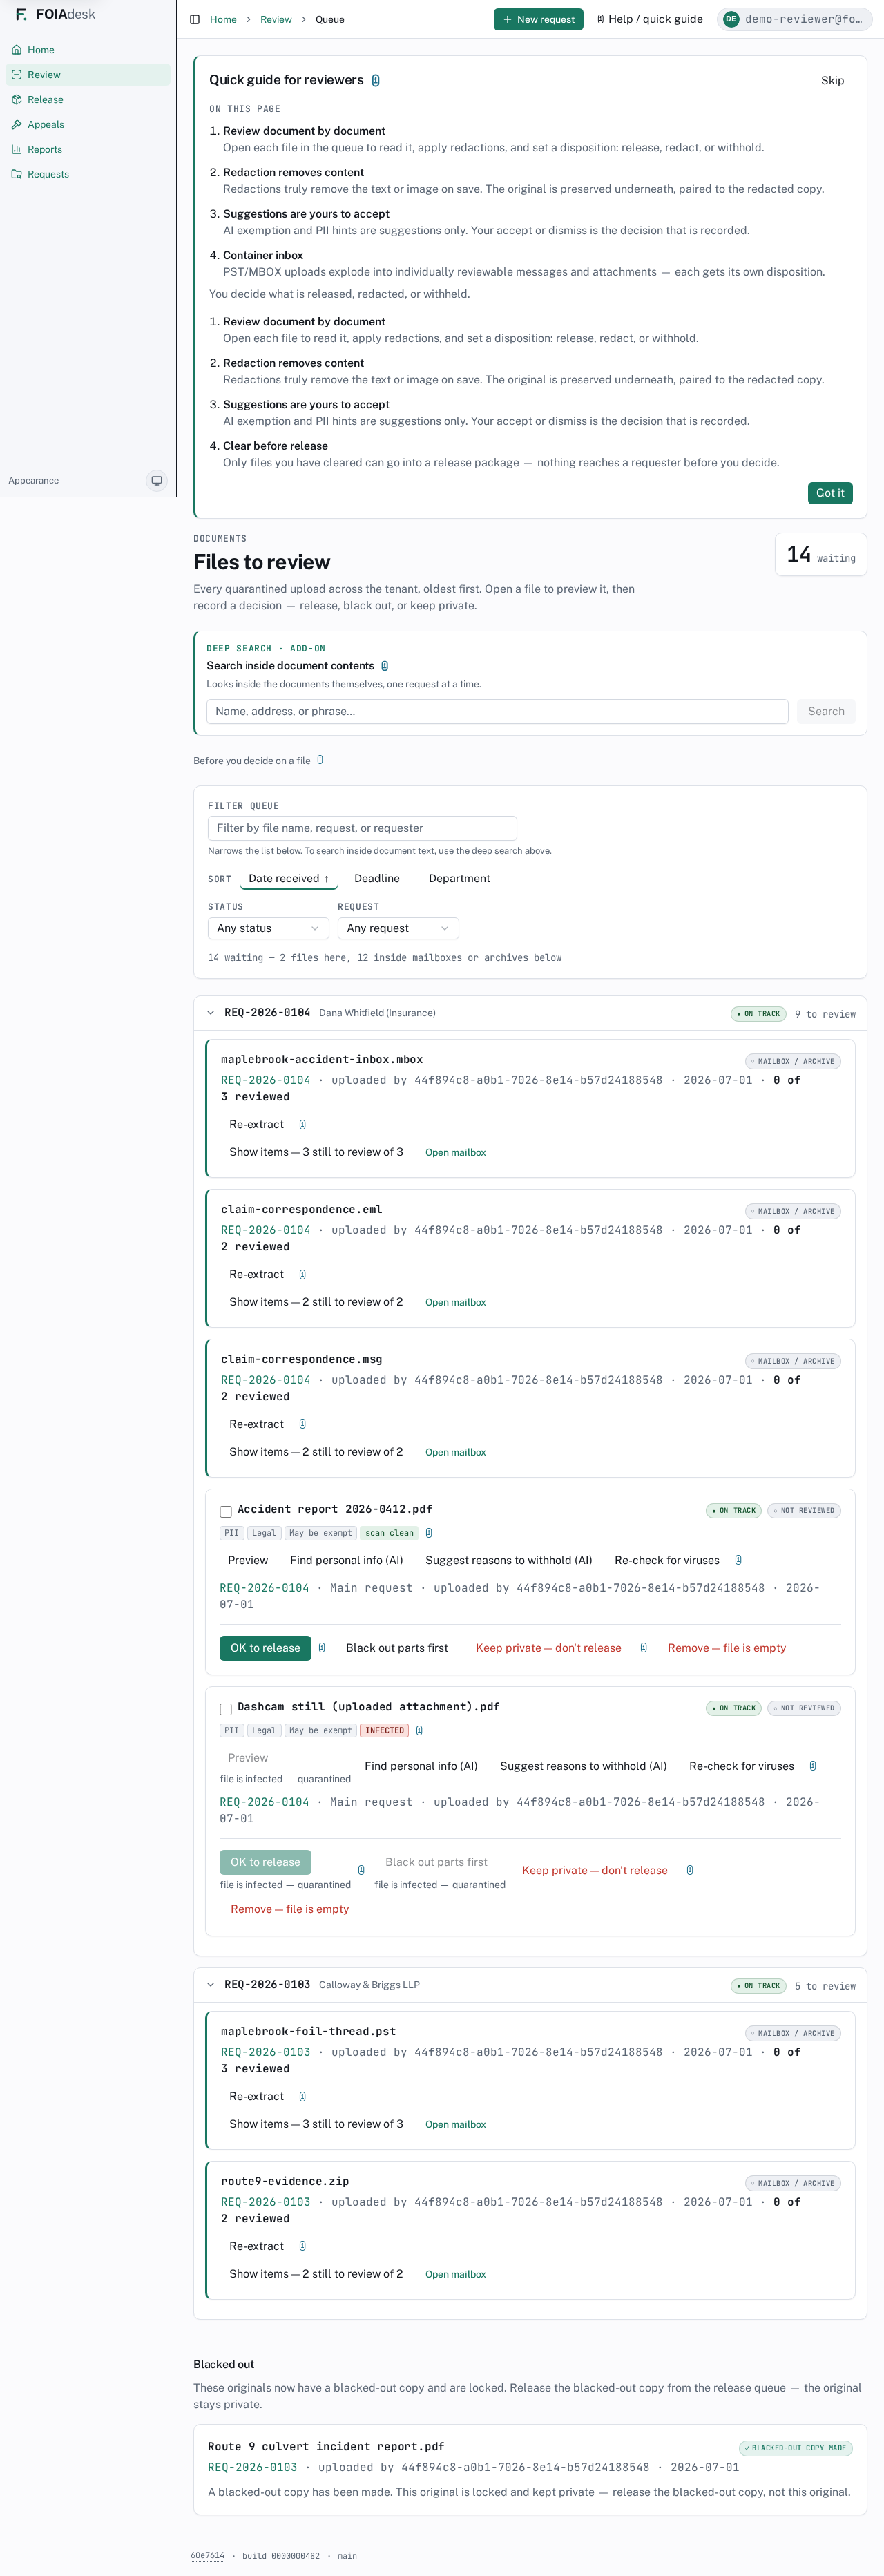
Files to review lists every upload waiting for a decision, oldest first, grouped by request. The counter at the top right shows how many files are still waiting. A single file appears as its own card; a mailbox or archive appears as a container card you step inside (see Mailboxes and other containers below). A line under the filters spells the split out for you — for example, 14 waiting — 2 files here, 12 inside mailboxes or archives below.
Files to review: the waiting counter, deep-search box, filter and sort controls, files grouped by request, and container cards you open to review the items inside.
Each file card carries:
Content badges — small tags such as PII, Legal, or May be exempt that flag what the file may contain, plus its scan result (scan clean or INFECTED).
Its request's traffic-light status and a NOT REVIEWED marker until you act.
An actions row: Preview, the AI assist buttons, and Re-check for viruses.
The disposition controls — the decision you record for the file.
Narrow the queue
Use Filter queue to narrow the list by file name, request, or requester — it filters the cards you see, it does not read inside the files. Sort reorders the queue by Date received, Deadline, or Department, and the Status and Request dropdowns let you show just one request or one review state at a time.
Find a file by its content
Above the queue, Search inside document contents reads the text within your files — type a name, an address, or a phrase and open the matches directly, one request at a time. The search only ever reaches your own agency's records; there is no path to another agency's files.
i
Deep content search is an add-on. The search-inside box is labelled Deep search · Add-on — it is available when your agency has the content-search add-on turned on. The plain Filter queue box above always works and searches file names, requests, and requesters.
Setting a disposition
Work one file at a time. Open and read each file with Preview, then record one of four decisions on its card:
A file card with its badges, the AI assist and Re-check for viruses actions, and the four decision buttons: OK to release, Black out parts first, Keep private — don't release, and Remove — file is empty.
OK to release — the file is clean as-is and can go into a release package.
Black out parts first — opens the black-out editor so you can remove exempt text before it is released (see Blacking out exempt content).
Keep private — don't release — withholds the file; you record the legal reason (see Withholding with a legal reason).
Remove — file is empty — drops a file that has no responsive content, so it never clutters the release.
The labels are deliberately plain, and the decision you click is what the audit trail records.
i
AI hints are suggestions only.Find personal info (AI) and Suggest reasons to withhold (AI) mark up likely PII and possible exemptions, but they never change a file on their own. Your accept or dismiss is the decision that is recorded — the human action is always the audit event.
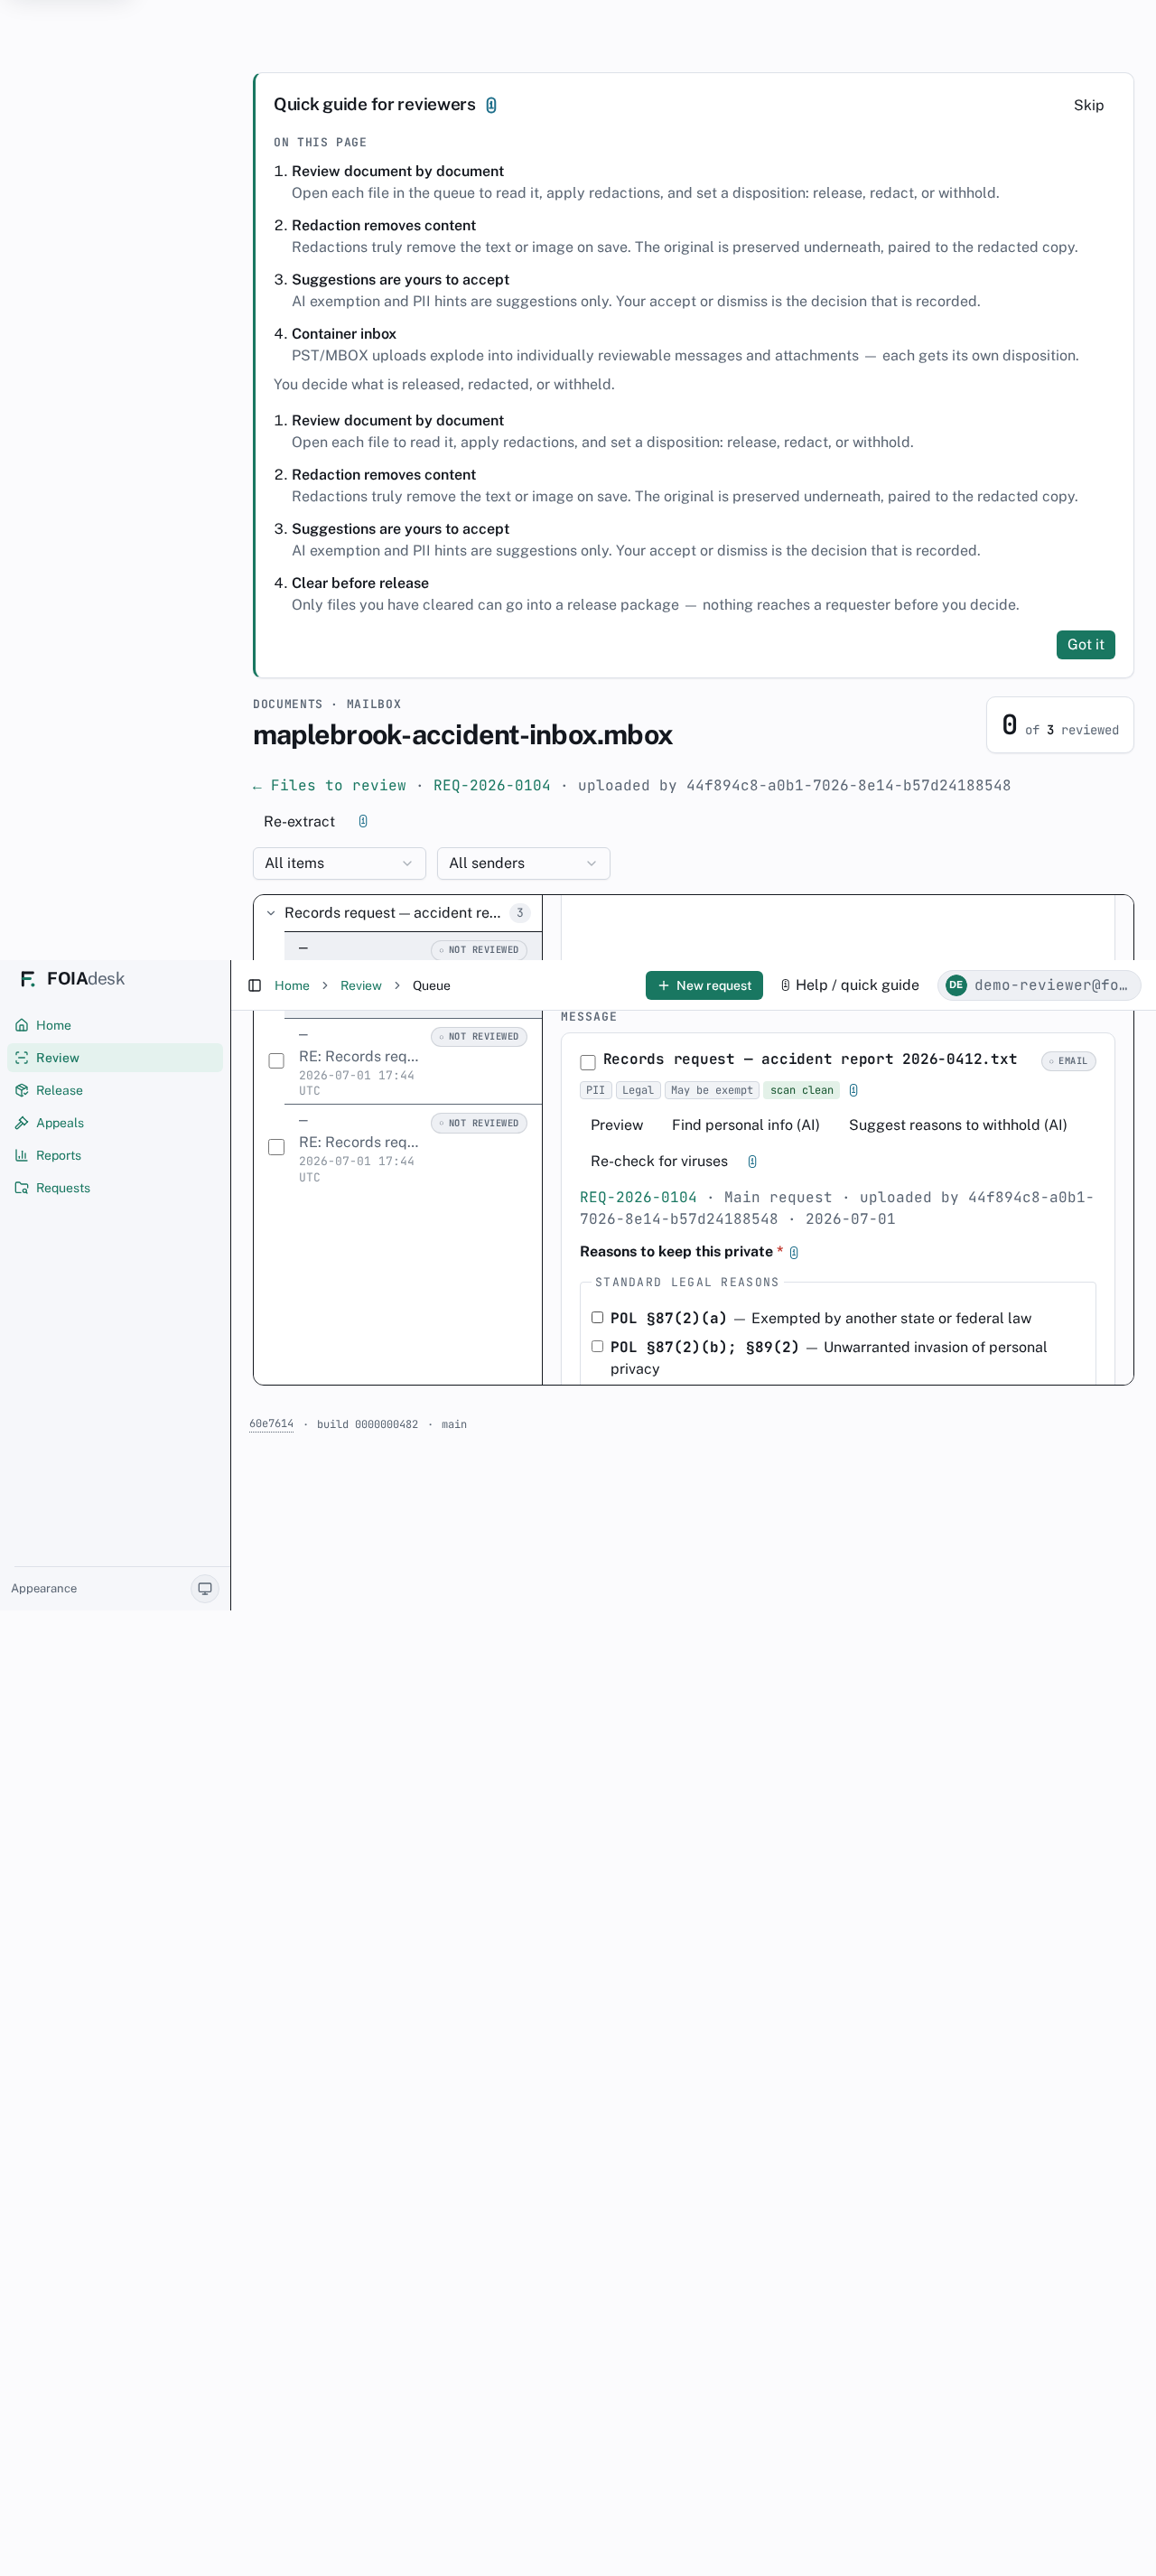
Withholding with a legal reason
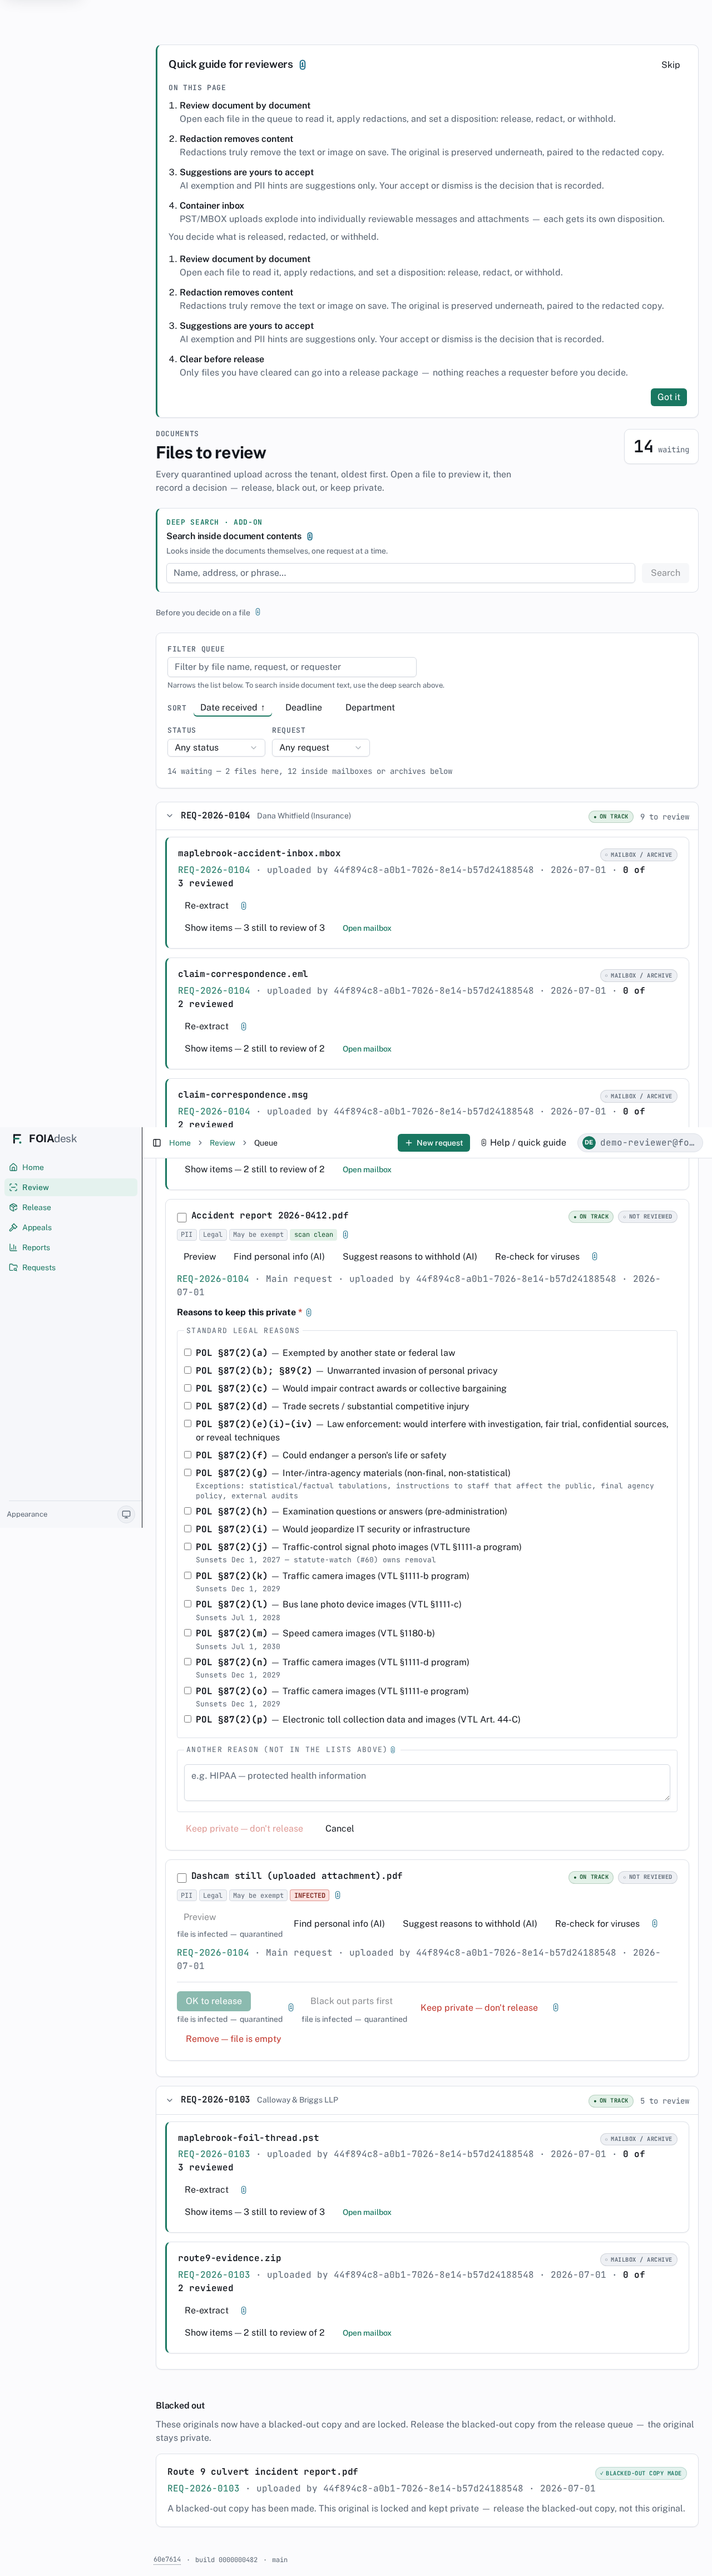
When you choose Keep private — don't release, FOIAdesk asks you why. A Reasons to keep this private panel opens with the New York Public Officers Law exemptions laid out as a checklist — you tick the one (or more) that applies rather than typing a citation from memory.
The withhold panel: the §87(2) exemptions as a labelled checklist, with a free-text box for any reason not in the list.
Each entry pairs the citation with a plain-language description, for example:
POL §87(2)(b); §89(2) — Unwarranted invasion of personal privacy
POL §87(2)(e) — Law enforcement: would interfere with an investigation, a fair trial, confidential sources, or reveal techniques
POL §87(2)(f) — Could endanger a person's life or safety
POL §87(2)(g) — Inter- or intra-agency materials that are non-final and non-statistical
The list runs the full statutory range — from §87(2)(a) through the traffic- and toll-camera categories at §87(2)(j)–(p). If your basis is not one of these, use the Another reason (not in the lists above) box to record it in your own words. A reason is required before the file can be withheld; once you confirm, the citation is recorded with the decision.
Blacking out exempt content
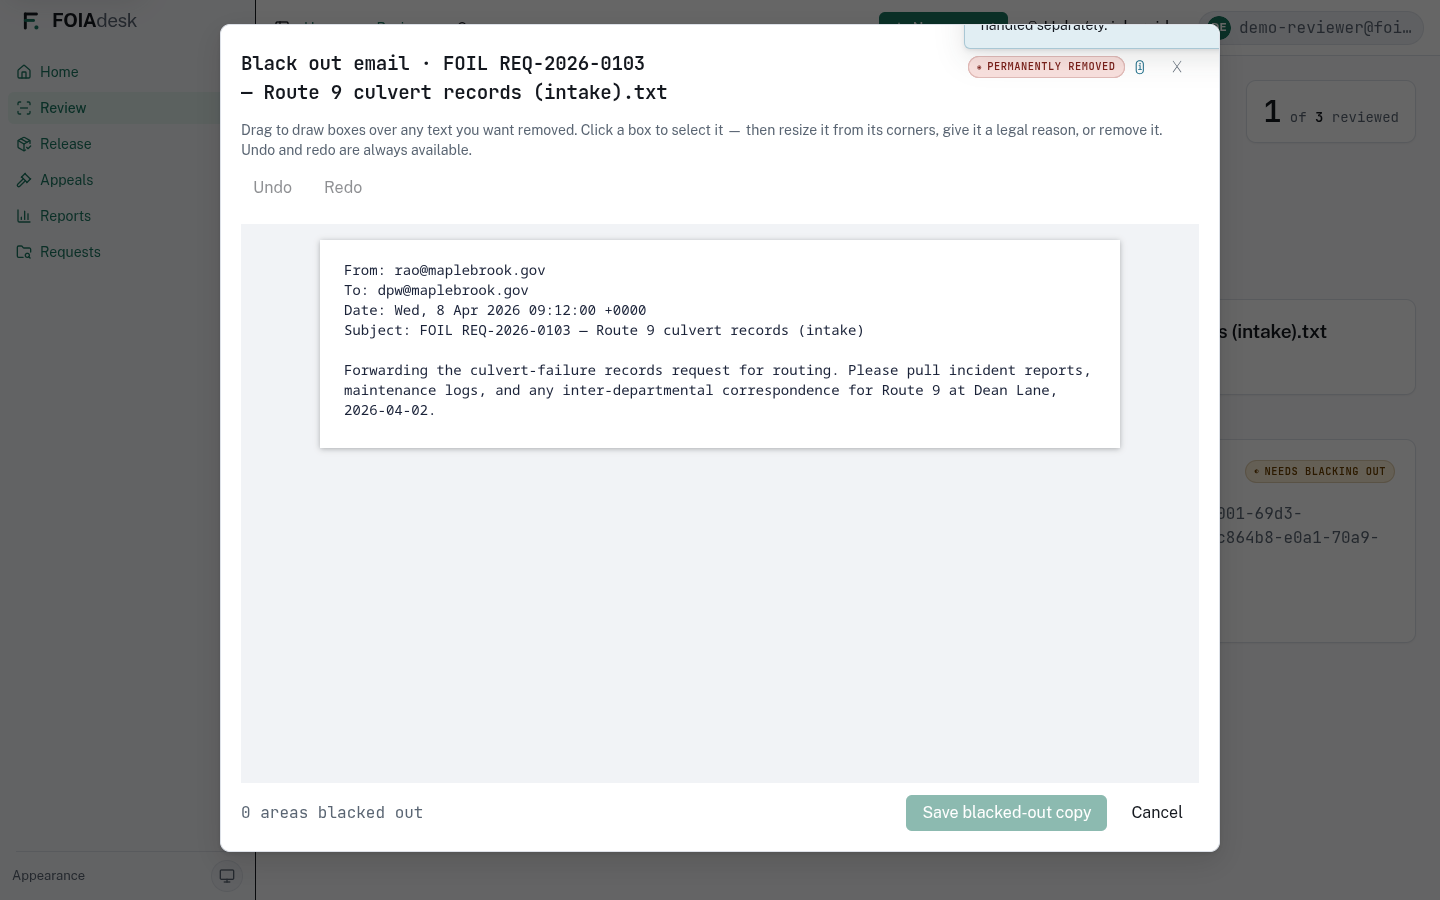
Open the redaction editor with Black out parts first. Drag boxes over the text you want removed, give a box a legal reason if you wish, and use Undo and Redo freely. The footer counts how many areas you have blacked out, and Save blacked-out copy commits your work.
The black-out editor: drag boxes over text to remove, undo and redo, a count of areas blacked out, and Save blacked-out copy.
!
Blacking out truly removes the content. When you save, the text under each box is permanently removed from the released copy — there is no overlay sitting on top of live text that someone could lift off. The original file is preserved underneath and paired to the redacted copy, so your office keeps a complete record while the requester only ever sees the cleared version.
The original is locked and paired to your copy
Once you save a blacked-out copy, its original moves into a Blacked out section at the bottom of the queue and is locked. The card is badged Blacked-out copy made and reminds you that the original is kept private — you release the blacked-out copy, never the original.
The Blacked out section: originals that now have a blacked-out copy, each locked and badged, with a note that the redacted copy is what gets released.
This pairing is why the release gate is safe: the original and the redacted copy travel together in the record, but only the cleared copy can ever be handed out.
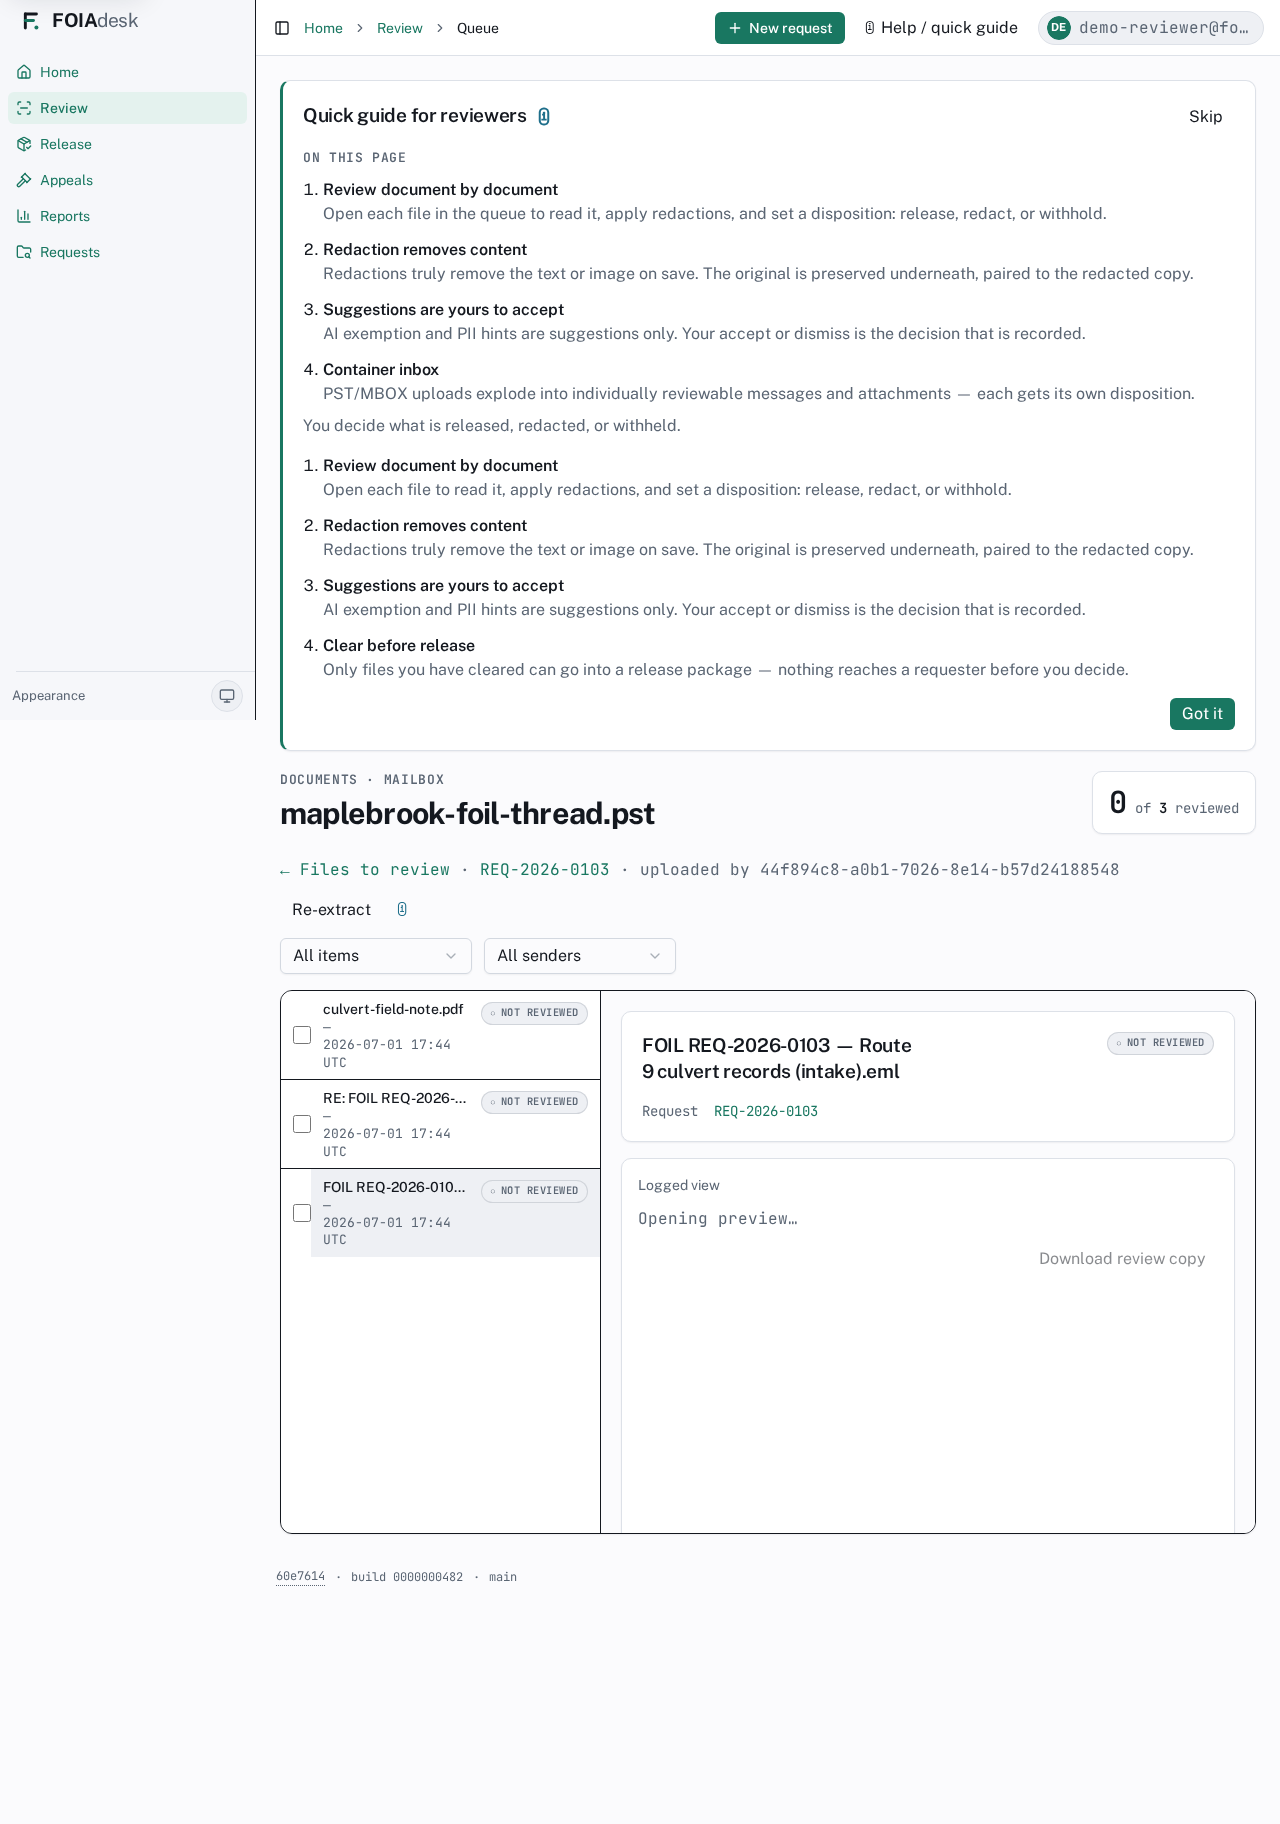
Mailboxes and other containers
Some uploads are containers — a .pst or .mbox mailbox, or a .zip archive. FOIAdesk explodes each container into its individual messages and attachments, so every item is reviewed on its own. In the queue, a container appears as a card showing its file name, a Mailbox / Archive tag, and an of N reviewed count. Use Open mailbox to step inside; Re-extract re-explodes it if the upload was updated.
The review queue with container cards: each mailbox or archive shows a Mailbox / Archive tag, its reviewed count, and Open mailbox and Re-extract controls.
Inside, the container opens as a two-pane reader: a list/navigation pane beside a reading pane. An email container (.pst/.mbox) navigates by message, with each message's attachments shown attached to it; a .zip archive navigates by folder. Filters at the top — for example All items and All senders — narrow the list. The of N reviewed counter at the top right tracks your progress through the whole container.
The two-pane mailbox reader: a message list beside the reading pane, each item marked Not reviewed until you decide, with the reviewed counter at the top.
Every item inside gets the same controls as a standalone file — Preview, the AI assist buttons, virus-scan status, and the four dispositions — including the Keep private — don't release withhold panel with its §87(2) checklist. You clear, black out, or withhold each message and attachment on its own.
A single message inside a container set to Keep private: the same §87(2) reason checklist you use for a standalone file.
Quarantined files
Every upload is virus-scanned before it reaches you. A file that fails the scan is badged INFECTED and marked file is infected — quarantined. You can still see it in the queue, but the release paths are closed off: OK to release and Black out parts first are disabled, so an infected file can never be cleared or redacted into a release.
A quarantined file in the queue: the INFECTED badge, the file is infected — quarantined note, and the release and black-out actions disabled.
You can still Keep private — don't release or Remove — file is empty to clear it out of the queue, and Re-check for viruses re-runs the scan if you believe it has been cleaned since.
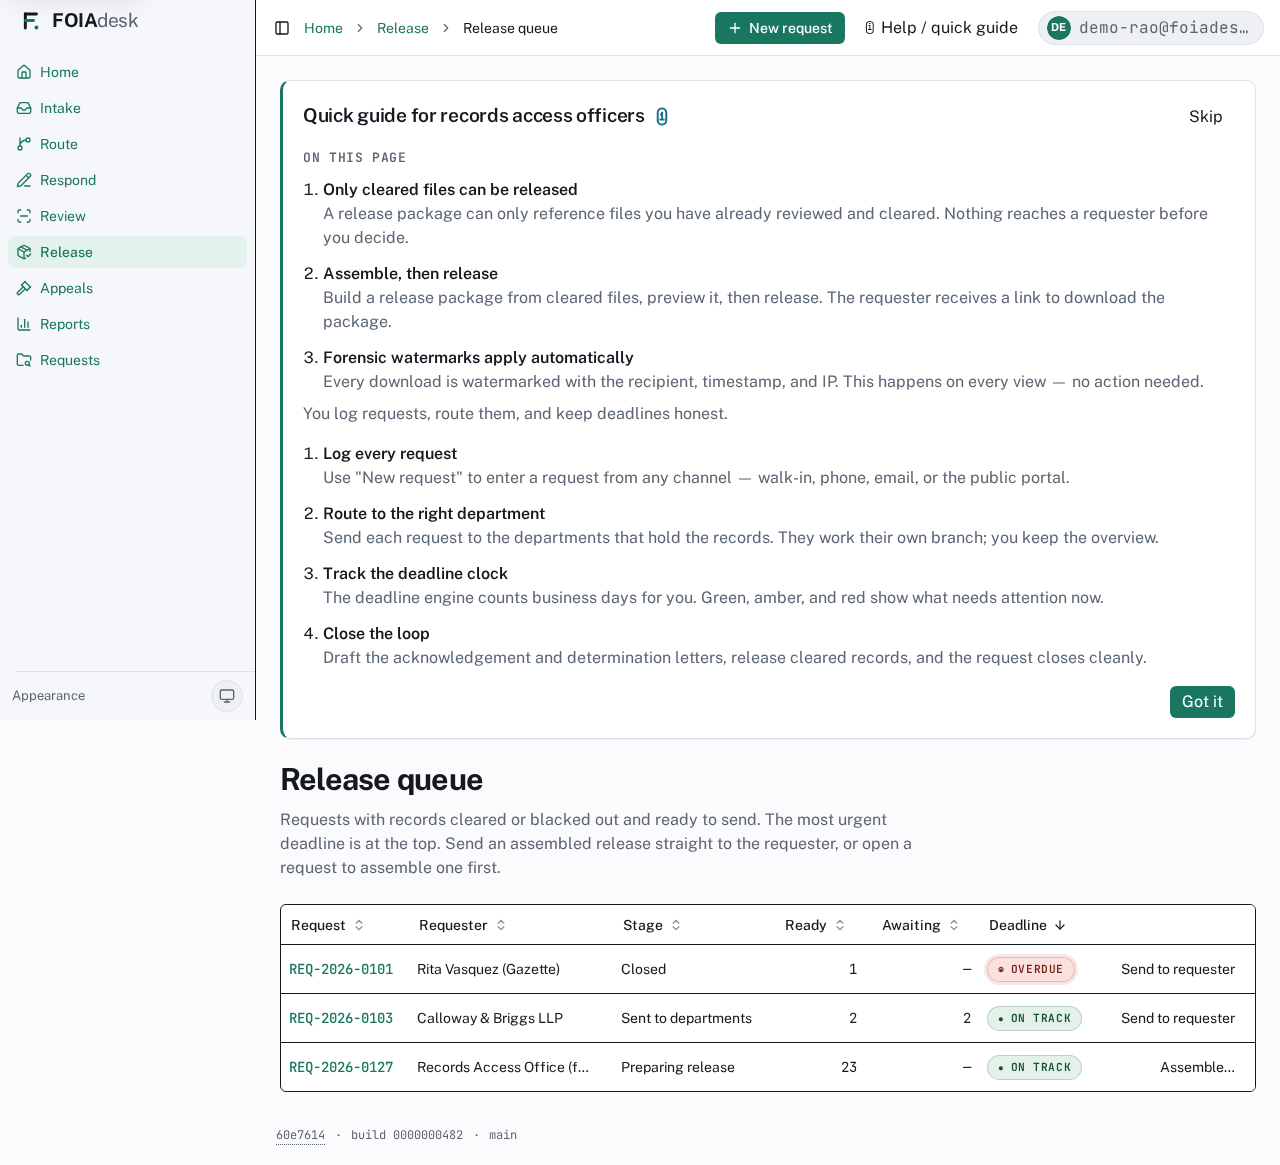
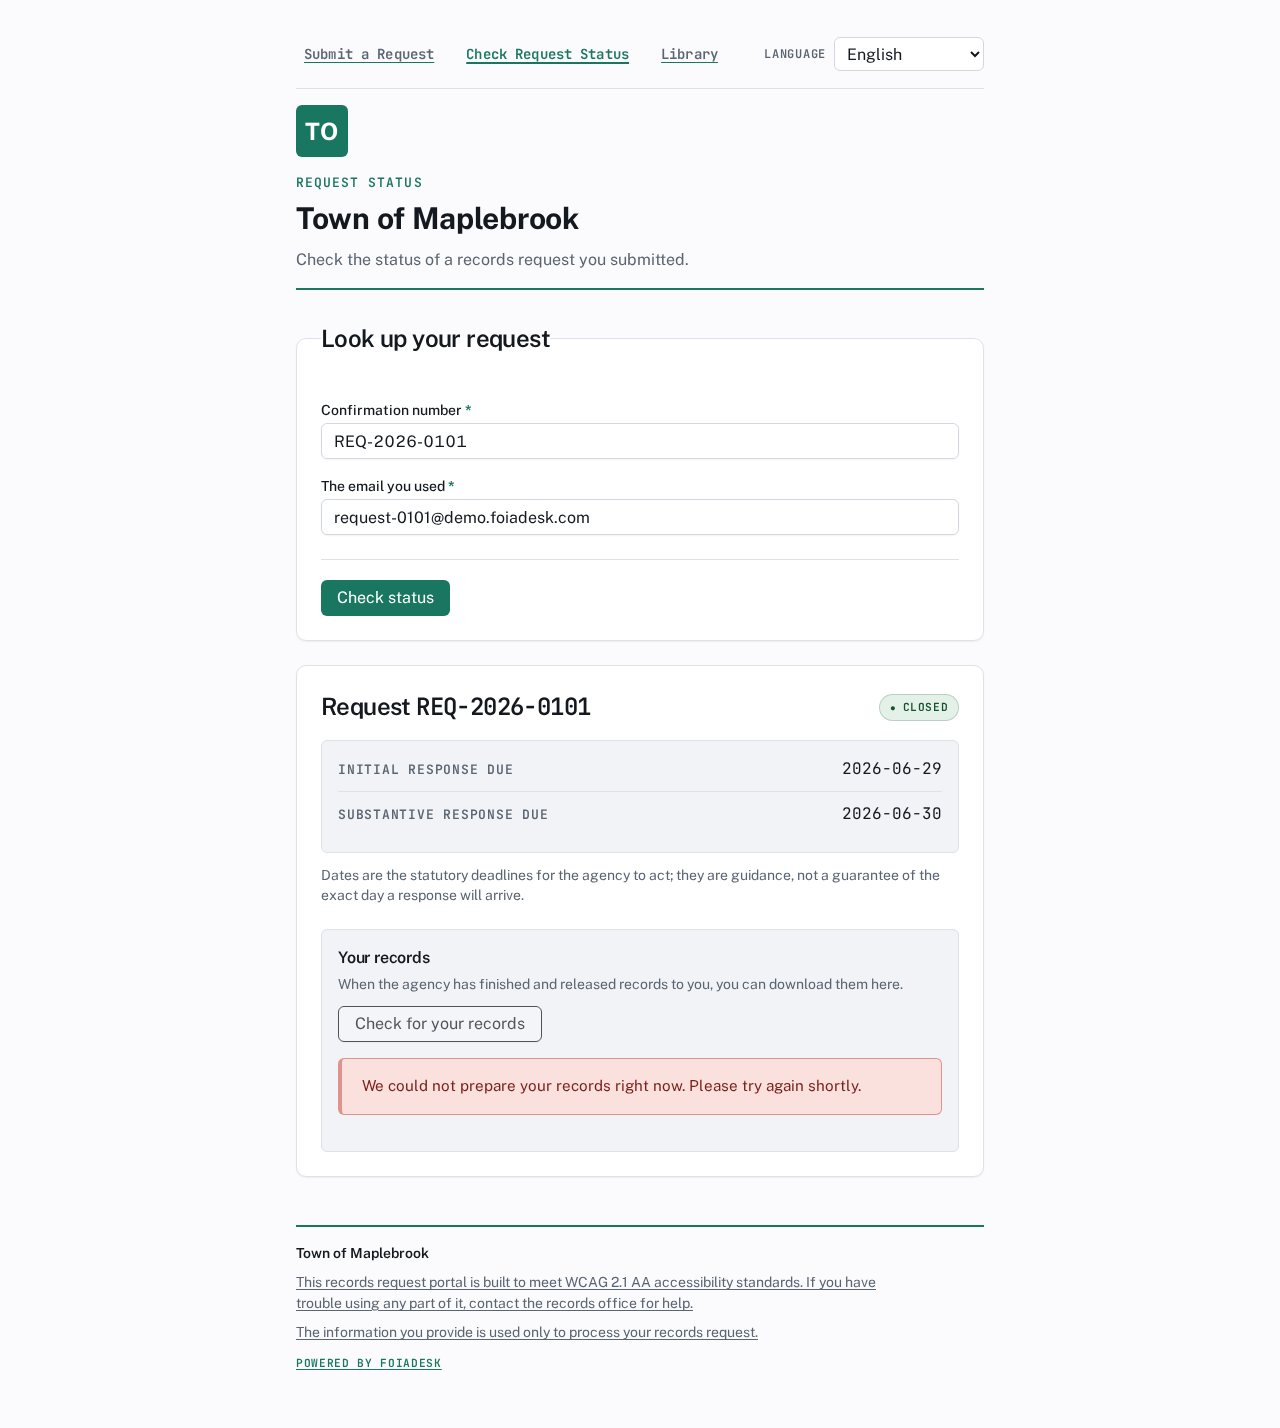
Releasing the records
When the records for a request are cleared or blacked out, they move to the Release queue. Each row shows how many records are Ready to release, how many are still Awaiting returns from departments, and the request's deadline. Open a request to Assemble a package, then Send to requester.
The Release queue: requests with records ready to send, ready-to-release and awaiting-returns counts, deadline, and Assemble or Send to requester actions.
!
Only cleared files can be released. A release package physically cannot reference a file you have not marked OK to release — there is no path for an unreviewed, quarantined, or withheld file to reach a requester. Every pre-release view and download also carries a forensic watermark with the recipient, timestamp, and IP address, applied automatically.
Review is the gate. Read each record, black out what the law protects, set its disposition — and the system guarantees that only what you cleared ever leaves your office.
⚖ Appeals officer
Appeals officer
Your appeals queue is your whole workspace — one screen, every appeal awaiting your decision.
You decide appeals. When a requester challenges a determination, the appeal lands in your queue, and your queue is the entire job. There is no navigation to learn and nothing else to set up — by design, you get a single screen so you can read the appeal, watch the clock, and record your decision without hunting through the product.
Your queue is the workspace
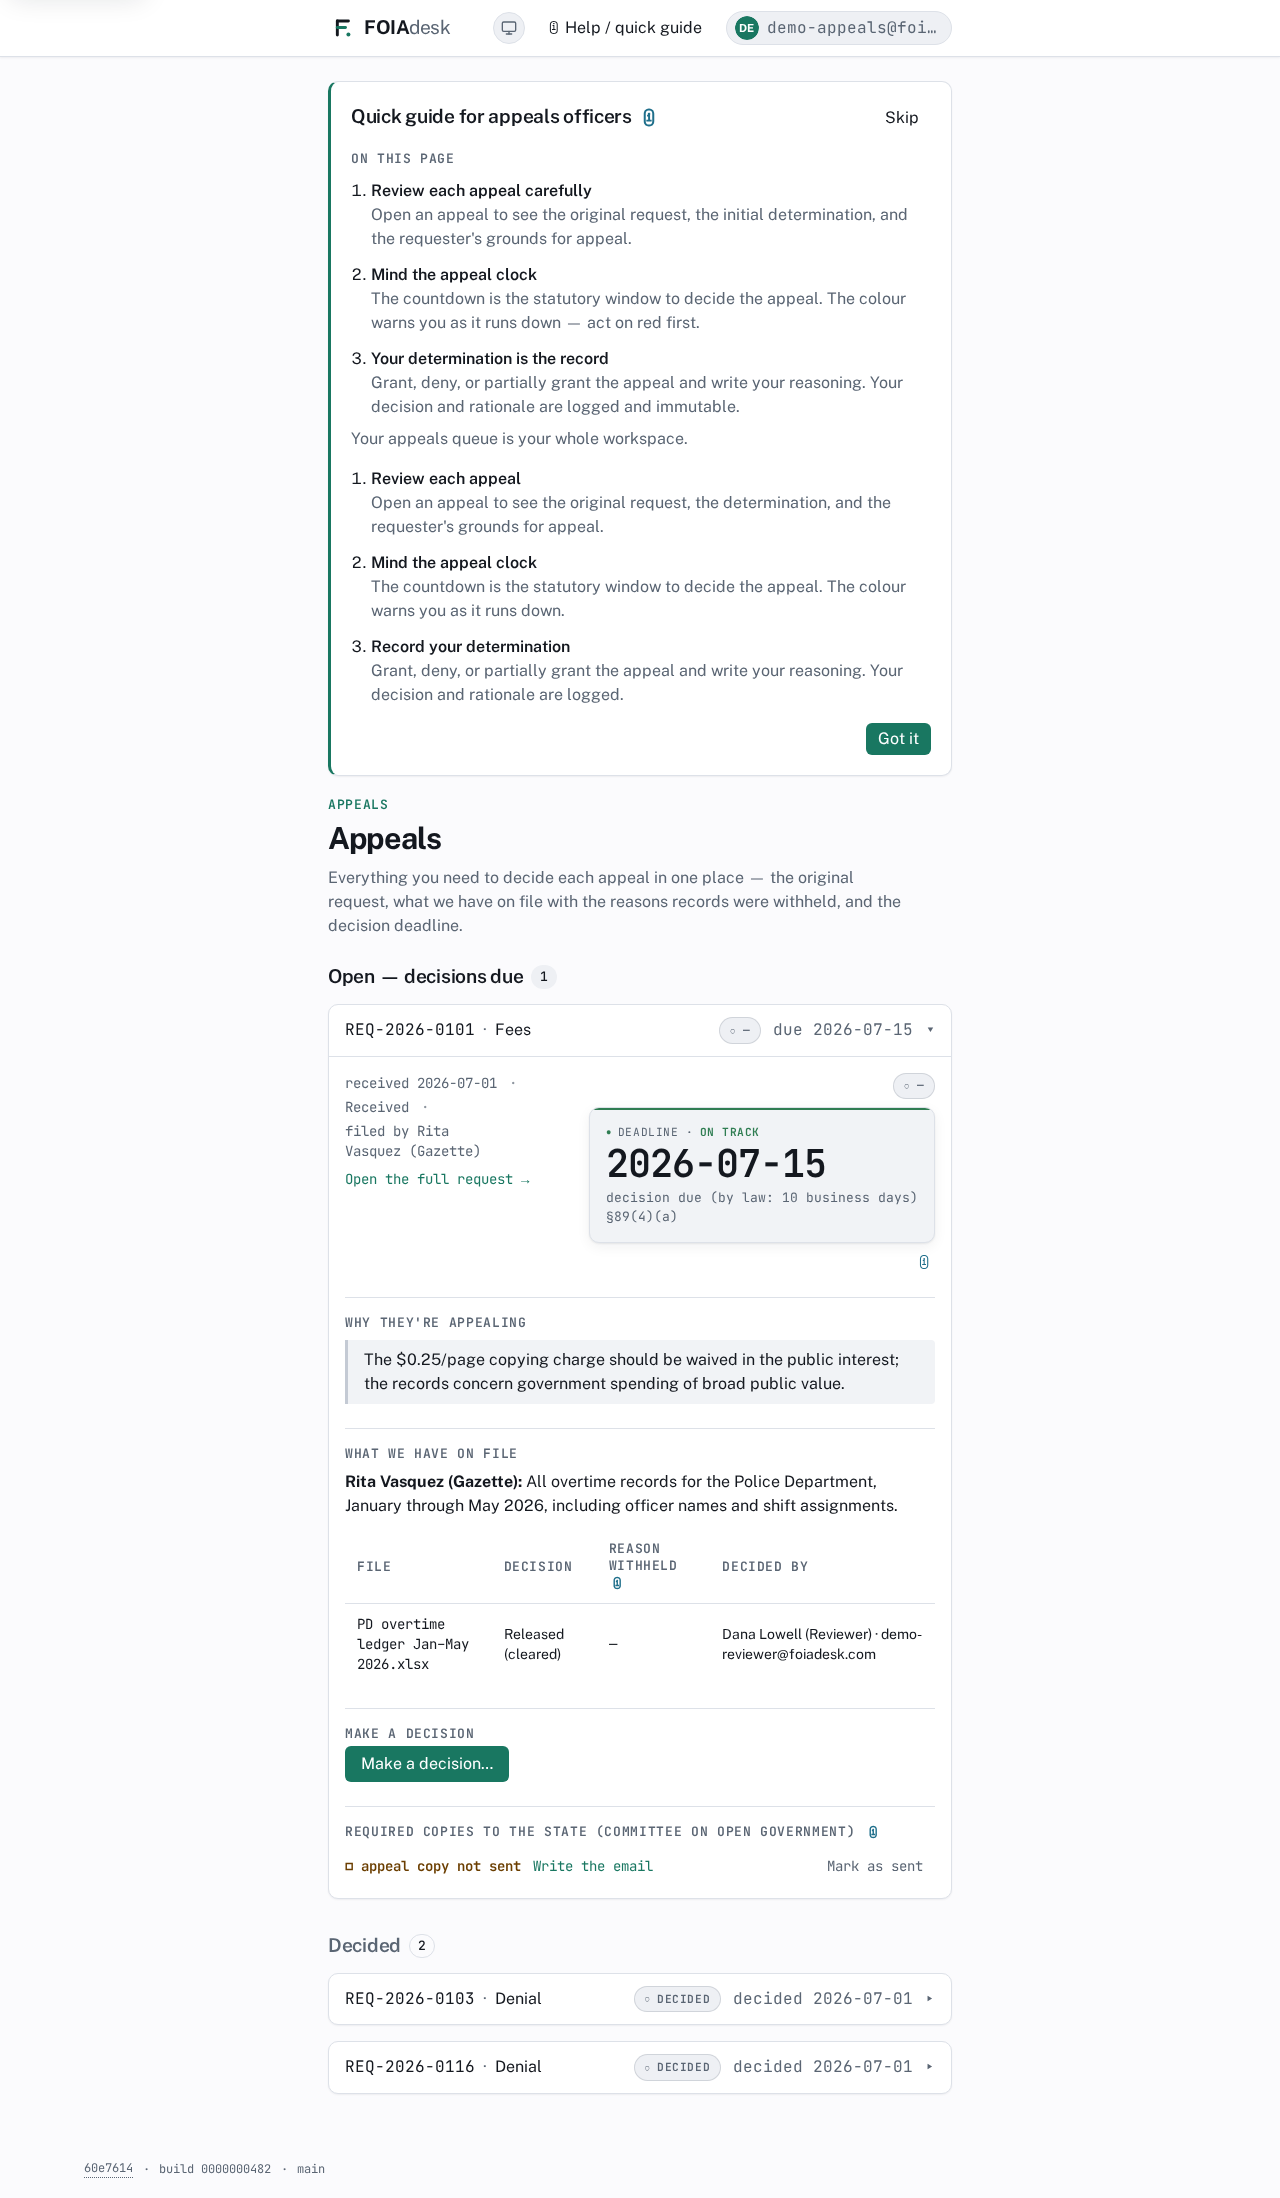
The screen opens on Open — decisions due: the appeals waiting on you, each showing the request it came from, what's being contested (a denial, fees, adequacy of search, or format), and the appeal clock counting down to your statutory deadline. Below it, a Decided section keeps the appeals you've already ruled on, for reference. Open any card and everything you need to decide it is on the same page.
The single-screen Appeals workspace: an open appeal (REQ-2026-0103, a Denial) with its appeal clock, the original request, the records on file with their dispositions, and the Make a decision action.
For each appeal you can see:
The original request — what the requester asked for, under The request.
What's being contested — for example, a Denial — shown on the appeal card.
Why they're appealing — the requester's own statement of why they are challenging it.
What we have on file — a Records and decisions table listing each record gathered for the request with its decision (Released cleared, Released redacted, Withheld, or Discarded), the law section behind any withholding, and who decided it. If any files are still under review, a line tells you how many remain.
i
You may have been brought in by a one-time secure magic link rather than a full account — no password to manage and nothing to install. You confirm on your device to open the appeal, and when you record your determination you re-confirm by email. That second confirmation is part of the record.
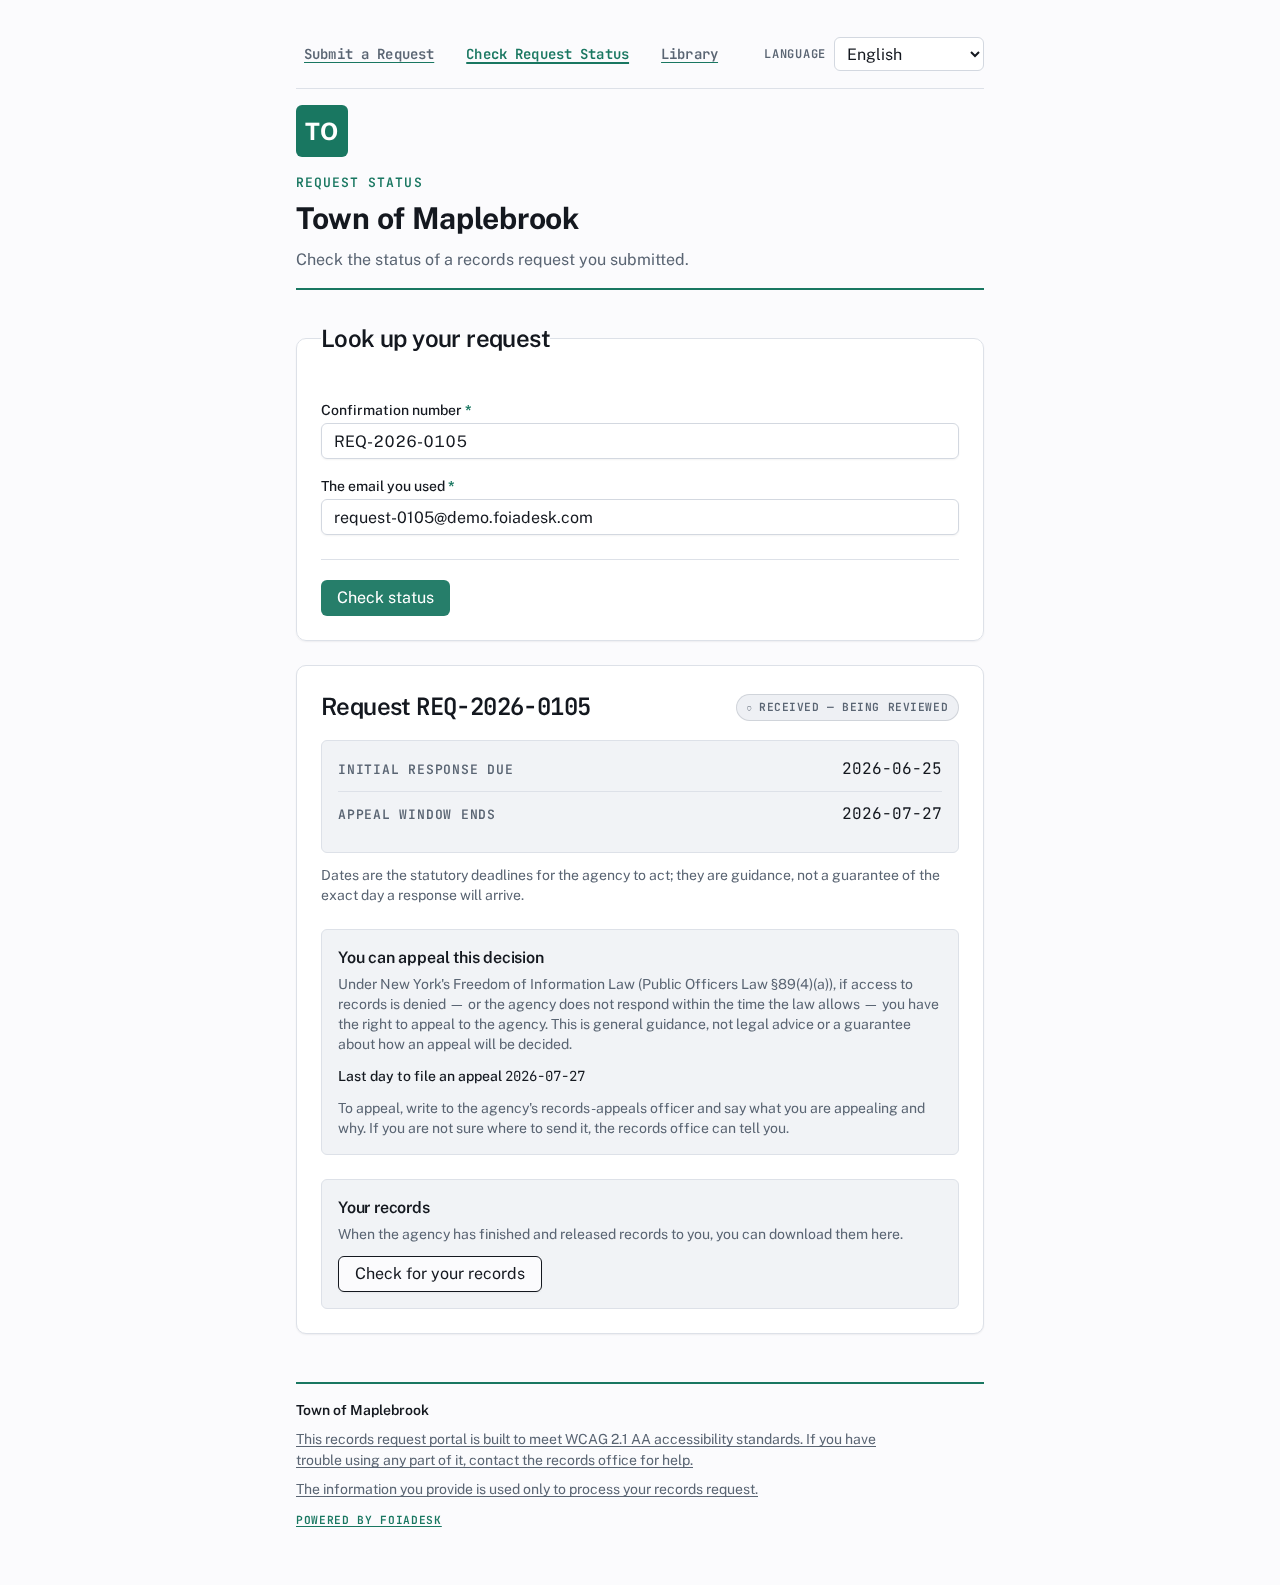
Decide an appeal
Review it carefully. Open the appeal and read the original request, the initial determination, the requester's grounds, and the records on file with their dispositions. This is the full basis for your decision, all on one screen.
Mind the appeal clock. The countdown is the statutory window to decide — by law, 10 business days under §89(4)(a) — and its colour warns you as it runs down: ● On track, then ◐ Due soon, then ◉ Overdue. Work the ◉ Overdue appeals first.
Record your determination. Choose Make a decision…, pick an outcome, set the decision date, and explain your reasoning. Your decision and rationale are saved to the request's history.
!
The appeal clock is a statutory deadline, not a reminder. Once it goes ◉ Overdue the agency is out of time on the appeal, so clear those first and don't let one sit while you work an easier case.
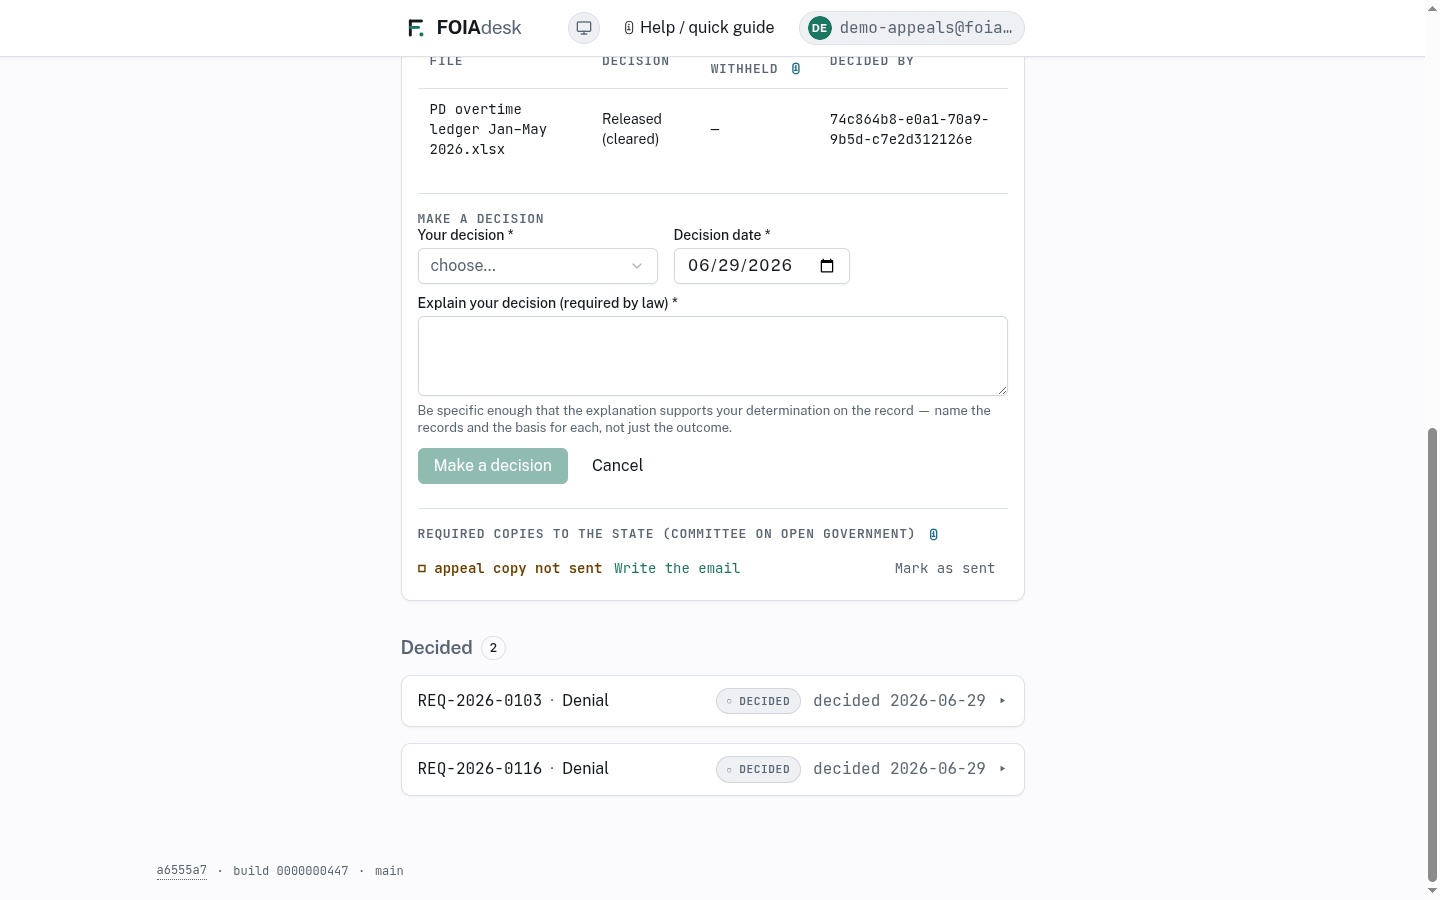
When you choose Make a decision…, a short panel asks for three things:
Your decision — one of Keep the denial, Overturn — release the records, or Release some.
Decision date — the date you are ruling.
Explain your decision (required by law) — your written reasoning. The law requires an explanation, so the panel won't let you submit without one; name the records and the basis so the record stands on its own.
If you overturn the denial or release some records, the affected files are re-opened for the agency to act on your ruling.
The determination panel: the outcome choice — Keep the denial, Overturn — release the records, or Release some — the decision date, and the required written explanation.
i
Your determination and its rationale are logged and immutable once recorded. You cannot quietly edit a decision after the fact, and you don't need to — the record stands as you entered it.
If you were invited by a magic link
If the agency brought you in by a one-time secure link rather than a full account, the experience is the same single screen, with two extra safeguards:
Opening the appeal. The link works only on the device you open it on, for that one appeal. If it was forwarded to a new device, you'll first see Verify it's you and be asked for a short code we emailed you to the invited address — so only the person the agency invited can read the appeal.
Recording your decision. Because recording a determination is the one legal action the link performs, it gets its own check: choose Email me a confirmation code, enter the emailed code, then Submit my decision. Only then is the determination committed, and that confirmation is part of the record.
!
Links are re-sent, never extended. If your link is expired or turned off, it simply shows "This link can't be opened." For security it can't be lengthened — ask the agency to send a fresh one.
◳ Supervisor / auditor (read-only)
Supervisor & auditor
You get a read-only view across every request and report — you watch the whole queue and run the oversight reports, but you never act on a request.
Your role is oversight, so your view is read-only. You can look across the entire agency — every request, every timeline, every report — but you do not act. The screens that intake, route, respond to, and release records are simply absent from your navigation.
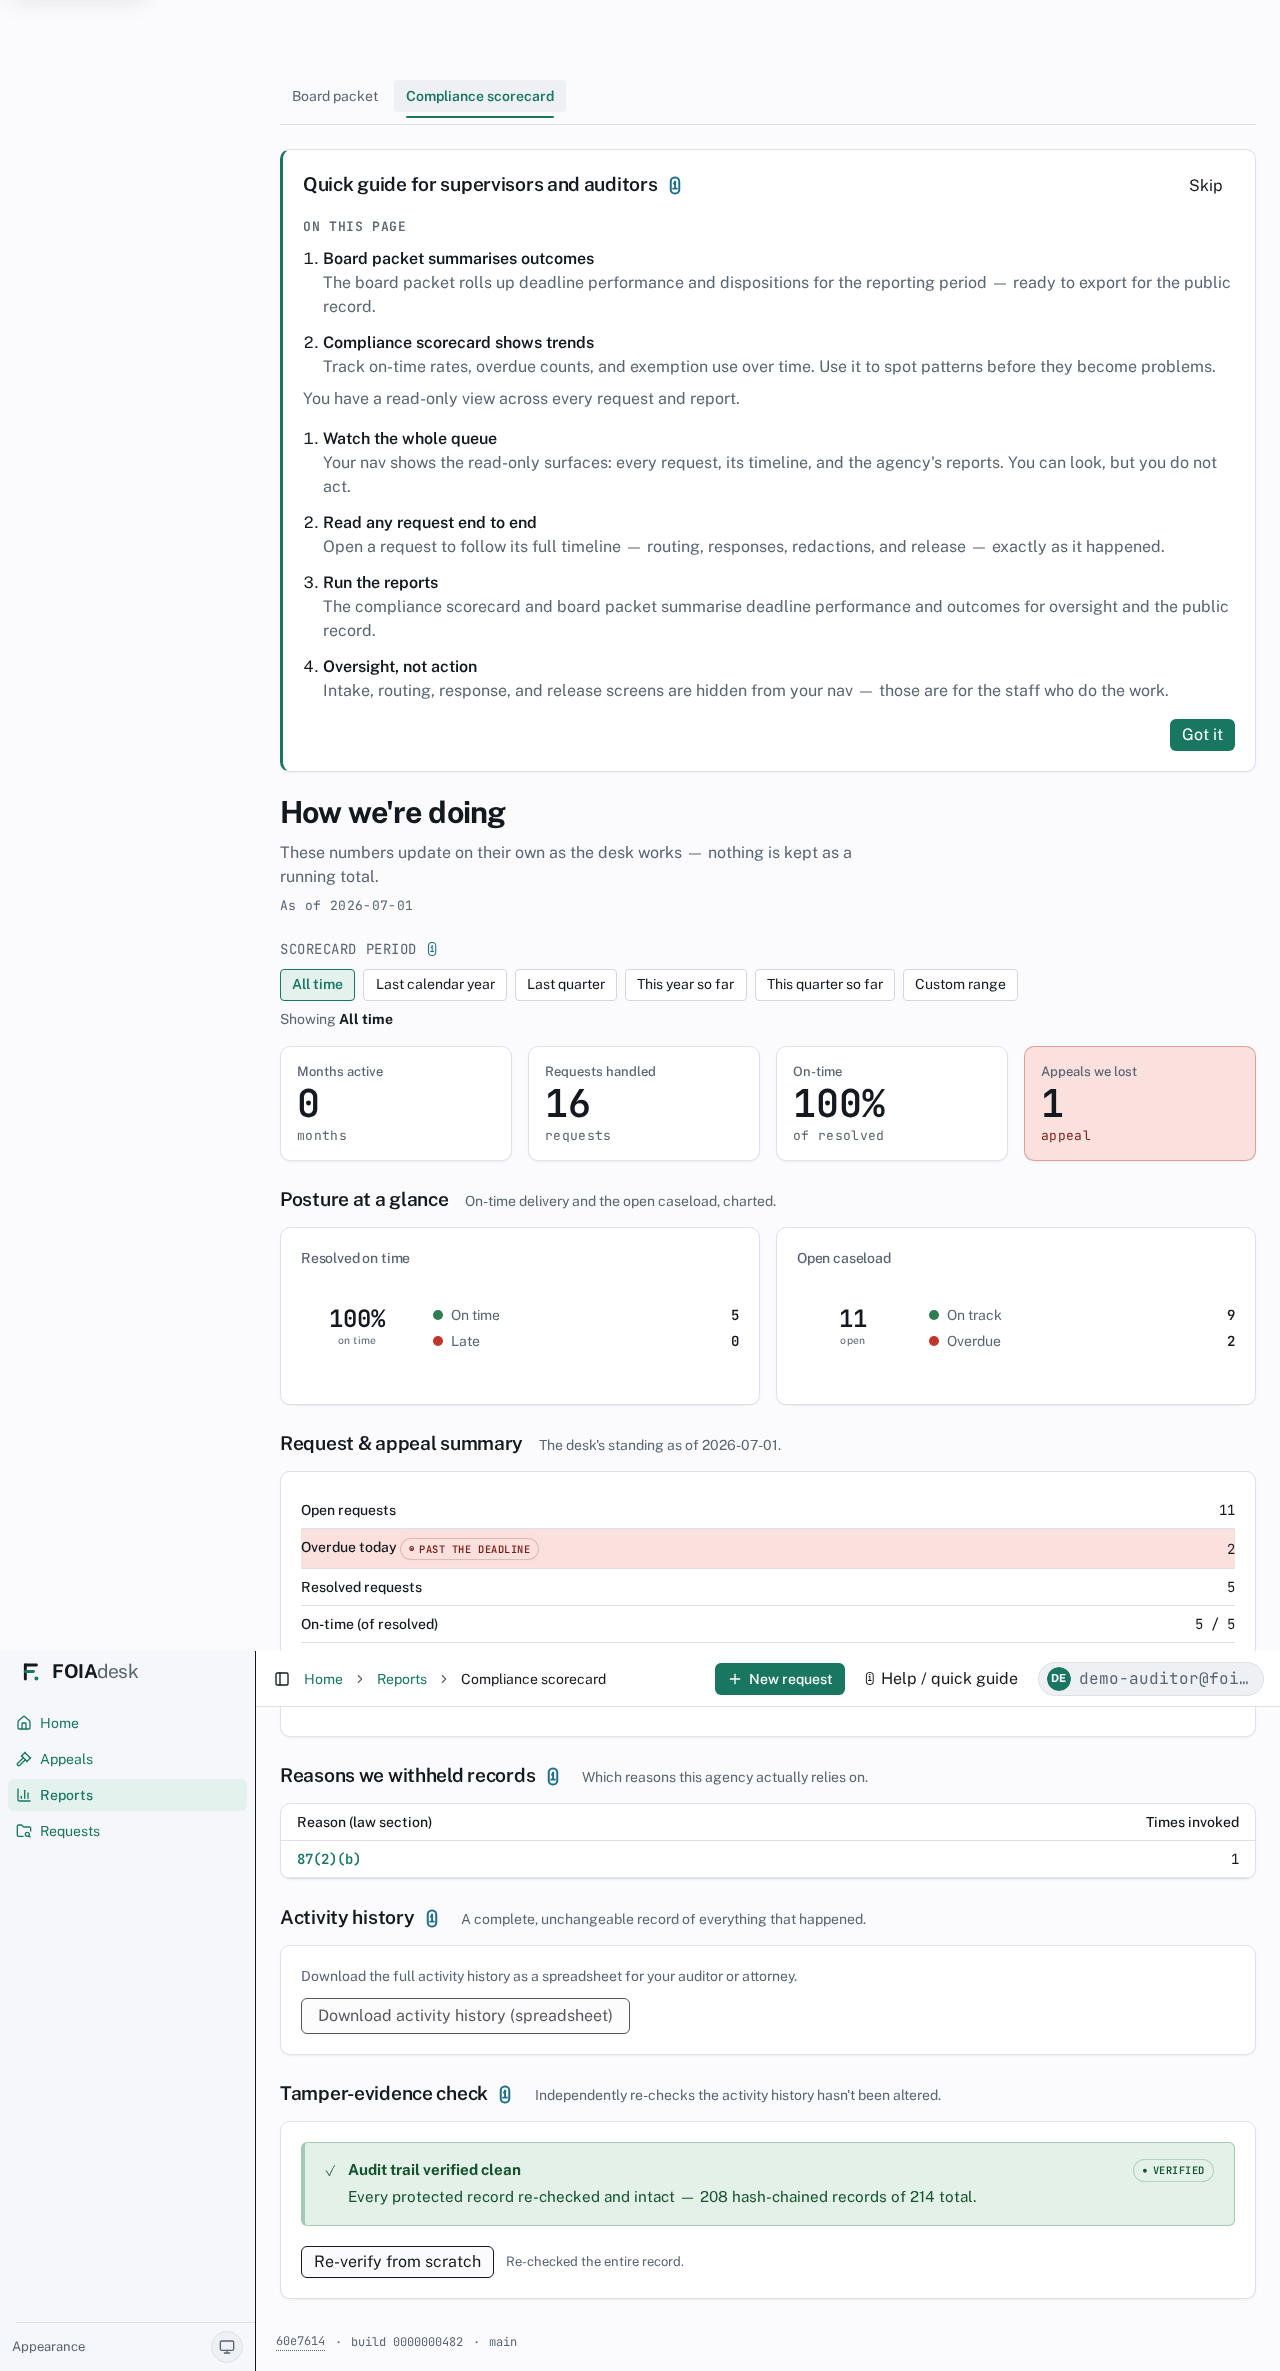
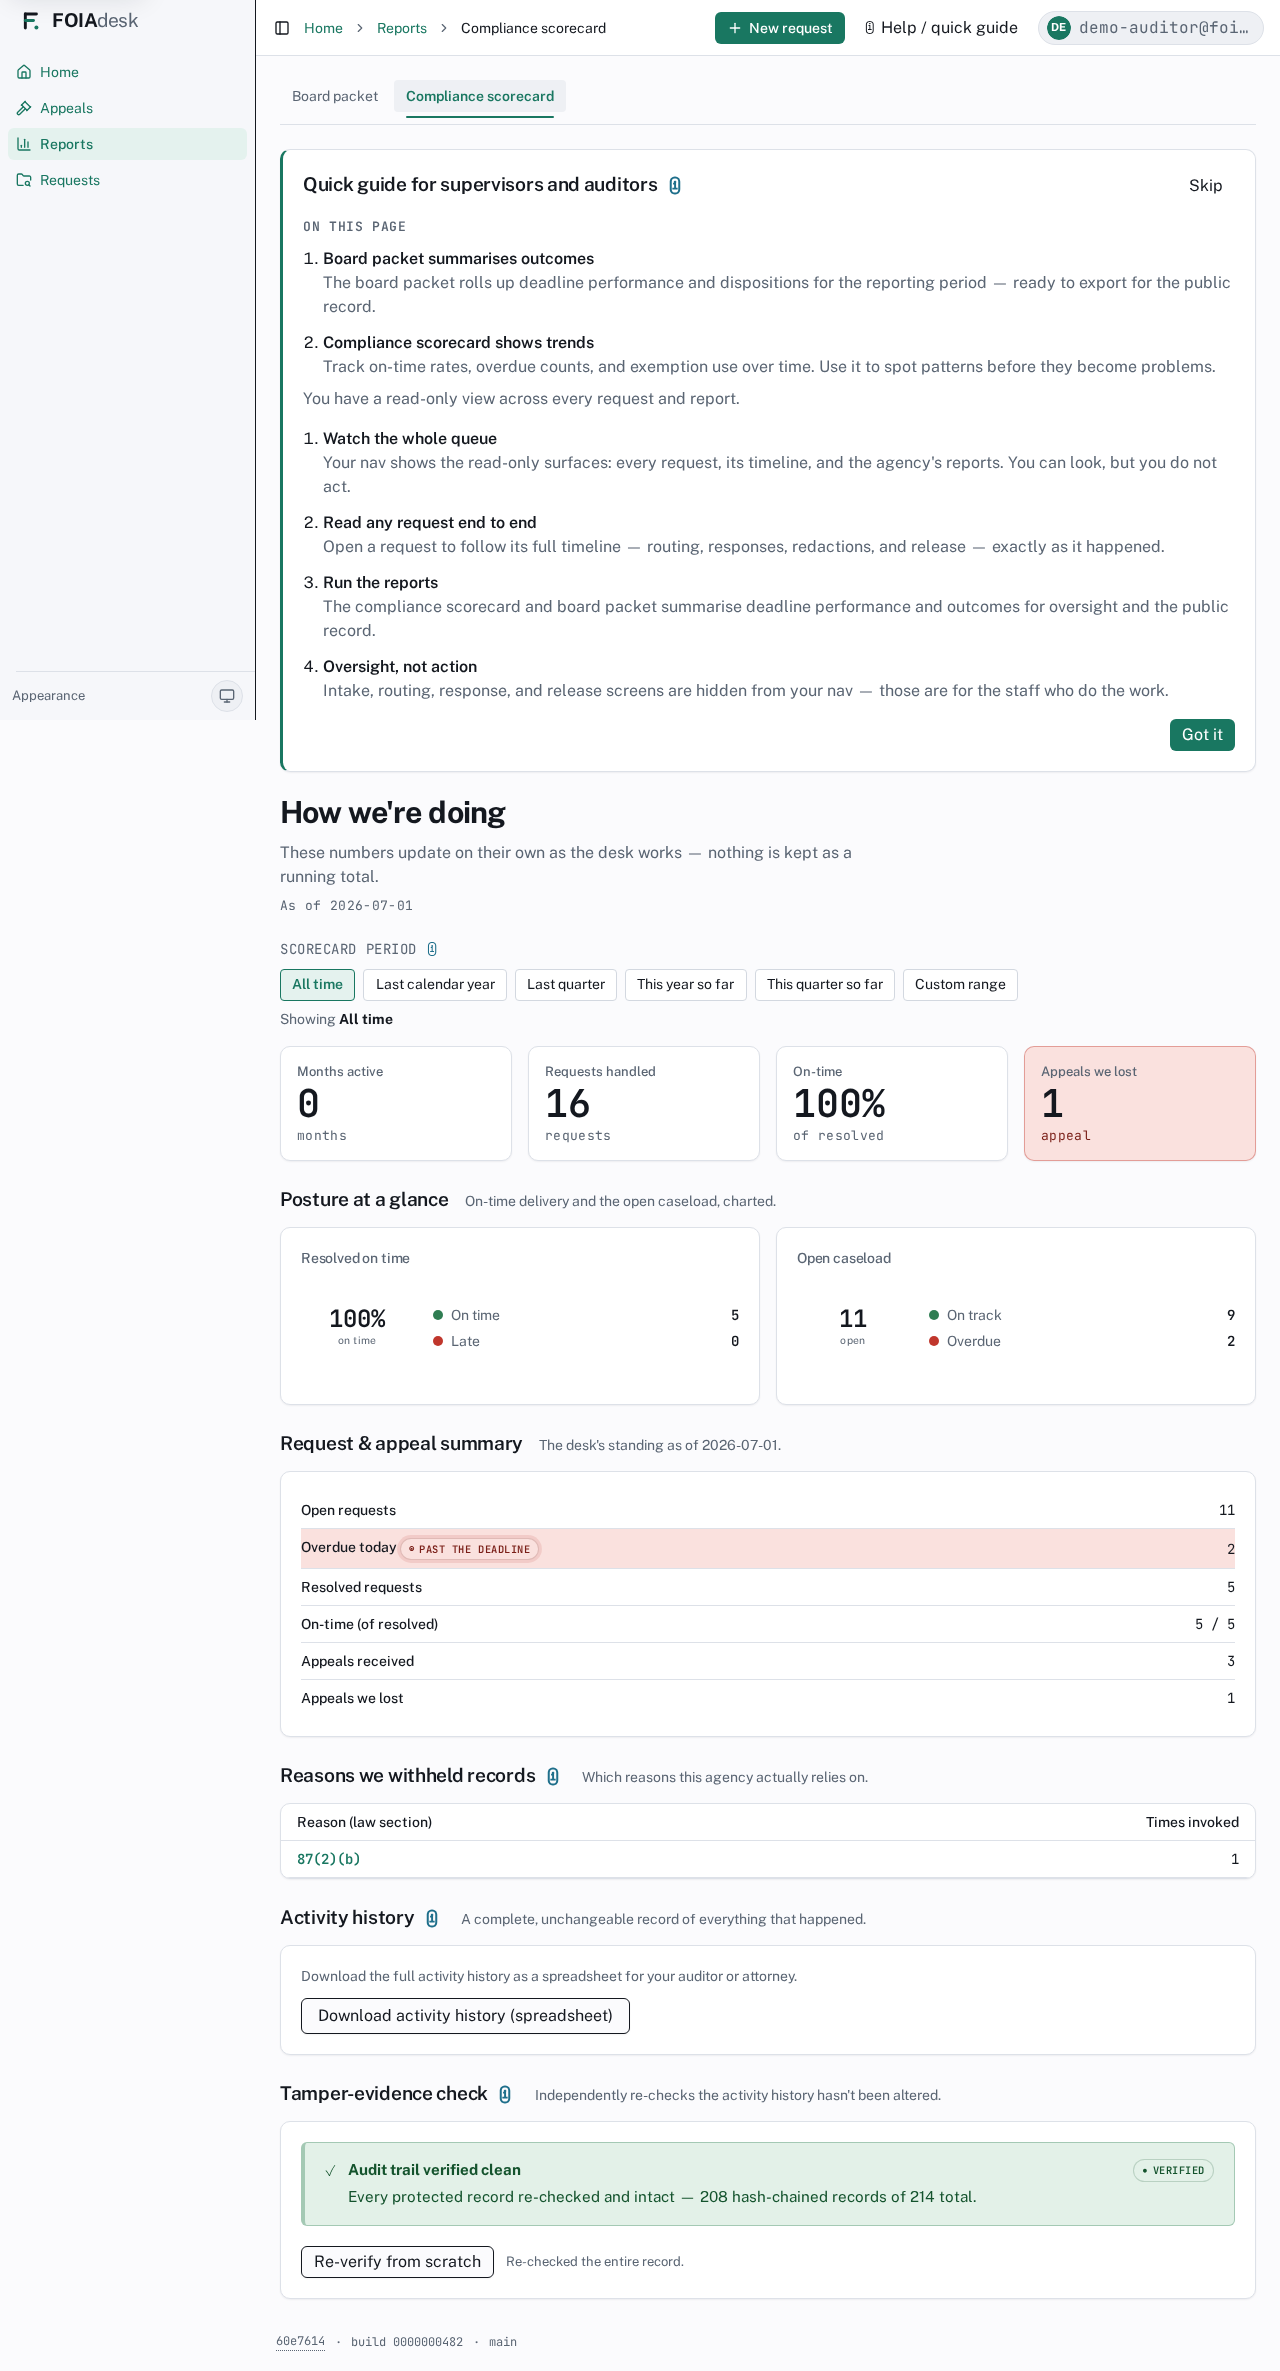
Read-only navigation
Your left navigation shows Home, Appeals, Reports, and Requests. You do not see the action screens (Intake, Route, Respond, Review, Release, Admin) that other roles use to move work — those are hidden because your job is to observe, not to handle requests. Even on the screens you can open, there are no buttons that change anything.
i
The screens you see are the same ones an administrator sees — the request log, the board packet, and the compliance scorecard are identical. The difference is that you cannot act on them: there are no buttons that change a request, only views, filters, and downloads.
The request log and timelines
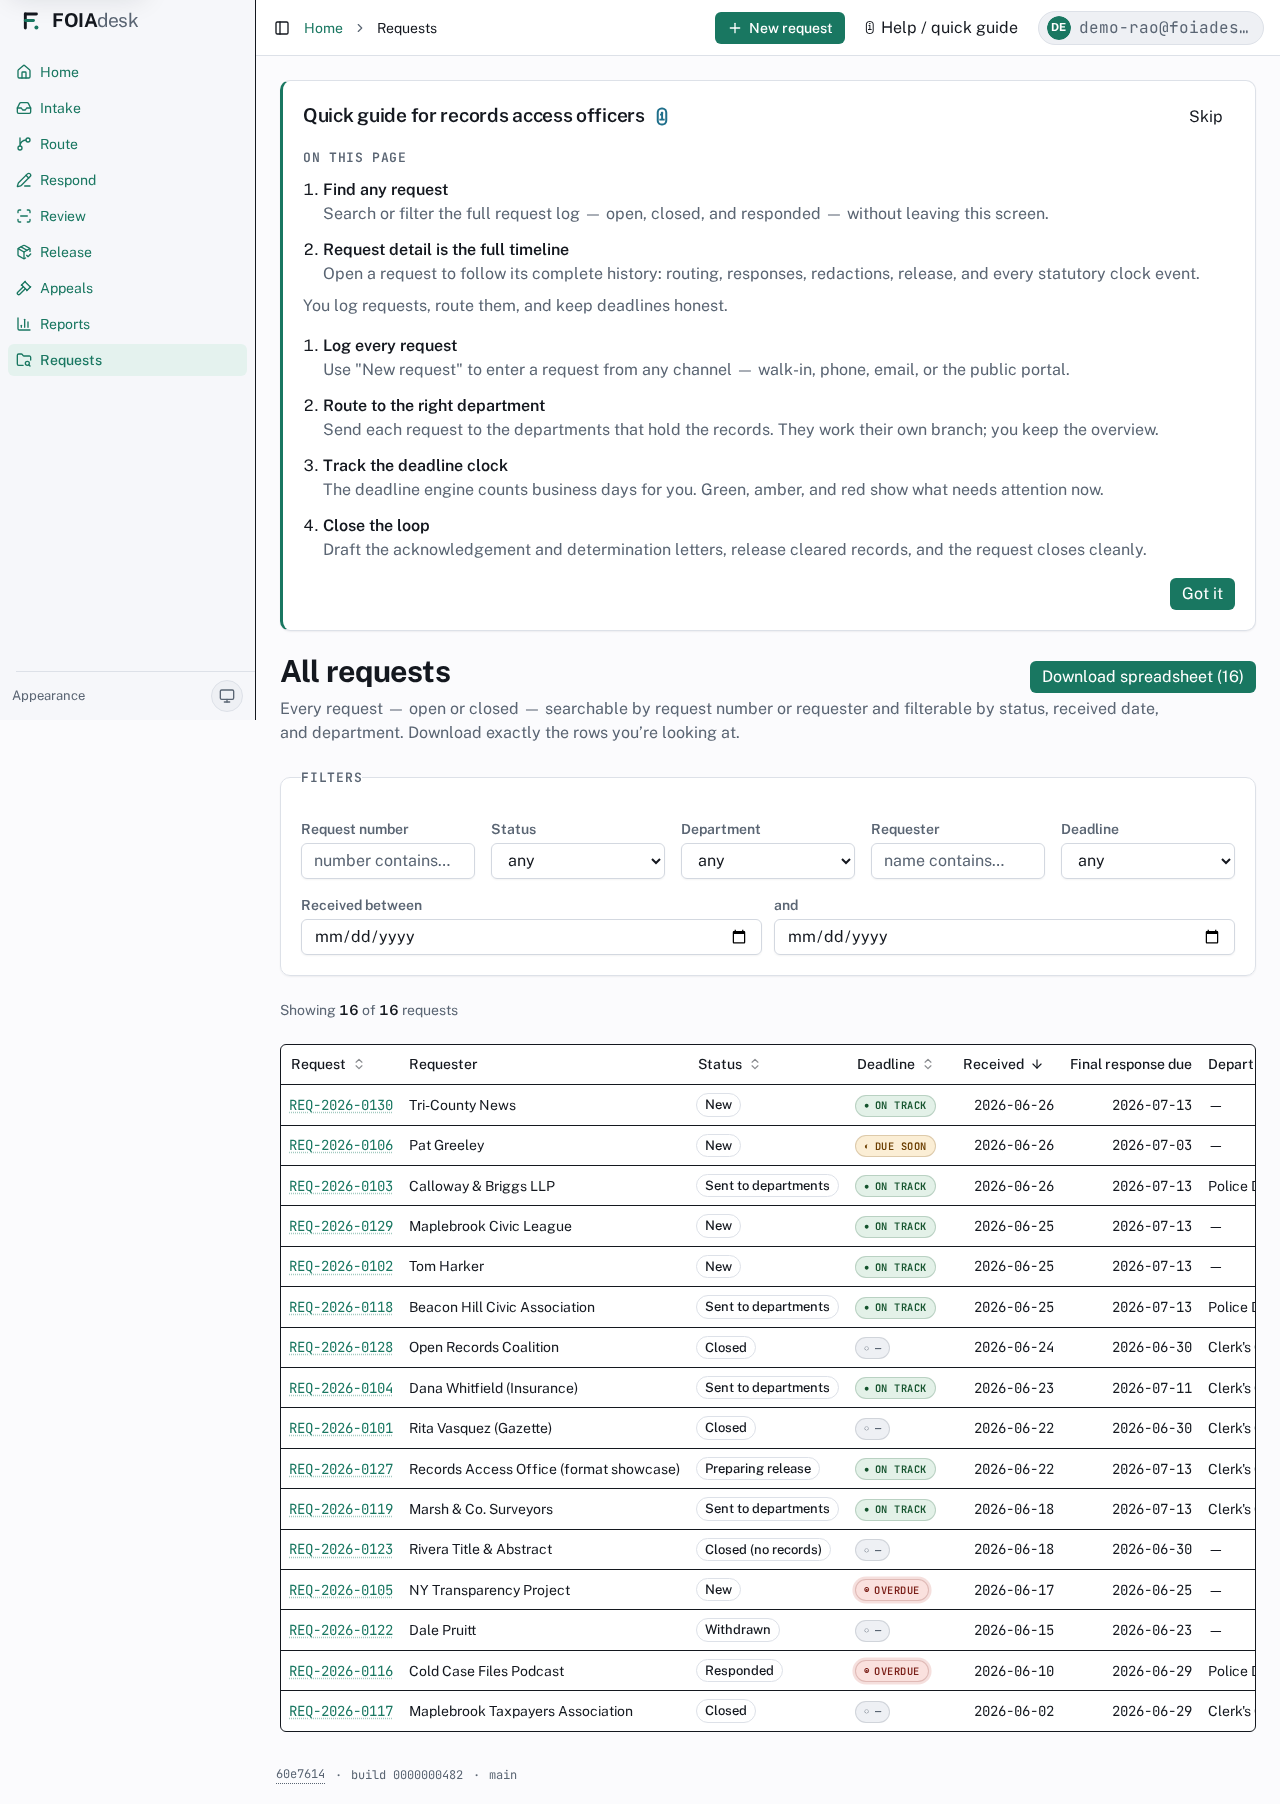
Requests is your window into the whole queue. It lists every request — open, responded, and closed — with its requester, status, deadline state, key dates, and the departments it routed to. Search by request number or requester and filter by status, received date, deadline, or department, then download exactly the rows you are looking at.
The Requests log: every request — open or closed — with requester, status, deadline state, received and final-response-due dates, and assigned departments, all searchable and filterable.
The deadline column tells you the clock state at a glance — ● On track, ◐ Due soon, or ◉ Overdue. Open any request to follow its full timeline — routing, responses, redactions, and release — exactly as it happened, in order.
✓
Watch the deadline states across the queue first. An ◉ Overdue row is where to look next; open it to see why and who held it.
The board packet
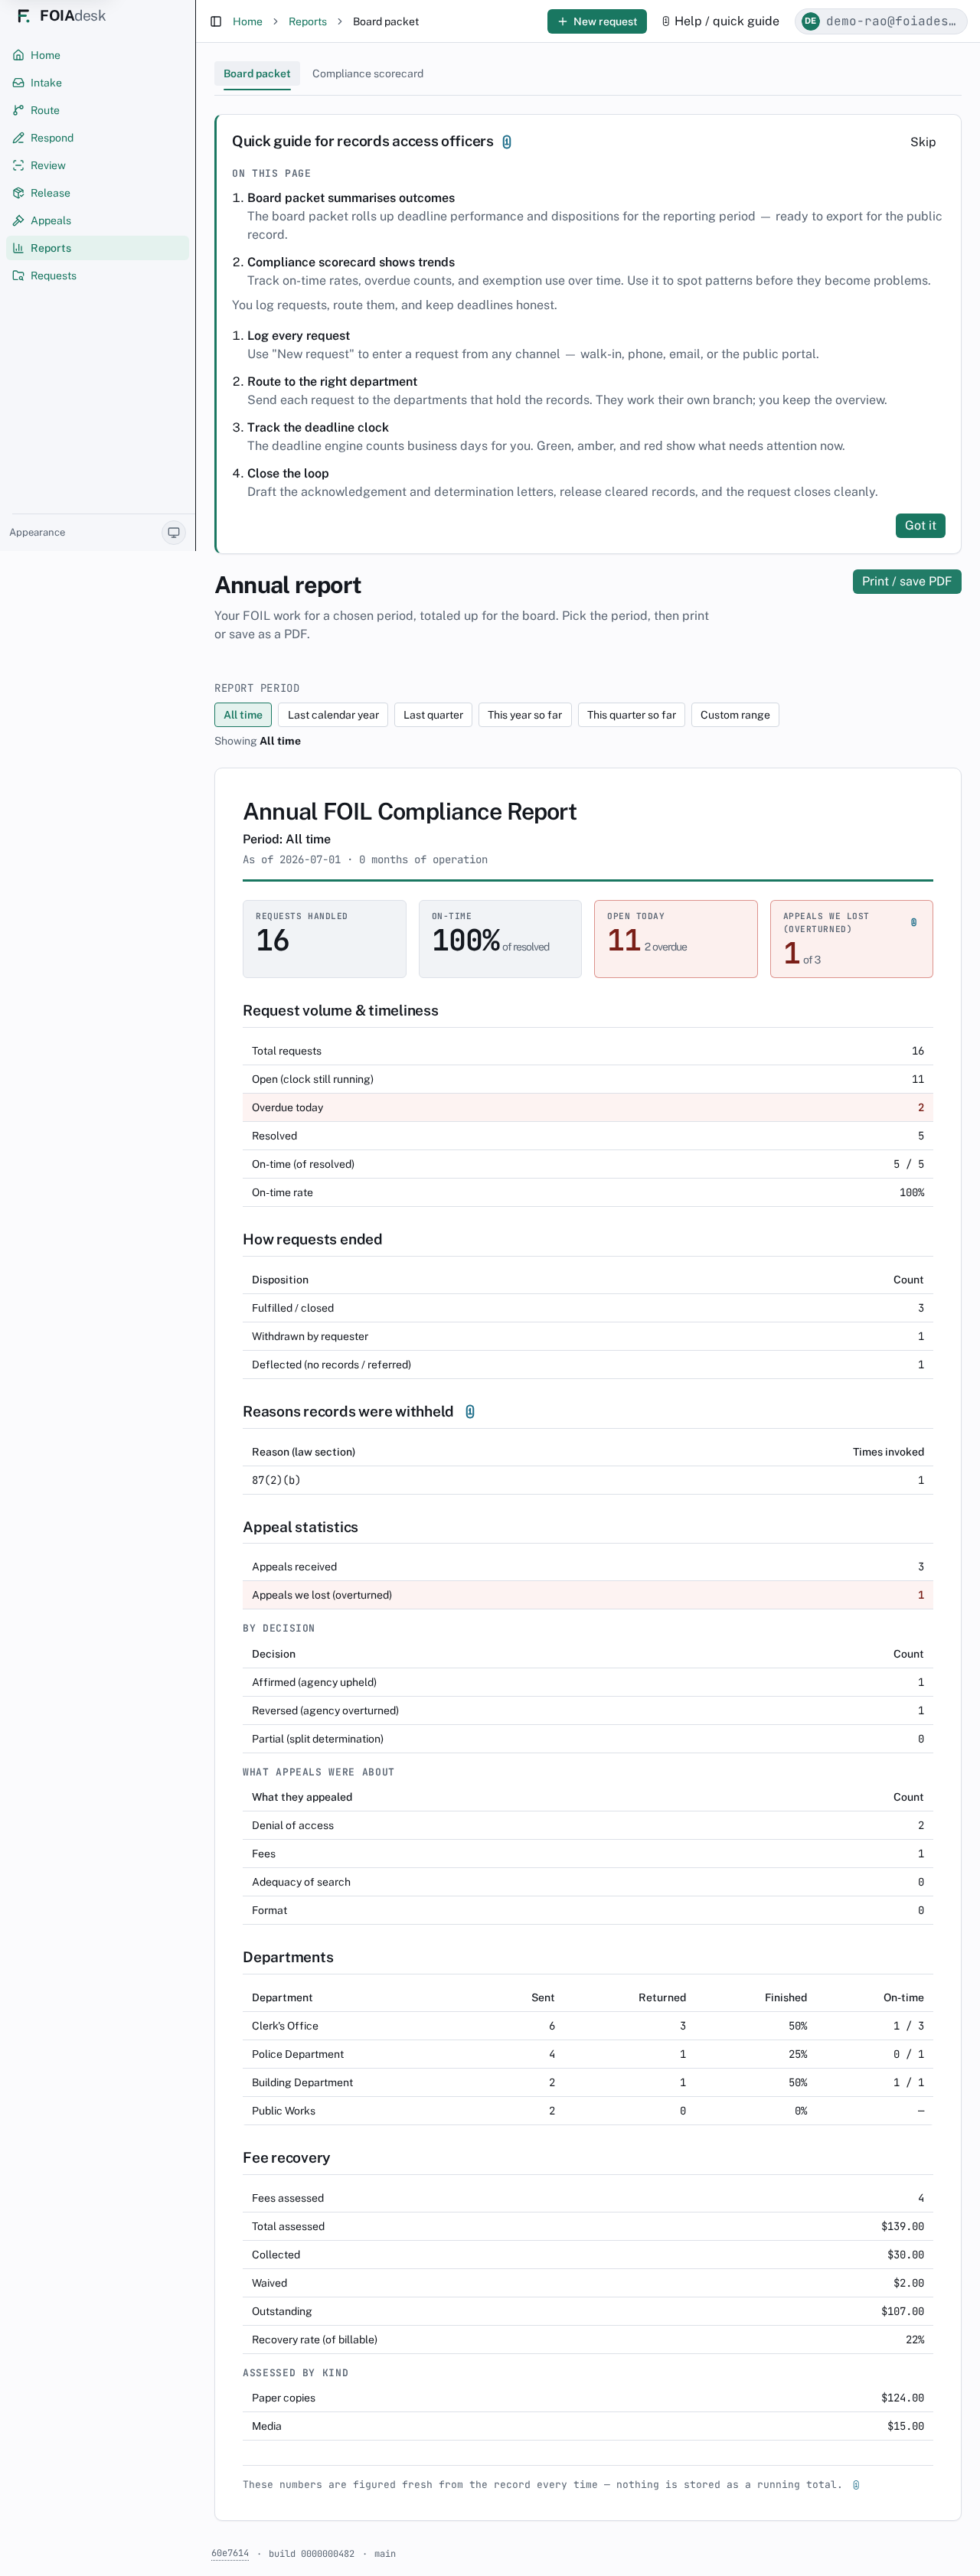
Reports opens to the Board packet — an annual-report roll-up of deadline performance and dispositions for a reporting period, formatted for the public record. Pick a Report period (last calendar year, last quarter, a custom range, or all time) and it summarises request volume and timeliness, how requests ended, the reasons records were withheld, appeal statistics, per-department performance, and fee recovery. A Print / save PDF button produces the clean, board-ready sheet.
The Board packet report: a period roll-up of request volume, timeliness, dispositions, withholding reasons, appeals, and per-department performance, formatted for export to the public record.
The compliance scorecard
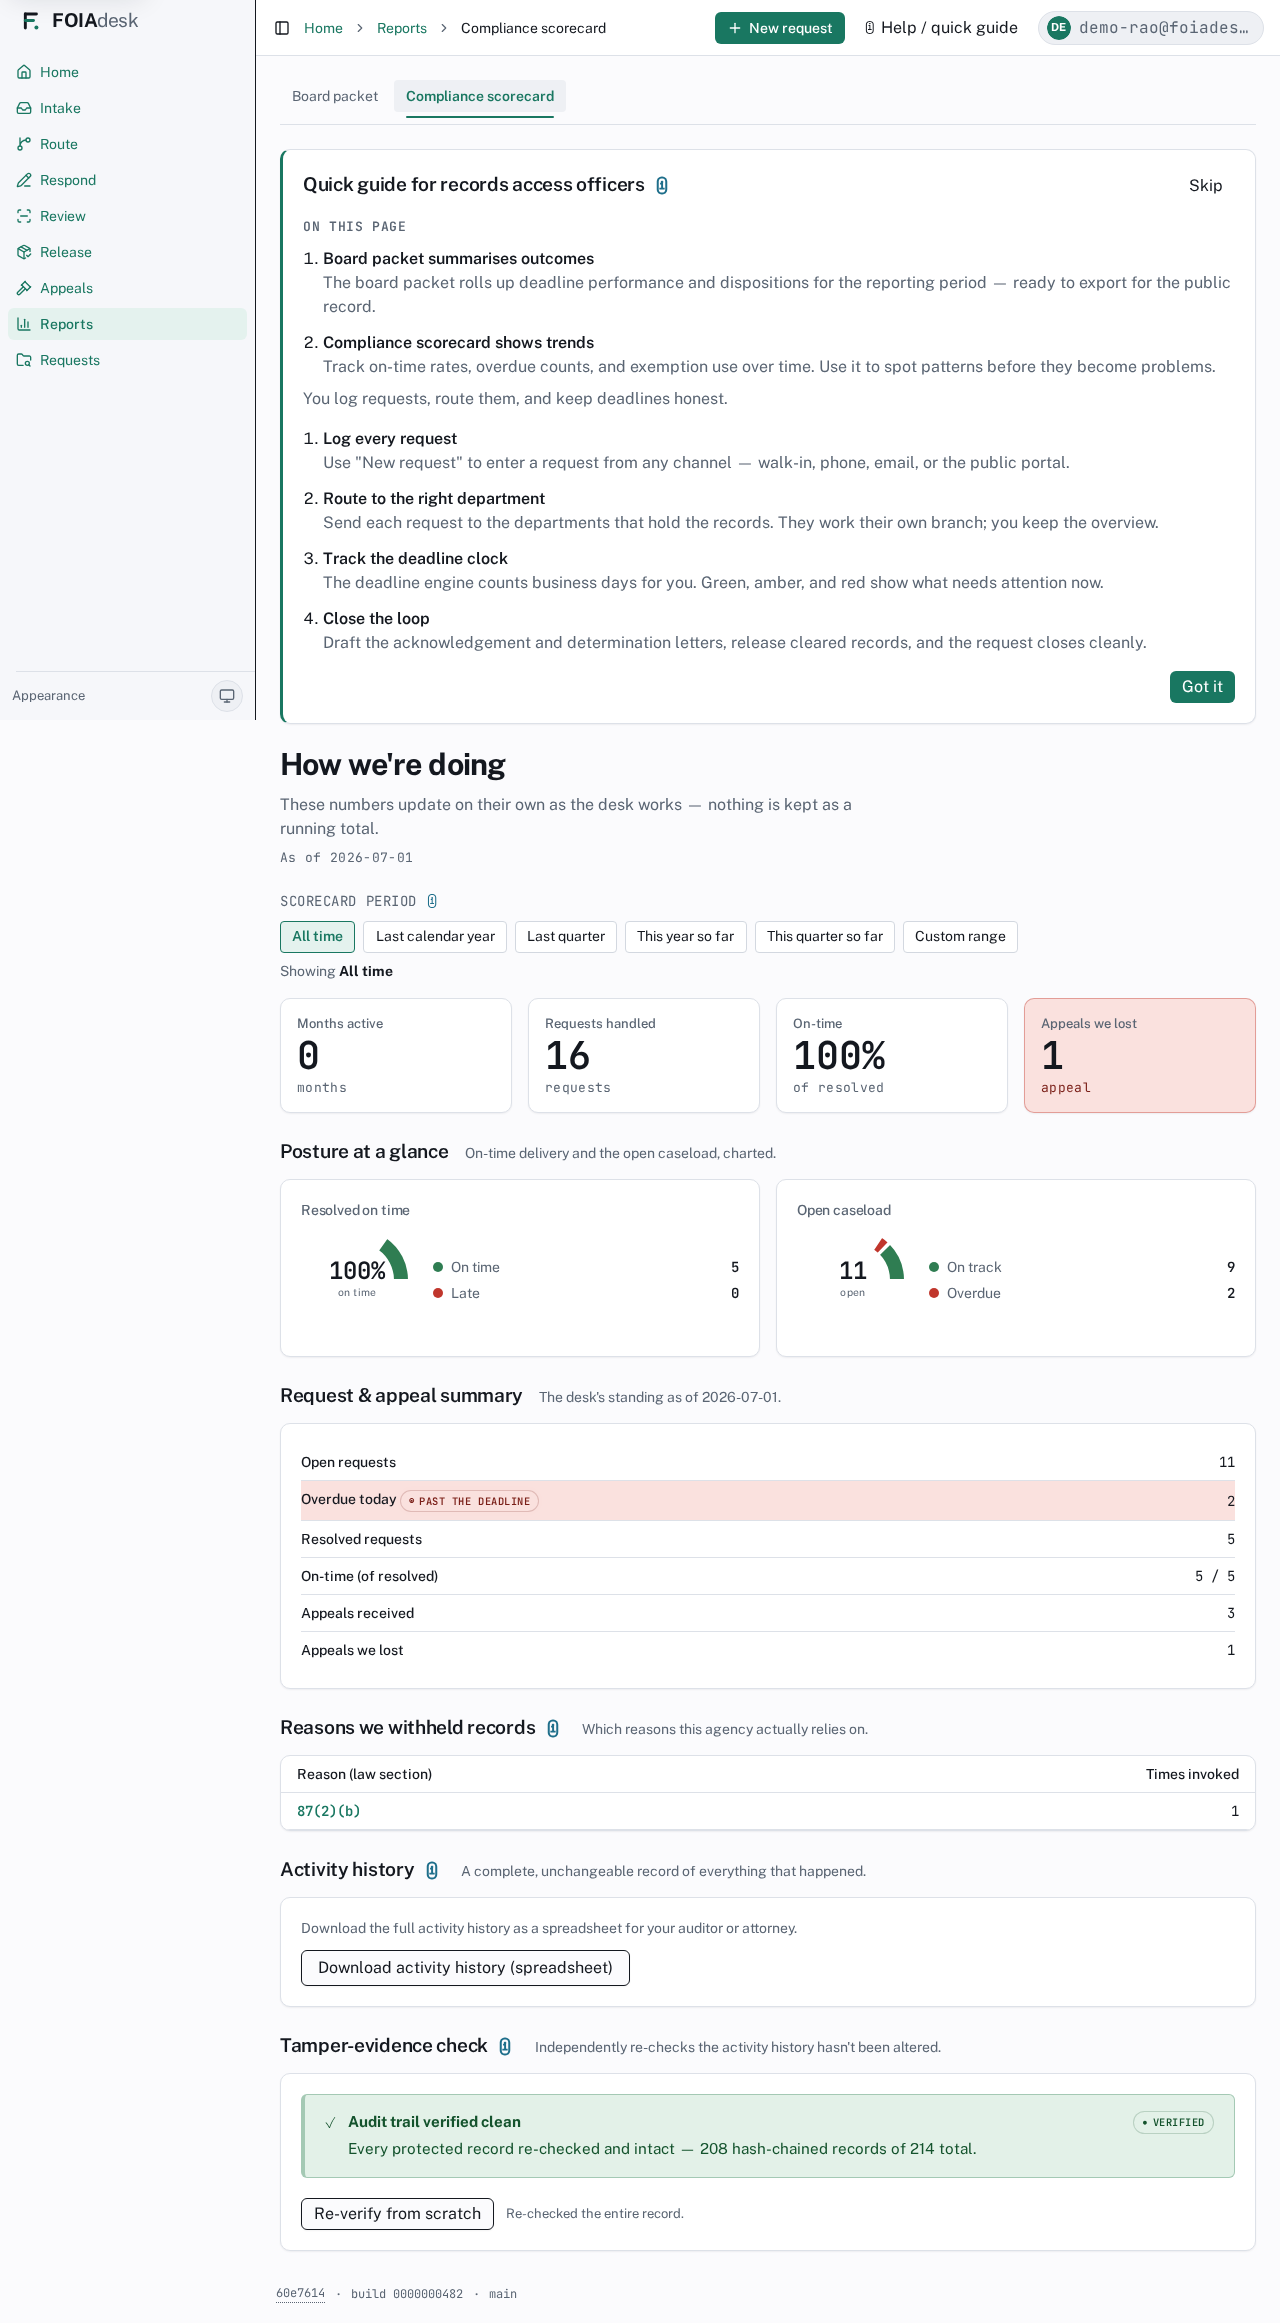
The Compliance scorecard tab — headed How we're doing — shows how the desk is doing over time. These numbers update on their own as the desk works, so you spot patterns before they become problems. Pick a Scorecard period (All time, Last calendar year, Last quarter, This year so far, This quarter so far, or a Custom range) and everything below re-figures.
The Compliance scorecard: on-time rates, overdue counts, open and resolved request totals, withholding reasons, and a downloadable activity history.
The scorecard reads top to bottom:
Headline figures — Months active, Requests handled, On-time (of resolved), and Appeals we lost.
Posture at a glance — two dials: Resolved on time (On time vs. Late) and Open caseload (● On track vs. ◉ Overdue).
Request & appeal summary — Open requests, Overdue today, Resolved requests, On-time (of resolved), Appeals received, and Appeals we lost.
Reasons we withheld records — every law section actually cited, with how many times each was invoked. This is where you see which exemptions the desk relies on.
i
The board packet and the scorecard are designed to print. Use your browser's print or Save as PDF to produce a clean report for a board meeting or the public record — this same printable approach produced the very PDF you may be reading.
The audit trail — export and verify
Oversight isn't only reading numbers; it's being able to prove they're honest. Two tools sit at the bottom of the compliance scorecard, and together they are the auditor's centrepiece — a complete, unchangeable record of everything that happened, and an independent tamper-evidence check that re-proves that record hasn't been altered.
Export the activity history
The Activity history section hands you the whole record as a spreadsheet — "a complete, unchangeable record of everything that happened." Select Download activity history (spreadsheet) and the portal prepares a CSV you can open in any spreadsheet program and hand to an auditor or attorney.
The compliance scorecard's Activity history export and Tamper-evidence check: download the full record as a spreadsheet, then verify the hash chain re-checks clean.
i
The export is always the whole record. Unlike the figures above it, the activity-history download is not limited by the scorecard period — it's the complete event trail by design, every entry from the beginning. Each row carries the action, when it happened, who did it (with their name), the records it touched, and the full event detail. The button waits until the record finishes loading; if you see "Available once the record finishes loading," give it a moment.
Verify the hash chain
The Tamper-evidence check "independently re-checks the activity history hasn't been altered." Every protected entry is sealed with the one before it into a hash chain, so a later edit or deletion of any entry breaks the chain from that point on. The check re-walks that chain and reports the result.
The Tamper-evidence check on the compliance scorecard: a clean pass shows "Audit trail verified clean" with the count of hash-chained records verified, plus a "Re-verify from scratch" control.
A clean pass shows Audit trail verified clean with a ● Verified badge and a count — for example, "Every protected record re-checked and intact — 208 hash-chained records of 238 total."
If anything was altered or removed, it instead reports Tamper detected, tells you a protected record may have been changed, and lists exactly where the chain broke — your cue to preserve the exported record and contact your administrator.
Re-verify from scratch re-checks the entire record from the beginning rather than just what's changed since the last check. It's the authoritative pass.
i
Verification runs on the server, over the sealed record. The check re-computes the hash chain itself, not a copy — so a clean result is real assurance the history is intact end to end, and there's nothing here you can edit. The auditor's whole role is exactly this: read everything, change nothing, and be able to prove the record wasn't touched.
◈ Public requester
Submitting a request (public)
Anyone can ask an agency for its public records through the portal — no account, no fee — then track the request, read what's released, and appeal a denial, all online.
You have the right to request public records under your state's freedom-of-information law — in this demo, the New York Freedom of Information Law (FOIL). There's no fee just to ask, and you never have to explain why you want the records. The agency runs everything through its public records portal, so you can submit a request, follow it, download what's released, and appeal a denial entirely online — no account and no password, ever.
The portal has three tabs across the top — Submit a Request, Check Request Status, and Library — plus a Language selector. This page walks the whole journey in that order.
Submitting a request
The portal opens to Submit a Request. You'll see a plain-language note about your rights and the agency's duty to respond, a reminder to check published records first, and the request form itself.
The Town of Maplebrook public records portal: your FOIL rights, the five-business-day response duty, a "before you submit" reminder, and the request form.
To send a request:
Enter your name and an email so the agency can reach you about the records.
In What records are you requesting?, describe the records as specifically as you can — dates, departments, and subjects all help.
Optionally pick a Department of interest and a Date range of records to point the agency in the right direction.
Click Submit request. You don't need an account, and you'll get a confirmation number to follow up with.
Filling out the form
Fields marked with an asterisk (*) are required — that's just Your name and What records are you requesting? Everything else is optional and only there to help the agency find your records faster.
The request form: required name and records-description fields, an optional "I am a..." choice defaulting to "Prefer not to say," and optional department and date-range fields.
Your email — optional, but without it the agency has no way to reach you. Add it so you get updates and a way to look up your request later.
I am a... — optional, and it defaults to Prefer not to say. The agency cannot require you to identify yourself or state a reason for the request.
Department of interest — optional; it tells the agency where to route your request first.
Date range of records — optional; naming a window (for example, "January 2026 through May 2026") narrows the search and speeds your request.
✓
Be specific. A precise request gets you records faster — name the dates, the department, and the subject. "Public Works invoices for road salt, January through March 2026" beats "anything about snow." Narrowing the scope means less to search and a quicker answer.
i
No login, still spam-protected. The form is protected against automated abuse, but it needs no account and no password. Note your confirmation number when it appears — you'll use it, with the email you entered, to check on the request.
What happens next
By law, the agency must respond within five business days of receiving your request. It will do one of three things:
Grant access to the records.
Deny the request in writing, with the reasons.
Acknowledge the request and give a date by which it will respond.
You don't need to do anything while you wait — the agency will follow up using the email you provided.
Checking your request status
Already submitted? Use the Check Request Status tab to see where your request stands. Enter the confirmation number you received and the email you used, then select Check status.
The Check Request Status page: look up a request with its confirmation number and the email you used.
For your privacy, a wrong number or email returns the same neutral "we could not find that request" message either way — it never reveals whether a request exists. Double-check that both match exactly what you submitted.
Reading your status page
Once your request is found, the page shows its number, a status badge, and the statutory dates that apply. The status is plain language:
Received — being reviewed — the agency has your request and is looking at it.
In progress — it's been routed to the relevant department(s) or the agency is gathering responsive records.
Responded● Responded — the agency has issued its response.
Closed● Closed — the request is finished.
Withdrawn or Closed — these records are not held by this agency — the request ended without a records release.
The date rows show the statutory deadlines that apply to your request — Initial response due, Substantive response due, and, on a denial, Appeal window ends. These are the dates the law sets for the agency to act; as the page notes, they're guidance, not a promise of the exact day a response will arrive.
Downloading your released records
When the agency finishes and releases records to you, the Your records section on your status page is where you collect them. Select Check for your records and, if a release is ready, the page lists each file as a download link.
A closed request's status page with the "Your records" section and the "Check for your records" button.
i
Download links are short-lived. The links are valid for a few minutes for your security. If one stops working, just select Check for your records again to get fresh links. If the agency emailed you a "your released records" link, that page works the same way — open it straight from the email.
If the agency hasn't released anything yet, you'll see a note saying so; if the portal briefly can't prepare the package, it will ask you to try again shortly. Neither means anything is wrong with your request.
The public reading room
The Library tab is a public reading room. Records this agency has already released in response to earlier requests — and chosen to publish — are posted here for anyone to read and download, with no confirmation number and no account needed.
The public reading room (Library): released records published for anyone to read and download, here showing the empty state before anything has been published.
Each published entry shows the request it came from, the date it was released, a public-safe description, and the downloadable files. When nothing has been published yet, the page simply says "No released records are published yet."
✓
Check the Library first. If the records you want are already published here, you can download them immediately — no request and no wait. That's also why the request form reminds you to check published records before you submit.
Appealing a denial
If the agency denies your request — or doesn't respond within the time the law allows — you have the right to appeal. When that applies, your status page shows a You can appeal this decision panel with the legal basis and, importantly, the Last day to file an appeal.
A status page showing the "You can appeal this decision" panel, the statutory basis under Public Officers Law §89(4)(a), and the last day to file an appeal.
Under New York's Freedom of Information Law (Public Officers Law §89(4)(a)), you may appeal a denial to the agency. To appeal, write to the agency's records-appeals officer and say what you are appealing and why — the panel links the records office's contact details if the agency provided them, and if you're unsure where to send it, the records office can tell you.
!
Watch the appeal deadline. The Last day to file an appeal shown on your status page is a statutory cutoff. If the window has already closed, the panel says so — file your appeal in writing before that date.
i
This is guidance, not legal advice. The portal explains your right to appeal and the deadline; it does not decide the appeal or guarantee an outcome. You appeal by writing to the agency — there is no "submit appeal" button on the public portal.
Reviewing an appeal by secure link
An appeal is decided by the agency's appeals officer, who may be brought in by a one-time secure magic link rather than a full account. If you receive such a link, it opens the appeal record on the device you open it on and only for that one appeal.
The secure appeal-review link showing its safety message: an invalid, expired, or turned-off link can't be opened, and links are re-sent, never extended.
For security, the link works only on that device, for that one appeal, and it can't be extended — only re-sent. If it's forwarded to a new device, opening it asks for a short code emailed to the original address. An invalid, expired, or turned-off link shows "This link can't be opened," with a note to ask the agency for a fresh one. The full appeals-officer experience is covered in the Appeals officer section.
Choosing your language
Every portal page carries a Language selector in the top bar. The demo portal offers English, Simple English, and Español — pick one and the whole portal switches, including the form labels, status messages, and the reading room.
Accessibility
The portal is built to meet WCAG 2.1 AA accessibility standards. If you have trouble using any part of it, the records office can help — contact information is in the portal footer. The details you provide are used only to process your request.
⬚ Feature guide
Intake & request creation
Every request enters FOIAdesk the same way — logged, dated, and put on the clock — whether it arrived through the public portal, by email, or across the counter.
This is the front door. A request can reach you through several channels, but they all converge on one logged record with a started deadline clock. Intake has three tabs — New request (type one in by hand), Import (load a batch from a spreadsheet), and Email queue (promote captured inbound mail) — and this section covers each, plus the duplicate and campaign signals you see while logging.
Submit through the public portal
Requesters use your agency's public portal to file without calling or emailing. They fill in their details and what they are looking for, and the request lands in your intake queue already structured.
The requester opens your portal and completes the public request form — name, contact email, and a description of the records they want.
They submit, and FOIAdesk creates the request with received via: portal and the submission timestamp.
The request appears in Intake for you to confirm the details and start the clock.
✓
The portal captures the received date for you. A portal submission is timestamped the moment the requester hits submit, so the statutory clock is anchored to a fact, not a memory.
The public request form a requester fills out: contact details, a records-description box, and the submit action that timestamps the request.
Promote an email from the Email queue
Mail sent to your agency's intake address lands on the Email queue tab, waiting for a person to turn it into a tracked request — nothing is ever auto-promoted. Each captured email is shown as a card with everything you need to triage it at a glance:
A traffic-light status — ● On track, ◐ Due soon, ◉ Overdue — projected from the moment the email arrived, so an email that has been sitting reads as live statutory exposure before you have even logged it.
The subject, the From → To addresses, and a short body snippet.
A summary line: Received {date/time} · N attachments · response due {date}.
To act on one:
Read the card. If it is a genuine records request, choose Promote to request.
Promoting creates the tracked request, starts the statutory clock from the legal receipt moment of the email, and attaches the message and its attachments as files on the request — then drops you onto the new request.
If it is not a request — spam, a vendor reply, misdirected mail — choose Dismiss. A confirmation explains that no request is created and no clock is started, but the raw email is kept for the audit trail. It is a decision, not a delete.
Working the queue is an intake-desk action, limited to the RAO, intake clerk, or an administrator.
i
Promote and dismiss are both logged. Whether you turn an email into a request or set it aside, the action is recorded, so there is always a trail of how an inbound message was handled.
The Email intake queue: captured messages each showing a projected deadline status, sender, snippet, and received/response-due line, with Promote-to-request and Dismiss actions.
Bulk-import from a spreadsheet
Moving to FOIAdesk from another system — or from a tracking spreadsheet — you don't retype every open request. The Import tab loads a batch at once and rebuilds each deadline from its original arrival date, so history stays honest.
On the Import tab, drop a CSV or Excel (.xlsx) file, or Download example CSV to see the exact columns and fill it in. (Legacy .xls is asked to be re-saved as .xlsx; a multi-tab workbook prompts you to pick the worksheet.)
Match your columns. FOIAdesk auto-maps common headers; you can also start from a preset for a prior system (GovQA, NextRequest, JustFOIA). The fields it maps are your existing request number (kept as-is), requester name and request text (both required), arrival date (required), and optional requester email, type, channel, and arrival time (if you leave the time blank it defaults to the start of the business day, which is flagged because it affects the clock).
Preview the batch. A reconciliation tally shows how many rows are ready, already imported, duplicated within the file, or have problems — and any problem row gets an inline Fix panel so you correct it in place without re-uploading.
Choose Import to create the requests. Imported requests keep their existing numbers and start their clocks recomputed from the arrival date; the completion step reports what imported and what failed, and flags any near-identical clusters as possible campaigns to review.
✓
Back-dating is the point. Import rebuilds each request's statutory deadline from its real arrival date, so a request you migrate that is already days into its window shows the correct — sometimes already ◐ Due soon or ◉ Overdue — status the moment it lands, not a fresh clock.
The spreadsheet import: step one asks for a CSV or Excel file with a drag-and-drop area and a downloadable example template, keeping existing request numbers and rebuilding each deadline from the original arrival date.
Log a walk-in or phone request manually
Requests that arrive by phone or at the counter are typed in by hand on the New request tab.
Open Intake and stay on New request. If you are holding a paper request or an email printout, use Start from a file to attach it as you log.
Under Requester, enter the Requester name (required) and email if given, and set Requester type (reporting only) and How was it received? (for example, phone or walk-in).
Under Request, summarize the ask in What are they asking for?
Under When it arrived, set the Received date and Time — backdate them if the request actually arrived earlier.
Watch the Deadlines preview compute the first reply due by date from what you entered, then Save & start the clock.
The New request form: requester details, the request text, the received date and time, and a live deadlines preview showing the first-reply-due date before you save and start the clock.
!
Get the received date right before you save. The clock starts from the received date and time you enter, and it runs whether or not the request has been acknowledged or routed yet.
Catch duplicates and campaigns
While you log a request, FOIAdesk watches for ones that look the same — a single requester sending twice, or many requesters asking for the identical record (a campaign).
A possible duplicate flag appears when a new request closely matches an existing open one, so you can link rather than double-track.
A campaign groups similar requests together so you can acknowledge and route them as one batch from the Campaigns tab in Route.
Duplicate / campaign signal
The intake-time banner showing a suspected duplicate or a campaign grouping with a link to the related requests
✓
Group before you route. When several people ask for the same records, handle them as a campaign so the same release work isn't repeated request by request.
⌥ Feature guide
Routing & the request tree
One request fans out to the departments that hold the records — the request at the root, each department a branch — and every branch is tracked, correctable, and returned with an attestation, while the RAO keeps the whole-request overview.
A FOIL request rarely lives in one place. FOIAdesk models it as a tree: the request at the root, departments as branches, each acting on its own work order while the RAO keeps the whole-request overview. This section covers routing as a capability — the role-based walkthrough lives in the RAO / intake section.
How a request moves from intake through routing, review, and release.
The request tree (root → department branches)
The tree is the mental model that makes everything else in this section coherent. One legal request can need records from several offices at once, so FOIAdesk gives it a shape: the request at the root, the departments as branches, and one whole-request overview sitting above all of them.
The root is the request. It is owned by the RAO and carries the one thing the law cares about: the statutory deadline. Acknowledgement, the determination letter, fees, appeal, and closure all attach to the root, because they are decisions about the request as a whole.
Each branch is a department's work order. Routing the request to a department grows a branch — a self-contained unit of work carrying what that department was asked for, its own internal due date, its own traffic-light status, the records it gathers, and the dispositions it sets. The branch is where a responder actually works (see Work orders below and the Department responder role section).
A department acts on its own branch only, and reads its siblings. A responder can upload, note, and dispose only on their own branch; the other departments' branches are visible read-only for context — so Public Works can see that Police is also working the same incident without being able to touch Police's records. Your agency can restrict sibling visibility entirely — it is a tenant-configurable setting in Admin & settings → Departments.
So a single request fans out into parallel branches that each run their own internal clock while the root keeps the legal one. The seeded culvert-failure request REQ-2026-0103 shows this directly: one request routed to Police Department, Public Works, and Building Department — three branches working in parallel under one statutory deadline (and it is the demo's appealed request, so you can follow it all the way through).
Two clocks, and they never move each other. This is the distinction worth holding onto: a per-branch extension adjusts one department's internal due date to manage workload, and it does not touch the request's statutory deadline at the root. Conversely, a statutory extension recorded on the request moves the root deadline and does not reach into the branches. Correcting the tree — bounce, recall, or reroute (below) — moves work between branches and likewise never restarts the statutory clock running underneath. Each of these is detailed in its own subsection below.
Routing and fan-out
From the Route screen the RAO acknowledges the request, then selects the departments that hold responsive records and sends. Routing to several departments at once is fan-out — one request, many branches working in parallel.
Open Route and pick the request from the queue. It must be acknowledged first — an Acknowledge before routing gate blocks routing until it is.
Check the box for each department that holds records — you can select several at once.
Click Send to departments. FOIAdesk creates a branch and a work order for each one.
i
Acknowledge before routing. New York requires acknowledgement before a request goes anywhere; FOIAdesk blocks routing until the request is acknowledged. See the RAO / intake section.
Work orders: acknowledge, in-progress, return
Each branch carries a work order — the unit of work a department owns: what was asked, its internal due date, the records gathered, and its dispositions. A department responder sees only their assignment and moves it through three states.
Acknowledge the work order to confirm the department has it.
Mark it In progress while searching for and gathering records.
Upload responsive files and Return the branch — attaching an attestation that the search was complete.
The return attestation is the responder's signed statement about the search they performed. It is captured at return time and kept on the branch as part of the record.
Return with attestation
The responder's return action with the search-completeness attestation checkbox and statement
Per-branch extensions
A branch can take its own extension — a department that needs more time gets a per-branch internal due date adjustment, with justification, without resetting the others.
Open the request hub and find the department's branch.
Adjust its internal due date and record the reason.
The branch's traffic-light state recomputes against the new internal target.
!
A branch extension is internal; the statutory deadline is the request's. Per-branch dates manage workload across departments. The legally operative date is the request's statutory deadline at the root, and an extension of that requires a formal statutory extension recorded on the request. Statutory specifics are draft pending attorney review.
Bounce, recall, reroute
Branches don't always go to the right place the first time. Three corrections keep the tree accurate, and each is an audited event on the request.
Bounce — a department that holds no responsive records sends its branch back, with a reason, instead of returning empty-handed.
Recall — the RAO pulls a branch back from a department (sent in error, or no longer needed).
Reroute — the RAO moves the work to the correct department, or adds a department that was missed.
✓
Correcting a branch never restarts the clock. Bouncing, recalling, or rerouting moves the work; the statutory deadline keeps running underneath, so the overview stays honest.
AI auto-routing
When your agency has enabled it, an Auto-route with AI button sits beside the department checkboxes on the route panel. This is the only AI action in FOIAdesk permitted to change state, and it works as a confidence split, not a black box:
Departments the AI is very confident about — at least 85% — are routed right away, the work orders dispatched immediately. This is reversible: a banner offers Undo to restore the prior routing.
Less-certain guesses are not routed. They drop into a Less-certain AI suggestions list for you to confirm one at a time — each row shows the suggested department, an "X% confidence" pill, the AI's rationale, and the records it thinks that department holds. You Accept & send, Modify before sending, or Dismiss each one (accepting is still gated on acknowledgement, and routes through the normal audited human path).
After a run, a summary banner reads, in effect, "Sent to N departments automatically; M less-certain guesses added as suggestions for you to confirm."
The action is feature-flagged per tenant and logs the model and prompt version on every routing it performs.
The route panel: the acknowledge-before-routing gate, the department checkboxes, and the Auto-route-with-AI action that routes high-confidence departments and leaves less-certain ones as suggestions to confirm.
Everything else AI does — classification, exemption hints, PII detection, letter drafting — is suggest-only forever: a write to a suggestions table that a human must accept or dismiss.
i
A plain word-match hint is always on, separate from the AI. Even with AI routing off, the manual route panel quietly flags a department as Suggested when the request text matches that department's records inventory. It is a keyword hint, suggest-only — you still check the box to route.
i
AI routing may be unconfigured on a given deployment. Where the routing model is not set up, not included in the plan, or can't be reached, the Auto-route with AI button either does not appear or explains plainly why it can't run — and you route by hand with the department checkboxes, which always works.
One request, many branches, one overview. Routing fans the work out to the departments that hold the records, keeps every move audited, and lets AI help only where a human can instantly undo it.
▤ Feature guide
Documents & review
Every responsive file enters as a tracked node, is scanned before anyone opens it, moves through an explicit set of review states, and carries one disposition — release, withhold, or discard — that decides whether it can ever reach a requester.
Files in FOIAdesk are not loose attachments; each is a FileNode with its own state, scan status, and disposition. This section covers the document lifecycle from the moment a file lands to the moment a reviewer clears, redacts, or withholds it. Assembling the cleared records into a package is its own Release section, and the redaction editor has its own Redaction section.
Getting records in
Responders gather responsive records onto a request's branch. Files arrive several ways, and all converge on the same data layer:
Direct upload — drag a file onto the request, or use the file picker.
Email import — pull a request or its attachments in from an .eml message.
Container ingest — a .pst/.mbox/.eml/.msg mailbox or a .zip archive explodes into its individual messages and attachments, each reviewed on its own. See Container ingestion.
Desktop client — the native shell adds watched folders that ingest through the same custody path as the web app.
i
One ingest path, one custody record. However a file arrives, it lands in the same data layer with the same tenant and branch keys and the same audit trail. There is no side channel that skips review, and files are tracked identically in every custody mode.
Virus-scan quarantine
No one opens an unscanned file. Every ingested file is scanned, and the result gates what you can do with it. Until the scan clears, the file is quarantined — it cannot be previewed, redacted, or released, and the queue shows its scan status inline.
!
A quarantined file is not actionable, and can never reach a release. Infected or suspicious uploads are walled off with no override that moves them into a package. Scan and container ingestion can run concurrently, so a disposition you set must be re-checked against the file's live state, never a pre-scan snapshot.
A file in the review queue flagged infected: the scan result marks it quarantined, and its only actions are to keep it private or remove it — it can never be added to a release.
The review queue
The queue is the Review workspace. Files are grouped by request, each carrying its own disposition control, its virus-scan status, and suggest-only AI assist buttons. A counter shows how many files are still waiting. Work one file at a time: open and read it, black out anything exempt, then set a disposition. Nothing reaches a requester until a reviewer has cleared it.
The review states
Every file moves through a small, explicit set of states. The state is what the release gate checks — only cleared or redacted files can ever be assembled into a package.
State
Meaning
Pending scan
Uploaded, awaiting virus scan; not yet openable.
Awaiting review
Clean and queued for a reviewer to read and decide.
Cleared (OK to release)
Reviewed and approved for inclusion in a release package.
Needs redaction
Has exempt content; routed to the redaction editor before it can be released.
Withheld
Reviewed and kept private — exempt in full or non-responsive, never released.
Discarded
Dropped as empty or non-responsive, with no released content.
Locked (internal)
The original of a redacted pair — preserved for the record, never released. See Redaction.
Set a disposition: clear, withhold, discard
Setting a disposition is the reviewer's core action — it is what decides a file's fate.
Open the file from the Review queue and read it.
Black out any exempt text first if the file needs redaction (see Redaction).
Choose the disposition: OK to release, Keep private — don't release, or Remove — file is empty.
The labels are deliberately plain so the decision is unambiguous; the state names above are the underlying record values the release gate enforces. Only files set to OK to release (or the redacted copy of a redacted file) can be assembled into a release package.
✓
The human disposition is the audit event. AI hints can mark up likely PII or possible exemptions, but they never set a disposition on their own — your clear/withhold/discard is what gets recorded.
Preview supported file types
Reviewers read content in-app with Preview, without downloading every file. A wide range of formats previews in the browser — the Supported files section is the full plain-language matrix, and the short version is:
PDF & images — pdf, png, jpeg, webp, tiff, bmp, gif, and iPhone heic/heif photos render in the viewer.
Documents & data — Word, Excel, and PowerPoint (docx/xlsx/pptx, and the older doc/xls/ppt), OpenDocument (odt/ods/odp), txt, csv, json, and eml email are rendered to a PDF for review.
Video & audio — common video (mp4, mov, webm, …) and audio (mp3, m4a, wav, …) files play right on the page. Video is review / release / withhold only — never redacted (see below).
Containers — a mailbox or archive previews its children: you step inside and preview each message and attachment individually.
Anything that can't preview in the browser can still be downloaded, handled in your own tool, and uploaded back — nothing fails silently. See Supported files for the per-format detail.
The seeded REQ-2026-0127 is the every-format showcase: it holds one cleared record in each previewable type, so every preview path can be exercised on the demo tenant without uploading anything.
!
Video is review / release / withhold only — never redacted. You can preview a video and mark it released or withheld, but FOIAdesk does not offer frame-level video redaction. A video that needs any portion removed must be withheld in full. See Redaction.
In-app preview
The file preview pane rendering a document next to its disposition and AI-assist controls
Forensic watermark on pre-release views
Every pre-release view and download of a record carries a forensic watermark — the viewer or recipient, a timestamp, and the originating IP address — applied automatically. This holds for reviewer previews and for the requester's eventual download.
Review is the gate. Read each record, set its state, and the system guarantees only what you cleared ever leaves your office — and every look at it before release is stamped.
▤ Feature guide
Supported files
Almost anything a requester or a department sends, FOIAdesk can take in, preview, and release. This section is the plain-language guide to what previews in the browser, what redacts in-app, what you handle in your own tool, and what each choice costs.
Public records arrive in every format imaginable — scanned PDFs, phone photos, spreadsheets, mailbox dumps, video. FOIAdesk's rule is simple: any file can be ingested, scanned, and released; the differences are only in how it previews and how it redacts. Nothing fails silently — if a file can't preview in the browser, you can still download it, redact it in a tool of your choice, and upload the result.
What happens to every file
Ingest — upload it to the request like any other file.
Virus-scan — every file is scanned before anyone can open it.
Preview — most files render in the in-app viewer with the forensic NOT FOR RELEASE watermark burned in until they're cleared.
Redact — black out exempt content, with true content removal on save.
Release — only cleared or redacted files can enter a release package. This gate never bends.
By family
Family
Examples
Previews in-app?
Redact
PDF
.pdf
Yes
In-app
Photos & images
.png.jpg.webp.tiff.bmp.gif
Yes
In-app
iPhone photos (HEIC)
.heic.heif
Yes
In-app
Word / Excel / PowerPoint
.docx.xlsx.pptx (and older .doc.xls.ppt)
Yes
.docx/.xlsx/.pptx in-app; older in your own tool
OpenDocument
.odt.ods.odp
Yes
In your own tool
Apple iWork
.pages.numbers.key
Download to view
In your own tool
Text & data
.txt.csv.json
Yes
In-app
Email
.eml, mailbox exports
Yes (faithful render)
In-app
Video
.mp4.mov.webm …
Yes (plays in the page)
Never redacted
Audio
.mp3.m4a.wav.flac.opus …
Yes (plays in the page)
In your own tool
Mailbox & archive containers
.pst.mbox.msg.zip
Opened item by item
Per item
Other (RAR/7z, CAD, e-books, databases)
.rar.7z.dwg.epub.sqlite …
Download to view
In your own tool
i
"In your own tool" is a real, audited path — not a dead end. For a format the in-app editors can't open, you download the original through the audited redaction path, redact it in a specialized tool (Acrobat, Photos, etc.), and upload the redacted result. Because the removal happened outside FOIAdesk, you sign an attestation that you performed true content removal — that statement is the audit record. Only the redacted upload becomes releasable; the original locks.
!
Video is review, release, or withhold — it is never redacted. This is a deliberate, locked product decision. A video you can't release in full is withheld with an exemption cited; there is no in-app or upload-back path that turns a "redacted" video into a releasable file.
Mailbox dumps and archives
A .pst, .mbox, or .zip isn't reviewed as one blob — FOIAdesk explodes it into its individual messages and attachments, each with its own preview, redaction, and legal disposition. See Container ingestion for the full workflow.
What it costs (plain-language billing)
FOIAdesk never hard-stops statutory work to bill you — containers still explode, OCR still runs, and you can always release. Two things meter:
Processing minutes — container/ZIP/PST/MBOX extraction and OCR (making a scanned page searchable, charged per page) draw from the same monthly allowance: Town 300 · City 1,500 · Municipality 5,000 minutes per month. Past that, top up with a Processing Block ($49 per 1,000 minutes).
Storage — counted per GB: included Town 50 · City 150 · Municipality 400 GB, with overage in 50 GB / $15 blocks. If you bring your own S3 bucket, storage is free — you host the bytes.
i
Most reviews use little or no processing time. A normal PDF, photo, or Word document previews and redacts without touching the processing meter — minutes are consumed only when a container is exploded or a page is run through OCR. Plain uploads only count toward storage.
For the engineering source-of-truth matrix (every format × ingest/preview/redact/release/explode/metering, with code pointers), see docs/file-types/supported-file-types.md in the repository.
▣ Feature guide
Redaction
Redaction removes exempt content for real — it produces a separate redacted artifact with the content truly gone, locks the original underneath, and keeps the two paired so your office holds the full record while the requester only ever sees the cleared copy.
Redaction is how exempt text is removed from a record before it is released, while your office keeps a complete, unaltered original underneath. It is a deliberate, paired workflow: you start from an original, create a redacted copy, and the original locks so it can never be released by mistake. This section walks the workflow end to end and documents each capability.
The redaction workflow
You never black out the original itself — you generate a redacted artifact from it. Redaction starts from a file's review card, where Black out parts first sits alongside the other dispositions.
A file's review card: its scan and deadline status, the suggest-only AI-assist buttons, and the four dispositions — OK to release, Black out parts first, Keep private — don't release, and Remove.
In the Review queue, open a file that has exempt content and choose Black out parts first. (The exact wording follows the file kind — Black out (document), Black out (picture), Black out (email), or Black out in another program for an exotic format.)
The redaction editor opens on the rendered file, titled Black out · {file name}. Drag to draw boxes over the text or regions to remove. Click a box to select it — then resize it from its corners, give it a legal reason, or remove it.
Give a selected box its §87(2) legal reason (see below). A box left without a reason is flagged with a reminder, though save is only blocked when there are no boxes at all.
Use Undo and Redo freely; the footer counts {n} area(s) blacked out.
Click Save blacked-out copy to commit. This produces the redacted artifact and locks the original.
The redaction editor: black-out boxes drawn over a rendered document, a selected box showing its "This box's legal reason" §87(2) picker, and the Save-blacked-out-copy action in the footer.
True content removal on save
The black boxes are not an overlay. When you save, the text or image under each box is permanently removed from the released copy — there is no live text hiding beneath a black rectangle that someone could lift off, copy out, or recover from the file.
!
The black-out is destructive to the released copy by design. What the requester receives has the exempt content gone, not hidden. This is the V1 contract: in-app redaction removes content on save, never an overlay over live text — so a released file cannot leak what was blacked out.
Original ↔ redacted pairing
Saving does not destroy the source. The original file is preserved and paired to the redacted artifact:
The original transitions to locked (internal) — retained for the record, appeals, and audit, but barred from any release path.
The redacted artifact is what enters the release path, marked cleared.
The pair stays linked, so an auditor or appeals officer can always compare what was withheld against what was released.
The seeded REQ-2026-0103 carries exactly such a pair — a needs-redaction original locked underneath its released redacted copy, with the black-out boxes visible on the copy — so you can see the locked-internal ↔ released relationship on the demo without redacting anything yourself.
i
Why the lock matters. If an appeal reverses a redaction, the locked original is the source of truth used to produce a corrected release. See Appeals and Release.
A locked original paired to its blacked-out copy: the original is kept private and locked for the record, and only the redacted copy is released.
Exemption citations — §87(2)
Two places in review ask for a statutory reason, and both draw from the same list:
On a redaction box — the This box's legal reason picker. One box carries one primary basis, chosen from a dropdown that starts at No reason yet. Different boxes on the same page can cite different reasons, so a page can be removed piece by piece for the right grounds each time.
When you withhold a whole file — choosing Keep private — don't release opens a Reasons to keep this private checklist where you tick every reason that applies. At least one reason is required before you can withhold.
The reasons come from your tenant's pinned statute pack — New York's FOIL exemptions at Public Officers Law §87(2) — and are grouped by source: Standard legal reasons (the shared attorney pack) and, if your agency has authored any, Your agency's added reasons (local-law grounds). A free-text Another reason (not in the lists above) field covers a basis outside the pack — for example a health-privacy law or attorney-client privilege.
The withhold form on a file: the required "Reasons to keep this private" checklist of §87(2) exemptions, an agency-added-reasons group, and a free-text field for a reason not in the lists.
The standard §87(2) grounds in the pinned pack are:
Citation
What it covers
POL §87(2)(a)
Exempted by another state or federal law
POL §87(2)(b); §89(2)
Unwarranted invasion of personal privacy
POL §87(2)(c)
Would impair contract awards or collective bargaining
POL §87(2)(d)
Trade secrets / substantial competitive injury
POL §87(2)(e)(i)–(iv)
Law enforcement: would interfere with investigation, fair trial, confidential sources, or reveal techniques
Examination questions or answers (pre-administration)
POL §87(2)(i)
Would jeopardize IT security or infrastructure
POL §87(2)(j)–(p)
The specific traffic-camera, bus-lane, speed-camera, and electronic-toll image exemptions (several carry statutory sunset dates)
!
Statutory language here is draft pending attorney review. Exemption citations and their wording are configured as data (statute-as-config) so legal corrections are edits, not code changes — and the labels above are drafted for review, not presented as settled law. The pinned pack also tracks sunset dates on the time-limited camera exemptions. Treat the cited grounds as a working draft until your counsel signs off.
AI suggestions are suggest-only
Where your agency has enabled them, review offers Find personal info (AI) and Suggest reasons to withhold (AI). These mark up likely PII and possible exemptions and return a panel you must confirm — Personal info the AI spotted (please confirm) and Reasons to withhold the AI suggested (please confirm). Nothing is applied automatically: you either Dismiss these suggestions, or Use these as a starting point, which pre-fills the withhold picker with the suggested reasons for you to accept or edit. They never change a file on their own.
i
Your accept or dismiss is the audit event. The AI write goes to a suggestions table; the human action that accepts or rejects it is what is recorded. The model and prompt version are logged on every AI event. This line is enforced in code, not in a prompt.
External-redaction fallback
Some files can't be redacted cleanly in-app — an unusual format, or a rendering the editor can't box accurately. For these, the external-redaction fallback lets you redact the file in your own tool and upload the finished redacted copy as the released artifact, still paired to the locked original so the record stays complete.
External-redaction upload
Attach an externally-redacted copy as the release artifact while the original locks internally
Video: review, release, or withhold — never redact
Video is a deliberate exception. FOIAdesk does not redact video — there is no frame-level or audio redaction tool.
A video file can be reviewed, released, or withheld in full — but it is never blacked out frame by frame inside the product.
A video that needs any portion removed must be withheld in full; the disposition is to withhold, not to attempt redaction.
Redaction removes what the law protects and nothing more — the requester sees only the cleared copy, while your office keeps the original, the citations, and the full chain of who changed what.
▦ Feature guide
Container ingestion
Mailbox dumps and archives don't get reviewed as one opaque blob. FOIAdesk explodes each container into its individual messages and attachments, so every item gets its own review and its own legal disposition.
Public-records responses often arrive as a container: a mailbox export or an archive holding many records at once — a single upload can hold thousands. FOIAdesk explodes each container so every message and attachment is reviewed, and dispositioned, on its own. This section covers the capability.
Supported container types
Type
What it is
PST
Outlook/Exchange mailbox export.
MBOX
Unix-style mailbox file.
EML
A single RFC 822 email (may itself carry attachments).
MSG
A single Outlook message.
ZIP
A general archive of arbitrary files.
i
Binary parsers are allowed here, and headers are preserved. Container formats like PST and MSG need real parsers; FOIAdesk runs them in the ingest pipeline. The reconstructed messages preserve their complete header set (sender, recipients, Cc/Bcc, dates) so the record is faithful to the original for review and release.
Explode a container into items
Uploading a container kicks off ingestion automatically. On ingest, the container is unpacked into its constituent items:
Upload the .pst, .mbox, .eml, .msg, or .zip to the branch like any other file.
Each message becomes its own reviewable record, with its headers, body, and metadata preserved.
Each attachment becomes its own record, linked to its parent message.
Nested containers (an archive inside an archive, a forwarded .eml) are unpacked recursively.
Every produced item is virus-scanned individually before it can be opened or acted on.
The seeded REQ-2026-0103 carries an already-exploded container — a mailbox upload unpacked into its individual messages and attachments — so you can step inside a real explosion on the demo and disposition the items one by one without uploading a .pst yourself.
Containers in the review queue
Each uploaded container appears in the Review queue as its own card — marked Mailbox / archive — not as loose files. The card shows a plain-English status (unpacking…, N of M reviewed, or a warning if a virus was found and it was not unpacked) and two ways in: Show items peeks at the children inline, and Open mailbox opens the full inbox view. A reviewer or RAO can also Re-extract to unpack again if needed.
The review queue with container cards: each mailbox or archive upload is one card tagged "Mailbox / archive" with its reviewed count, a Show-items peek, and an Open-mailbox link.
Review inside a mailbox
Choosing Open mailbox opens the container's own inbox: a message list on the left, a reading pane on the right, worked with the same controls as any file but scoped to the items within.
From the review queue, choose Open mailbox on a container card.
Narrow a large mailbox with the two filters: Show by decision (All items, Not reviewed, OK to release, Needs blacking out, Kept private, Removed) and Show by sender (every distinct sender in the mailbox). There is no separate message-vs-attachment filter — decision and sender are the two axes.
Preview each message and its attachments, and run suggest-only AI assist (PII, exemption hints) per item if your agency has it enabled.
Watch the N of M reviewed counter — which counts messages and attachments — track your progress, so a several-thousand-message mailbox is auditable item by item.
A .pst mailbox exploded into individually reviewable messages and attachments, each with its own disposition and an of-N-reviewed progress count.
Set a disposition per item
The whole point of exploding a container is that legal decisions are made item by item, not on the bag as a whole.
For each message and attachment, set its disposition in the reading pane: OK to release, Black out parts first, Keep private — don't release, or Remove — file is empty — the same four choices as any standalone file.
Withholding an individual item opens the same Reasons to keep this private §87(2) picker used everywhere else in review, so one message can be kept private with its exemption cited while its neighbors are released. Redact individual messages or attachments where exempt content appears, exactly as you would a standalone file.
A container is only complete when every item inside it has a disposition — partial reviews are visible from the reviewed counter.
Inside a mailbox: an individual message selected in the reading pane with its "Reasons to keep this private" §87(2) picker open, so the item can be withheld on its own grounds.
!
Disposition is per item, not per container. One mailbox can yield released messages, redacted messages, and withheld messages side by side. There is no bulk "release the whole mailbox" that bypasses per-item review — each item must be individually marked OK to release before it can enter a release package.
A mailbox dump is not one record — it is hundreds. Container ingestion makes that explicit, so every message and attachment gets the same individual legal disposition the law expects.
◳ Feature guide
Release
Release is the controlled exit. You assemble a package from cleared records, a three-layer gate guarantees nothing un-cleared can ride along, every pre-release view is watermarked, links expire, and you can revoke access after the fact.
A release package is the only way records leave your office, and it is built to make a leak structurally impossible — the gate re-checks clearance at every step. This section breaks the Release workspace into its sub-capabilities.
Assemble a package
When a request's records are cleared, you gather them into one package for the requester.
Open the request's Release tab (or the hub's Release action).
Review the Ready to release count against any records still Awaiting returns from departments, and the request's deadline.
Choose Assemble to build the package from the eligible files.
Review the assembled contents before sending.
A partial grant is normal: assemble the cleared and redacted records, withhold the rest, and the determination letter explains what was withheld and why.
The release queue: requests with records ready to send, their ready-to-release and awaiting-returns counts, the deadline, and the Assemble action.
The release gate (three layers)
Clearance is checked three times, so a file can never slip out between states:
Eligibility filter — only files in state cleared or redacted are even selectable for a package. Pending, needs-redaction, withheld, discarded, quarantined, and locked-internal files are not offered.
Hash-pin at assembly — when you assemble the package, each included file is pinned to its content hash. The package references that exact, cleared version.
Re-check at delivery — at the moment of delivery, every pinned file is re-verified against its live state and hash. If anything changed — a re-opened file, a failed scan — delivery is blocked.
!
A release physically cannot reference a non-cleared file. This is the central guarantee of the product. The gate is structural, not a checkbox: a package cannot be constructed around a file that is not cleared, and a file that changes after assembly will not deliver.
Watermark every pre-release view
Anyone who views or downloads records before release is on the record. Every pre-release and release view and download carries a forensic watermark — the recipient, a timestamp, and the IP address — applied automatically as part of the served file, so a leaked copy points back to who pulled it.
i
Watermarks are automatic. You don't enable them per file — every pre-release view and download is stamped without any action on your part.
Send to the requester and download
Once assembled, the package goes to the requester through a controlled link.
Choose Send to requester to deliver the package — typically a secure download link to the contact on the request. The matching grant, partial-grant, or denial letter is produced from Letters.
The requester opens the link and downloads the released records.
The send and each requester download are recorded against the request.
i
The requester never touches your storage. They receive a scoped, watermarked rendering through the release link, not a path into your file store.
Requester download
The requester-facing release page with the download link and any access notice
Expiring links
Release links expire. After the window passes, the link stops serving the package and the requester must be re-issued access. This bounds how long a sensitive package is reachable.
Link expiry control
Set or view the expiration window on an issued release link
Revoke access (kill switch)
If something needs to come back — a mistaken release, a court order, a late exemption — you can pull the package.
Open the release on the request.
Choose Revoke to disable the requester's link immediately, even within an otherwise-valid expiry window.
The revocation is logged, and the requester can no longer download from that link.
!
Revoke is immediate, but not retroactive to what was already downloaded. Revocation stops future access; it cannot recall a copy a requester already saved. Use it the moment an error is found, and follow with a corrected release if needed.
Corrected release after an appeal reversal
When an appeals officer reverses a withholding or redaction, the affected files reopen and you issue a corrected release.
The reversal reopens the previously withheld or locked content for re-review.
Clear or redact them per the appeal decision.
Assemble a corrected release with the newly cleared records and send a fresh link. The original release stays in the history; the corrected one is a new, gated delivery.
See the Appeals section for how a reversal feeds back into release.
Publish to the public reading room
Records of broad public interest can be published to the public reading room — a tenant-configurable, crawlable space where a release is posted once and served to anyone, so the next requester is pointed at what is already public instead of being delivered request-by-request.
Your agency turns the reading room on first — it is a tenant setting, off by default.
From a release that has already been sent, choose Publish to reading room. Only a records access officer or an administrator may publish a release (or later remove it) — a deliberately narrow permission, separate from the authority to send.
The published release appears in the portal's Library, where anyone can find it without filing a request. You can remove it from the reading room later if it should no longer be public.
i
Publishing is a separate, role-gated decision. A release does not become public just because it was sent — publishing to the reading room is an explicit, audited act limited to the RAO or administrator, and only when your agency has enabled the library.
The public reading room (the portal Library): released records an agency has published appear here for anyone to read and download, no request needed.
Release is where the work leaves the building. Every layer of the gate exists so that what leaves is exactly — and only — what was cleared.
✉ Feature guide
Letters & correspondence
Every letter the law requires — acknowledgement through appeal determination — is drafted from the live request, gated through RAO approval, sent by email with delivery tracking, and saved to the request as a downloadable letterhead PDF.
FOIAdesk drafts the correspondence the law requires and never lets it leave without approval. This section covers the kinds of letters, the approval gate, and how a letter goes out.
Kinds of letters
Letter
When it is used
Acknowledgement
Confirms receipt with an approximate response date — required before routing.
Grant
Records are released in full.
Partial grant
Some records released, some withheld or redacted, with the reasons.
Denial
Request denied in full, with the statutory grounds cited.
Extension
A reasonable extension of the response date, with justification.
Fee demand
States the estimated or assessed fee due before release. See Fees & money.
Appeal determination
The appeals officer's decision — affirmed, reversed, or partial. See Appeals.
!
Letter wording is draft pending attorney review. Templates are configured as data so legal can correct language without a code change. Treat the generated text as a working draft until your counsel has reviewed it.
Generate a letter
From a request's Letters (or Send a letter) area, pick the type and review the generated draft. The draft is pre-filled from the request — requester, dates, the deadline math, and the disposition — so you edit rather than author from scratch.
The RAO approval gate
A letter does not go out the instant it is drafted. Each letter sits in pending approval until a records access officer acts.
The author drafts the letter; it is saved in pending approval.
The RAO reviews the draft in the approval queue. Only a records access officer or a tenant admin sees this queue. Each card shows the subject, how it will go out (Letterhead PDF or Email to the recipient), who drafted it, a View request link, and a scrollable preview of the body.
The RAO chooses Approve & send, or Dismiss (which asks to confirm — Keep it or Dismiss letter) to reject a wrong template or a superseded determination.
!
No letter sends without approval. A drafted letter sits in pending_approval until the RAO clears it — the approval is a deliberate gate, and who approved which letter and when is recorded on the request as the audit event.
The letter approval queue: drafts waiting for a records access officer to approve and send, or dismiss back to the author.
Send via email, or produce a letterhead PDF
Approving a letter dispatches it and files a copy on the request automatically, so the correspondence history stays complete in one place. A letter goes out one of two ways:
Email to the requester — the approved letter is emailed to the contact on the request and its state moves to sent. If your agency has not finished setting up outbound email, the letter is still saved to the record but marked that it could not be sent — nothing is lost, and you can send it another way.
Letterhead PDF — some letters are produced as a document to print and mail rather than emailed (see Download the letterhead PDF below).
Before you send, the compose screen warns you if the recipient's address has bounced or been flagged as spam before, so you can catch a dead address rather than email into the void.
i
Per-letter "delivered / bounced" tracking after dispatch is not shown here. FOIAdesk records that a letter was sent — or that it failed to send (for example, email isn't configured yet) — and warns up front about a known-bad address, but it does not track a delivery receipt for each letter after it leaves. Follow your agency's normal practice to confirm receipt of a consequential letter.
Download the letterhead PDF
Every letter is also a formal document for your records and for mailing.
Open any sent or approved letter on the request.
Choose Download PDF to get the letter on your agency's letterhead.
The PDF is saved to the request's correspondence history automatically.
✓
The PDF and the record are the same letter. Whatever was approved and sent is exactly what downloads as the letterhead PDF and what is stored on the request — one source, no drift.
Every letter the statute requires is drafted from the live request, gated through the RAO, and saved back to the record — so the paper trail writes itself.
⚖ Feature guide
Appeals
When a requester challenges a decision, the appeal runs its own clock and lands on a single-screen appeals officer. A reversal feeds back into the request — reopening files and triggering a corrected release.
An appeal is a first-class object with its own deadline and its own decision-maker. This is the feature view of appeals — the mechanics of the workflow and how it connects to files and release. The role-based Appeals officer section covers the single-screen reviewer experience.
Intake an appeal
A requester appeals a denial or other adverse decision, and FOIAdesk opens an appeal tied to the original request.
Record the appeal against the request — by hand from the hub, or promoted from the requester's emailed appeal.
The appeal starts its own statutory clock, separate from the original request's deadline.
The appeal is assigned to the appeals officer.
i
The appeal clock is its own countdown. It is tracked with the same traffic-light states — ● On track, ◐ Due soon, ◉ Overdue — independent of the original request.
What can be contested
An appeal names what is being challenged, which frames the officer's review.
Contested type
What the requester disputes
denial
Records were withheld and they want them released.
fees
The assessed fee is excessive or improper.
adequacy_of_search
They believe responsive records exist that weren't found.
format
The records weren't provided in the form requested.
Make a determination
The appeals officer works a deliberately single-screen view — the appeal text, the underlying determination, and the released and withheld records, presented together — and issues a determination.
Review the contested decision against the cited exemption grounds and the relevant files.
Choose an outcome: affirmed (the original stands), reversed (overturned, records ordered disclosed), partial (some affirmed, some reversed), or remanded (sent back for further action before a final determination).
Record the reasoning, which produces the appeal-determination letter (gated through approval — see Letters & correspondence).
i
Appeals officers can be magic-link capable. An outside or part-time appeals officer can be granted a single-screen, navigation-free workspace reached by a magic link, without a standing login.
The single-screen appeals workspace: the contested decision, its appeal clock, the records on file with their dispositions, and the action to make a determination.
§89(4)(a) guidance
The officer's screen carries the relevant Committee on Open Government (COOG) guidance so the determination is grounded in the statute. New York's administrative appeal right lives at Public Officers Law §89(4)(a): a person denied access may appeal in writing within a set period, and the agency must decide and explain within the statutory window. The §89(4)(a) language is shown alongside the decision controls as reference, drawn from the configured statute pack.
!
The §89(4)(a) copy is for reference and is draft pending attorney review. The statutory window, wording, and citations are configured as data for legal correction. It is not legal advice — the officer's recorded reasoning is the operative decision. Confirm the current text with your counsel before relying on it.
A reversal reopens files and triggers a corrected release
When the officer reverses (or partially reverses) a denial, the decision flows back into the request.
The relevant locked-internal originals or withheld files are reopened for the disclosure the determination requires.
The reviewer clears or redacts them per the appeal outcome.
A corrected release is assembled through the normal three-layer gate and delivered as a new, watermarked package. The original release and the appeal both remain in the request history.
See the Release section for the corrected-release mechanics and Redaction for how the locked original is the source of truth a reversal draws on.
An appeal is a second look with teeth: when it reverses, the system reopens exactly the records the determination names and pushes a corrected release through the same gate as the original.
$ Feature guide
Fees & money
Fees move from estimate to demand to paid or waived, built from itemized line items, summarized in plain money tiles — and an unpaid demand can hold a release without ever stopping the statutory clock.
FOIAdesk tracks the money on a request without letting it block the statutory work — the clock runs and review proceeds regardless. What a fee can do is hold the final release until it is paid or waived. This section covers the fee lifecycle.
A fee moves through clear states: Pending (calculated from the line items but not yet stated to the requester) → Demanded (the assessed amount formally stated) → Paid or Waived. Recording a payment is what clears a release hold; waiving zeroes the balance. A very small fee can also be auto-waived the moment it is calculated, if your agency sets a threshold for that.
i
FOIAdesk records fees; it does not collect money. There are no payment rails in the product — you mark a fee Payment received when your finance office confirms the requester paid. FOIAdesk tracks the charge, the demand, and the balance so the record is complete; the actual collection happens through your normal cashiering.
Build an estimate from line items
A fee is assembled from itemized charges, not a single guessed number, so the demand is defensible.
Open the request's Fees area.
Add line items, each with a quantity and rate:
- Paper copies — per-page, capped at $0.25 per page for standard-size copies. - Media — actual cost of the storage medium (disc, drive) when records are delivered physically. - Labor — preparation time where the statute permits charging for it.
The estimate totals the line items so the requester sees exactly what they are paying for.
!
Fee amounts and rules are draft pending attorney review. The $0.25/page cap, what labor is chargeable, and media costing are configured as data so legal can correct them. Confirm the current schedule with your counsel.
The fee panel on a request: itemized charges with their quantities and rates, and the running total demanded.
Issue a fee demand
When the estimate is firm, you turn it into a demand the requester must satisfy.
Review the line items and finalize the amount.
Issue the fee demand — typically paired with the fee-demand letter (see Letters & correspondence).
The demand is recorded against the request with its amount and date.
Take payment or waive the fee
Once a fee is demanded, it clears one of two ways — the requester pays, or your agency waives it. Both actions live in the Actions column of the fee row, alongside Re-demand.
Payment received — record the payment when your finance office confirms the requester has paid. This is the action that lifts a release hold (below).
Waive — waive the whole fee when policy or a fee-waiver request applies. Waiving zeroes the balance. Only a records access officer or a tenant admin can waive a fee.
Re-demand — re-issue the demand, for example after correcting a line item.
The request's balance updates as payments and waivers are recorded.
The fees panel on a request: an itemized demand with its amount, status, and the basis, and the Waive, Re-demand, and Payment-received actions on the row.
i
Waiving is whole-fee, and it is not a partial discount. FOIAdesk waives a fee in full — there is no partial-waive control — and the waive action records the decision on the audit trail. It does not prompt you for a written justification, so if your agency needs the grounds for a waiver on the record (indigency, public interest), note them in the request's activity or the determination letter.
!
A waiver does not lift a release hold — only a recorded payment does. If you have already issued a demand (which places a release hold, below) and then decide to waive the fee, the hold stays until you record Payment received. The clean path is to waive a fee you don't intend to charge before you issue the demand — then no hold is ever placed. An auto-waived small fee (next) is born waived and never demanded, so it never holds anything.
Auto-waive small fees
A tiny fee can cost more to demand and collect than it is worth. FOIAdesk can waive those automatically at the moment the fee is calculated.
Your agency sets a threshold in Admin & settings → fee schedule: Waive fees at or below ($). Leaving it at $0 never waives anything.
When a calculated fee lands at or below that amount, it is recorded already waived — its status is Waived from the start, and the fee calculator shows the total with a "— waived (at/under threshold)" note so you can see why.
Because an auto-waived fee is never demanded, it places no release hold and needs no further action.
i
Auto-waive is off until an agency turns it on. The threshold ships at $0 (disabled), so nothing is waived automatically unless an administrator sets a dollar figure. The free labor allowance and the $0.25/page copy cap are separate pricing rules — they lower what a fee computes to, they are not waivers.
Read the money tiles
The money is summarized at a glance with tiles — Estimated (the provisional total), Billed (what has been formally demanded), and Owed (what remains outstanding, billed minus paid/waived). The dashboard rolls these up across requests so you can read outstanding, collected, and waived totals for your whole workload and drill into any tile to see the underlying requests.
The dashboard Money tiles rolling up across requests: Money owed, Estimated not billed, and Billed awaiting payment.
Release hold on an unpaid demand
An unpaid fee can hold the records, but it never holds the clock.
When a fee is demanded and unpaid, the request carries a release hold. Per rule R-702, the release gate will not deliver a package while a demanded fee is unpaid — the records are assembled and ready, but delivery waits.
Recording Payment received clears the hold and lets the release proceed. (As noted above, waiving a fee that was already demanded does not clear the hold — record the payment, or waive before demanding.)
!
Money never stops statutory work. A release hold pauses delivery pending payment, but the deadline clock keeps running and all the legal steps — acknowledgement, routing, review — continue regardless. Never use a fee to stall the request itself.
Fees are itemized, summarized in plain money tiles, and enforced only at the release door — so billing is defensible without ever standing between a requester and their statutory deadline.
◎ Feature guide
Audit & compliance
The integrity machinery — a tamper-evident, hash-chained audit trail you can verify end to end, a read-only window for oversight, forensic watermarks, the custody modes, and a legal hold that freezes purge.
Compliance in FOIAdesk is structural: who did what is recorded in a chain you can verify, oversight can read everything and change nothing, where files live is an explicit custody choice, and a legal hold can freeze deletion. This section documents that machinery.
!
No SOC 2 or CJIS claims at launch. FOIAdesk does not assert SOC 2 or CJIS compliance, and CHRI / NCIC-derived data is contractually excluded. The features below are integrity controls, not certifications. Compliance language is drafted for attorney review.
The hash-chained audit trail
Significant actions are not just logged — they are linked so the log can't be quietly rewritten.
Every meaningful action — intake, routing, disposition, redaction save, letter approval, release, revoke — writes an event recording the actor, the action, the affected record, and a timestamp.
Every entry carries a hash computed over its own content plus the previous entry's hash, forming a per-tenant, append-only chain. Altering or removing any entry breaks the chain from that point forward.
i
The human action is the audit event. Especially for AI assist, it is the person's accept or dismiss — not the suggestion — that is written to the trail, with the model and prompt version recorded on every AI event.
Verify the chain
Because the trail is chained, you can prove it hasn't been tampered with — from the Tamper-evidence check on the Reports → Compliance scorecard page. It covers the whole agency's trail (there is no per-request verifier).
The check runs on its own when the page opens — you don't have to start it. It calls a server-side routine that re-reads the tenant's event rows and recomputes every hash in the chain. This runs on the server, not in your browser, precisely because it hashes record content you are never shown.
A clean result shows a green Audit trail verified clean, marked ● Verified, with the count — "Every protected record re-checked and intact — N hash-chained records of M total."
If anything was altered or removed, it shows a red Tamper detected and lists where the chain broke, so a disturbance is pinpointed rather than merely announced.
If the check itself can't complete, it says Couldn't verify the chain and offers Try again. A failure is never dressed up as a clean pass.
After a clean pass the check remembers where it left off, so the next visit re-checks only what was appended since — noting "Checked only what changed since the last check."Re-verify from scratch discards that memory and re-walks the entire chain from the very first event.
The tamper-evidence check on the compliance scorecard: the auto-run result — "Audit trail verified clean", the hash-chained record count, and Re-verify from scratch.
Export the activity history
The same page carries Activity history — a one-click Download activity history (spreadsheet) that exports the tenant's complete, time-ordered event log as a CSV for an auditor or attorney. Each row carries the event's time and type, the actor (resolved to a name where possible), the request, work order, file, or appeal it touched, and the event's detail.
It is deliberately the whole record: the export is not narrowed by the scorecard's date filter above it, and it always covers the entire agency, never a single request.
The compliance scorecard: the Activity-history download that exports the full event log as a spreadsheet, above the tamper-evidence check that re-verifies the hash chain.
i
The export is the events; the verifier is the proof. The spreadsheet is the human-readable history you hand to an auditor; the tamper-evidence check is the separate, mathematical proof that that history hasn't been quietly edited. They sit side by side on the compliance scorecard, and any full-chrome role — including the read-only supervisor/auditor — can run both.
Read-only supervisor and auditor view
Oversight roles see everything and touch nothing.
A supervisor / auditor opens the Reports and Requests views.
They can read any request, its files' states, its correspondence, and its full audit trail.
They have no action controls — no routing, no disposition, no release, no edits.
The same read-only window is where compliance is demonstrated, not just enforced. Reports carries two roll-ups that turn the underlying events into oversight numbers: the board packet — request volume, timeliness, dispositions, withholding reasons, appeal statistics, per-department performance, and fee recovery for a reporting period, formatted for the public record — and the compliance scorecard — on-time rates, overdue counts, and exemption/disposition trends that update on their own as the desk works. Both are designed to print to a clean PDF for a board meeting. The full walkthrough lives in the Supervisor & auditor role section.
!
Read-only is structural, not a setting. The supervisor/auditor role has no mutating actions in its UI at all, so oversight can never accidentally change the record it is reviewing — the scorecard and board packet are views and downloads, never buttons that touch a request.
Forensic watermarks
The audit story doesn't stop at in-app actions — it follows records that are viewed before release. Every pre-release and release view or download carries a forensic watermark — the viewer or recipient, a timestamp, and the originating IP — applied automatically, tying each look at sensitive content to a person and a moment.
Custody modes
Where a tenant's files physically live is an explicit choice, configured in Admin & settings. File state lives in the app data layer in every mode, so the release gate works identically regardless of where the bytes are stored.
Mode
Where files live
BYO-S3
The tenant's own S3 bucket, via a cross-account role.
Short custody
Default — files auto-purge after the request closes.
Dedicated bucket
A per-tenant bucket in the FOIAdesk account, isolated from other tenants.
Paid retention
An add-on that keeps files beyond the short-custody purge window.
i
One release gate across all modes. A release package physically cannot reference a non-cleared file in any custody mode. Custody changes where bytes sit, never whether the gate applies.
Retention and the purge horizon
Short custody — the default mode — is not "keep forever." Once a request closes, its files enter a retention countdown and are auto-purged after the configured window, so a tenant isn't accumulating sensitive records past their usefulness.
The horizon is anchored to the request's closure — closing a request sets the clock from which the purge window runs, so retention is measured from a fact on the record, not a guess.
When the window elapses, the file bytes are purged while the file's state and the request's audit trail remain — so the chain still shows that a file existed, was reviewed, was released or withheld, and was later purged, even though the content is gone. The seeded REQ-2026-0117 (closed, released, routed to the Clerk's Office) is the demo's example of a closed request anchoring this horizon.
Paid retention is the add-on that extends the horizon for tenants that must keep records longer; dedicated bucket and BYO-S3 change where bytes live but the closure-anchored retention policy still governs them. Custody mode is set in Admin & settings.
i
Purge removes content, never the trail. Retention deletes the file bytes once the horizon passes; it does not delete the audit events that prove what was done with the file. The hash chain stays intact across a purge.
Legal hold freezes purge
A legal hold placed on a request freezes purge — short-custody auto-deletion and retention expiry are suspended for held records, so material under litigation or investigation is preserved until the hold lifts.
!
A hold overrides auto-purge, not access rules. Legal hold keeps files from being deleted; it does not by itself release them or change who may view them. The release gate and tenant scoping still apply to held records.
Integrity is not a report you generate after the fact — it is the chain, the verifier, the read-only window, the watermark, the custody choice, and the hold, all enforced as the system runs.
⚙ Feature guide
Admin & settings
The administrator configures the agency — its departments, its people and their scopes, the statute pack that drives the clock, AI feature flags, custody mode, and the public portal's branding and intake fields.
Admin is where the agency is shaped before and between requests. The sub-sections below cover each area of configuration. For the full administrator walkthrough see the Tenant administrator role section; this is the capability-by-capability reference.
Departments
Departments are the branches every request can route to.
Open Admin → Departments.
Add each department that holds records, with a name and the responders assigned to it.
Set whether departments may read each other's sibling branches, or restrict that.
The Departments admin: each department with its intake keyword and what it keeps, add, edit, and delete controls, and a spreadsheet import for long record schedules.
Users, roles, and scopes
People are granted exactly the access their job needs.
Open Admin → Users.
Invite a user and assign a role — tenant admin, RAO/intake, department responder, reviewer, appeals officer, supervisor/auditor, or operator.
Set their scope — for example, which department a responder works.
i
Roles are deliberately narrow. A department responder and an appeals officer get single-screen, no-navigation UIs; oversight roles are read-only. Granting the right role is what keeps each person on their stretch of the request.
Statute packs and Law updates
The deadline clock is driven by data, not code — the statute pack is that data: business-day counting, the holiday calendar, acknowledgement and extension windows, and the citations behind them. Statute packs are authored and published by the FOIAdesk operator (see the FOIAdesk operator section), pinned to your agency for your state, and published as immutable versions so there is always a record of exactly what was in force.
As an administrator you don't hand-author rules. Your surface is Admin → Settings → Law updates, where you review changes to the law that affect your agency and see them recorded — "Nobody at a village monitors Albany — we do." The deadline clock always runs on the pack pinned to your agency.
!
The clock obeys the pinned pack. Because statutory rules live in config, getting the pack right is what makes every deadline right. Rules are built through the operator's statute-pack UI — never hand-authored — and adopted as a version, not edited in place.
AI assist
AI assist is an add-on, turned on per agency, and it stays within strict bounds.
Whether your agency has AI assist is an entitlement shown on Admin → Settings → Billing (the AI add-on). It is switched on with the add-on, not toggled feature-by-feature on a settings screen.
Which model each feature uses, and the exact prompt wording, are set by the FOIAdesk operator (operator console → AI) and logged on every AI event.
✓
AI is suggest-only, except one action. Auto-routing is the only AI action that changes state (reversible, high-confidence, undoable). Everything else — classification, exemption and PII suggestions, letter drafting — only writes a suggestion a human must accept or dismiss. Enabling AI never hands a decision to the machine.
Custody mode
How files are stored is an agency-level choice.
Mode
What it means
Bring-your-own S3
Files live in the agency's own storage bucket.
Short custody (default)
Files held in-product, auto-purged after closure.
Paid retention add-on
Files retained longer under the retention add-on.
Dedicated bucket
A per-agency bucket in the FOIAdesk account.
Open the custody setting in Admin.
Choose the mode for your agency.
The release gate and file-state tracking work identically across modes.
Portal branding and intake fields
The public portal is configured to match your agency and capture the right details.
Open the portal settings.
Set the branding — agency name, logo, and colors on the public request form.
Configure the intake fields requesters fill in, so requests arrive structured the way you need.
Portal settings: brand the public request portal — agency name, logo, header image, and colors — and set the wording requesters see.
Devices
Every computer and app signed in to the agency is listed under Admin → Settings → Devices — the desktop client, a shared front-desk browser, and so on. Each device can be renamed for clarity or signed out (blocked within about an hour, re-registerable later). A computer used by more than one person is flagged as shared and re-prompts for sign-in before sensitive release/withhold actions.
Coverage (out-of-office)
Admin → Settings → Coverage redirects a person's deadline reminders and daily digest to a stand-in for a set date range, so nothing sits unread while a clock runs. Rules are one hop and recorded on each delivery; the screen flags overlapping or already-ended rules. Coverage moves notifications only — it never reassigns work or grants new access.
Coverage: redirect an away person's reminders and daily digest to a stand-in for a date range.
Turnover (records-officer handoff)
Admin → Settings → Turnover retires an outgoing Records Access Officer and hands a successor the same open-work view the dashboard shows. The successor is invited first and the predecessor is signed out only once that succeeds, so the desk is never left empty. A live snapshot of the open requests and deadlines the successor inherits sits below the form.
Turnover: hand a successor the records-officer keys and the open-work they inherit, in one step.
Exports & activity log
Admin → Settings → Exports & log pulls everything the agency holds into one ZIP — three spreadsheets (requests, document list, activity log) plus a plain-text guide. Document files themselves are never in the export; the list records each file's name, decision, and a content fingerprint, and the bytes are only ever handed out through the normal release step.
Exports & log: every request, the document list, and the full activity log in one download.
Integrations
Admin → Settings → Integrations gathers the IT-facing connections in one place: the agency's email submission address (with a readable-vs-private-random choice and one-click rotation), Microsoft 365 / Entra single sign-on (proven by a real test sign-in, with optional group-to-role mapping and domain-verified automatic sign-up feeding the Users Pending approvals queue), bring-your-own storage (a cross-account role handshake), and the agency's own web address & sending domain.
Integrations → email submission address: the agency's …@requests.foiadesk.com address, the readable-vs-private choice, and rotation.